Making of Warlord
Concept / InspirationThe main idea of this personal project of mine was to create an illustration of a futuristic warlord. I was inspired partly by Metal Gear Solid art, namely Raiden’s design and especially for the pose in one of Yoji Shinkawa’s depictions of Raiden, and I wanted to create an elite futuristic warlord with elegance about him, combining styles from the new and the old. As far as the concept design, I only had a general idea in my head but I designed it on the go within Zbrush. In other words I used no 2D concept but just designed the character in 3D as I modelled it, free-form. |
|
InfoIn this project I used mainly Zbrush for most of the modelling and all of the sculpting and posing, and I used Never-Centre Silo for much of the hard-edged modelling of several accessories. Finally, the lighting and rendering was done mainly within Zbrush where I exported several layers including lighting layers and special material layers and composited them in photoshop which I also used for the texturing and post-work. ModelingMost of the work for this character was created in Zbrush, which included using the Super-Average-Man base model, some Zsphere work for the base modelling of some of the accessories, all of the sculpting and transpose for posing the character and assembling the pieces together. However, a large amount of the hard-edged base modelling was created in an external modelling program, in this case Never-Centre Silo which is a great and focused 3D modelling program. Most of the accessories such as the helm and the weapon were box modelled in Silo, and it mostly consisted of starting from a cube, extruding faces, bevelling and adding edge-loops for hard-edges, edge splitting, subdiv-modelling, and assembling different modified primitive objects together (such as cylinders or planes) as components. In any case, the base mesh is very simple. |
 |
 |
 |
|
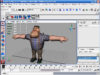
As I completed modelling each object I exported them as .obj files and imported them into Zbrush onto the Super-Average-Man base model and assembled them onto the model using transpose and using the tweak brush, as separate subtools. The result of the base mesh is as shown: |
|
 |
|
DetailingThe essence of this illustration is in the detailing. This is the stage in which I divided each subtool several times and sculpted higher resolution details, starting first at lower levels to define more basic forms and then slowly going up in division levels towards higher frequency surface detailing. An important thing to note is that form and proportions are always much more important than surface details in any piece, but either way, the surface details played a big part in enriching this illustration. The detailing was simply done by alternating between combinations of brushes which I used together with different values which I played around with. I mainly use the inflate brush for inflating out volumes, the clay, clay-tubes and standard for basic forms (clay brush is very good for organic forms) the clay and flatten brush for hard-edged modelling. I use the lazy mouse mode a lot in conjunction with all these brushes as it gives smooth strokes and good accuracy and is especially useful in hard-edged sculpting where I use it with the flatten brush to make hard-edged rims etc. For hard-edged sculpting, I also use a lot of masking and the then bringing out the forms that I want. I also use the pinch brush a lot for pinching pointy-edges such as those on spikes, and also for defining hard edges when I use it with Lazy-mouse mode. I also use the Pinch brush in ZSub mode which gives a nice effect when generally defining creases and forms etc. For the armguard I stitched on the spikes using the tracks brush as shown, and similarly was done for the shoulder-pad spikes, the pointy edges then further defined using the pinch brush. |
 |
|
|
|
 |
 |
General TipFor the Clothing / Kilt, it is generally a good idea to make sure that the base model is not just a plane (unless it’s a game-quality model) but rather has some thickness as this will make it much easier and less-destructive to sculpt. Also, before sculpting the folds, make sure it is generally flat first so that sculpting in the high res designs using the alphas will wrap on well, (and you can use 3D layers to make this easier). Moreover, after sculpting the details, in order to sculpt the folds and creases etc, I would advise the use of the Elastic Brush. This is a brush which displaces geometry non-destructively so that surface detail is retained while sculpting out geometry and is a great brush for this purpose. This is the final sculpt result: |
|
 |
|
RenderingFor this illustration, all of the rendering was done in Zbrush and photoshop, using a non-conventional technique. |
|
 |
|
 |
|
About authorMy name is Rami Ali Al-ashqar. I am Palestinian in origin but I was born in Jordan in November 1990. Currently I am a Computer Science student at the University of Edinburgh. I love computer technology and I also love art, especially fantasy and character design art, and the best way to fuse these hobbies together was through digital art, and hence I have practiced 3D art for a few years now. So far I am entirely self-taught in the realm of digital art. whether it be 3D-modeling, texturing, rendering or animation, but I am open for educational and career opportunities as I strive to improve and move forward. Related linksProfile: http://darukin.3dm3.com/ |
|