Making Of 'Arduous Path'
Sergey Musin shows how he was making his ‘Arduous Path’
I didn’t start this piece with a sketch or a particularly clear idea. I’d just got this picture in my mind of a cross and the thought that I’d like to add in some kind of “surrealism”, inspired by William Blake poetry and work by Kazimir Malevich. Then I saw a girl, walking somewhere in space or on a planet’s surface, and the cross. I decided to start with the girl, to paint her in Photoshop and then create the environment with Maya and ZBrush. In Photoshop I got a simple round brush and started painting a sketch with color (Fig.01 – 05). The image of a black girl began to appear.


When I saw that the shape was developing well, I knew where I wanted to add more detail. To do this I created a custom brush, which is something I always do when I’m adding in detail. You can see the details of the brush in Fig.06 – 07. You can experiment with these settings to give a unique texture to each individual material.


Here’s a really cool way to add real details to a material (Fig.08 – 09).


Then I changed the color to make it appear colder (Fig.10).

I continued adding details and also made the skin whiter. For the face I used the Round Fan Stiff Thin Bristles brush, which is a default PS5 brush (Fig.11 – 12).


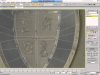
So now the girl looked liked she’d been cut from a framing shot from a sci-fi movie. The next step was the environment. First I made the ground and some crystals in Maya using the Extrude Face option on a polygonal plane. Then I painted it in Photoshop, using a 3D layer. I just dragged and dropped the textures onto the bottom layer (texture source) and then used the Stamp tool to paint the crystal textures (Fig.13).

Here’s what I got (Fig.14).

I rendered the objects in Maya and used mental ray for the lighting. To create realistic sunlight I just pushed one button in the mental ray Render settings and turned the light source to point where it was needed in the picture (Fig.15).

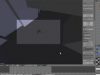
To create the cross I extruded faces from a cube and then just smoothed it. I made the land and castle in the background in ZBrush, then imported them into Maya and rendered without texture (Fig.16 – 17).


For the crystals around the cross, I added an icy material using mia_material_x from the mental ray shaders. I chose Frosted Glass (Fig.18).

I added a color texture of the ice to this shader and also made a normal map of this in CrazyBump and added it to the shader (Fig.19).

I also changed the bump attributes to “Tanget Space Normals” (Fig.20).

Here are the layers I ended up with (I rendered each layer separately) (Fig.21 – 24).


Sergey Musin shows how he was making his ‘Arduous Path’
I needed a foreground layer for my character and I made it in Maya in the same way as I’d make the background. Here is the result (Fig.25).

I composited these layers together with my character in Photoshop and started adding some textures and brushstrokes to give me image more detail and atmosphere. I also added more rocks to the background and some additional light rays going through the cross (for which I used the Dual brush)(Fig.26).

And here’s the final image (Fig.27).