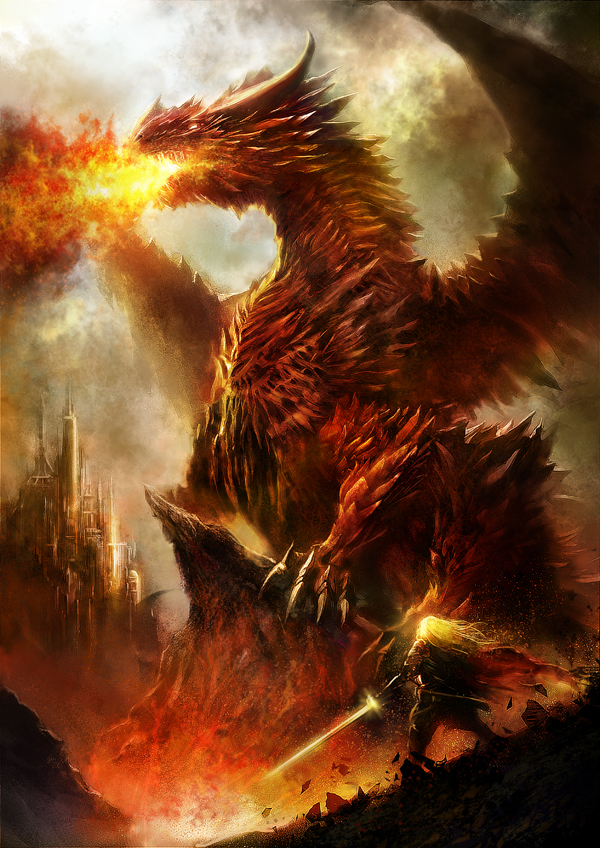
Making of The Challenger
I painted this piece for a Japanese illustration contest. Because I like the dragon,I decided to paint a fantasy world.
Introduction
Hello everyone! My name is Youichi Shimazaki and I’m a Japanese Digital Artist.
First of all, I’m most honored to have opportunity to introduce this tutorial. I have enjoyed painting with Adobe Photoshop since 2008. I use PhotoshopCS3 and a Wacom Intuos4 tablet and learn by trial and error. My goal is to become an activity 2D-Artist and Conceptartist not only Japan but also world wide.
Concept
I painted this piece for a Japanese illustration contest. Because I like the dragon,I decided to paint a fantasy world.When painting my illustrations, I utilize novels, movies and comics as the source of idea.This time I adopted these elements into this piece.For example, composition, castle, warrior, of course dragon!
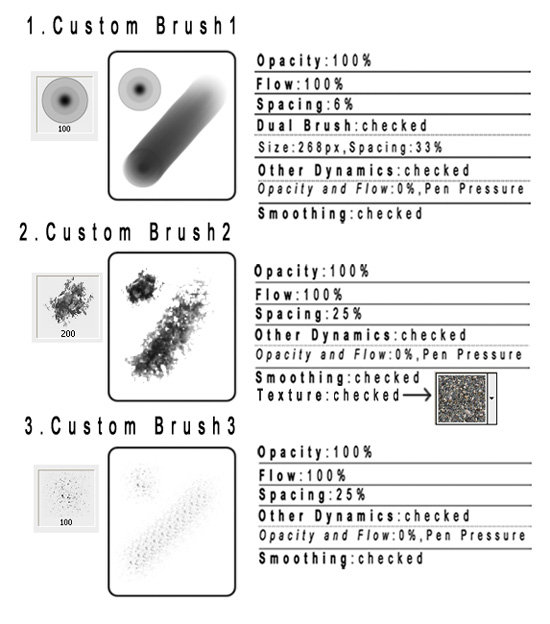
Brush Tool
I always use the various brushes properly. This time I decided to use mainly three “Custom brushes 1, 2, 3” and an Airbrush.
STEP 1: Sketch
At this step, I didn’t start with color.Drawing a monochromatic sketch, and then Coloring it by using the Layer Blend mode like Soft Light and Color on the layer which was draw the sketch.This time I used a “Custom brush 1”.
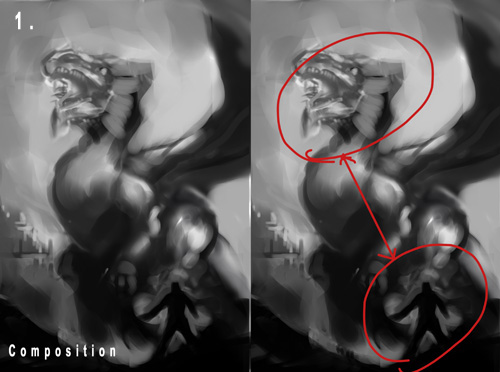
1. Composing the scene
To draw the challenger against the dragon and enhance the tension of the scene, I chose a diagonal composition.As you see, this piece is a very simple composition.
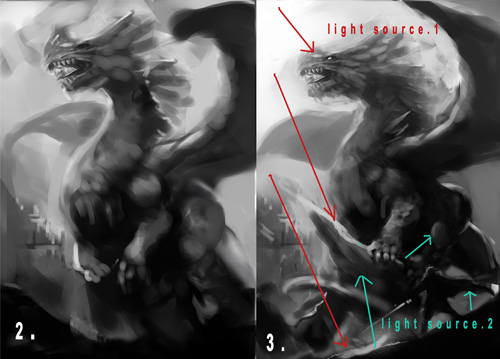
2. The Lightning
When I did my first sketch, I used 2 main sources of the light. First source is strong light of the sky. In this case, this source is most important. This helps me divide the light and dark areas in this piece. I made the dragon throw a big shadow against the character through the strong light. So, I succeeded in representing the dragon’s menace!
STEP 2: Painting – Value Refinement and Detail
At this step, I advance painting this sketch in monochrome.
This way helps me concentrate easily on the lightning, refinement without worrying about the color scheme. I used a “Custom brush 1” to define the shapes and forms.

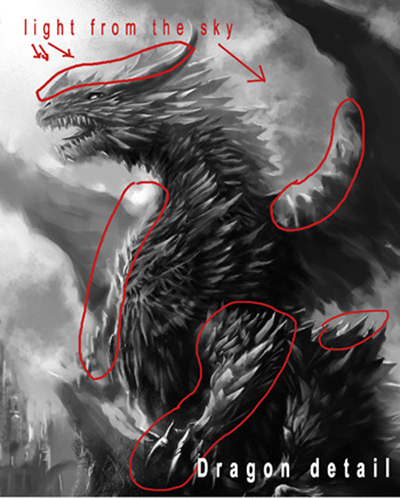
1. The Dragon
In this piece, I wanted to draw a fantastic dragon, not a reptile dragon. So, I decided to add thorns and thorns to the dragon’s body.
First, I created the basic form of the dragon at sketch, and then I painted the thorns with the “Custom brush 1”. At this step, the most important thing is to take care not to forget the direction of light from the sky. If you forget this, the dragon’s body turn out a flat.
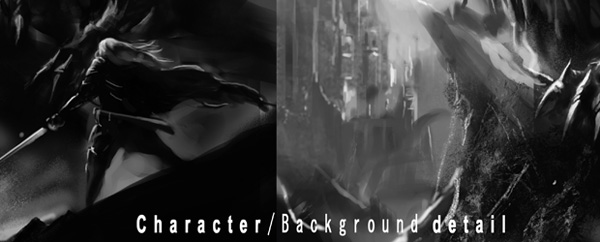
2. Character
Starting with a dark, then I use gradually bright tones.
Since this character is the challenger to the dragon!, I needed to described his situation.
So, I paint the breeze that is invisible to the eyes. To streaming his longhair and cloak, I wanted to represent the breeze.
3. Background
On one hand I wanted to paint a fantasy world; on the other wanted to do an atmosphere like battlefield. I decided to paint a smoky scene; ex.eruptions of ashes and lava. And I used “Custom brush 1, 2, 3 ” and an Airbrush, I painted flying rocks and smoke.
And then, I painted the castle and the cliff with bright tones. I was careful not to go into much detail at this piece. I used “Custom brush 2, 3” to define the form of this object.
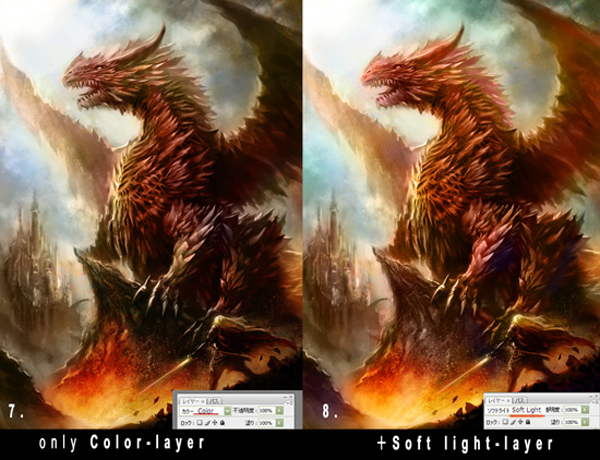
STEP 3: Change monochrome to color
I completed painting in monochromatic at last. Now, I added new 2 layers on the top. And I changed the blend mode of these from Normal: one of two layers is “Color-layer” and another one is “Soft Light-layer”.
Firstly, I painted with colors at “Color-layer”. It is important for me to use colors higher brightness and saturation.
Secondly, I used “Soft Light-layer” and placed this one on the “Color-layer”. Since painting with “Color” only gets too dark colors, I always use this “Soft Light” to heightening brightness and saturation as a whole.
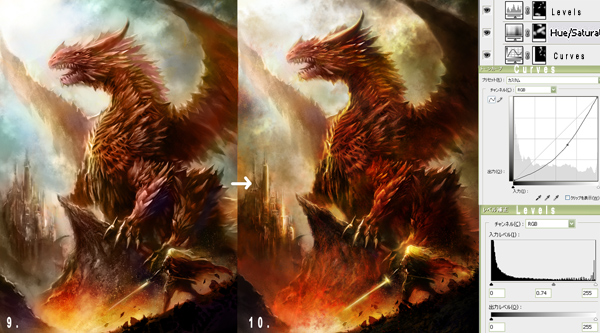
STEP 4: Adjustment Layers
Using the Adjustment Layers, I adjusted the Light, Shadow, Hue, Saturation, Brightness and Contrast in the image. So, I used the Curves, Levels and Hue/Saturation Adjustment layers plus Layer Mask to more stressing and tense.
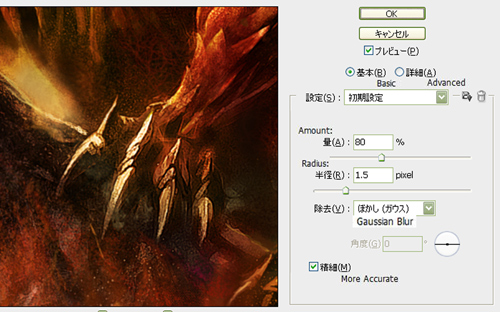
STEP 5: Smart Sharpen filter
I like to do use Smart Sharpen filter. This tool can help give my piece that good finished look.
I was careful not to overdo this tool.
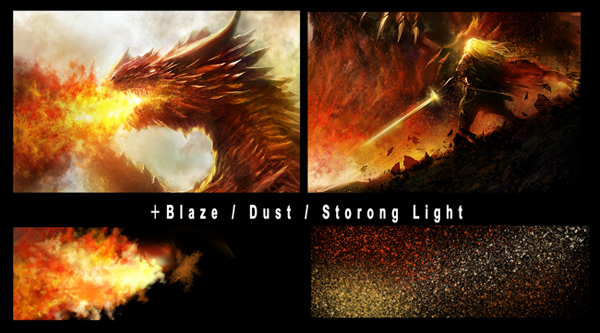
STEP 6: Final Step : Add Effect
At this final step, adding atmospheric effect “Blaze”, “Dust” and “Strong light”.
1. Blaze
To enhance the strength of the dragon, I decided to the dragon blowing blazing breath. So, I added a blaze to his mouth with “Custom brush 2″. Thereafter, to rising more glow his breath, I used new layer, which I changed the blend mode of the ” Linear Dodge(Add) ” layer.
2.Dust
The dust is useful effect for having dynamism! I painted in some dust with a “Custom brush 3 ” and an Airbrush.
3.Strong Light
I added strong light to the character’s hair and his sword with Linear Dodge. This way is concentrated in the area. Intentionally adding effects to the dragon’s blaze and the character’s hair, I composed a diagonal relationship between the former and the latter.


IN the END…
I hope you enjoy this tutorial.
If you have any question and comments, please feel free to contact me via Email or my website.
Thanks for reading!!!