Sculpting and Texturing Hard Surface objects with Zbrush 3.5
This tutorial is designed to illustrate new features in Zbrush 3.5 such as the Planar Brushes, Surface Noise, and Normal and Displacement Map generation while integrating features from legacy versions of Zbrush, such as importing UVs, using the Projection Master, sculpting with alphas, and baking Material information to color maps. I use a simple Tombstone as the basis for my demo.
Step 1
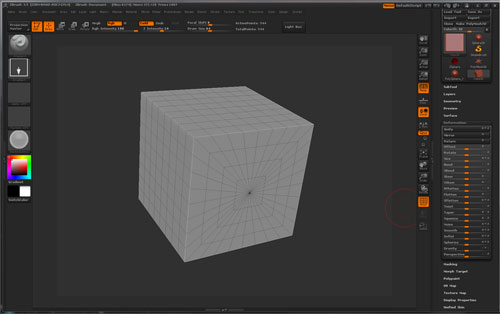
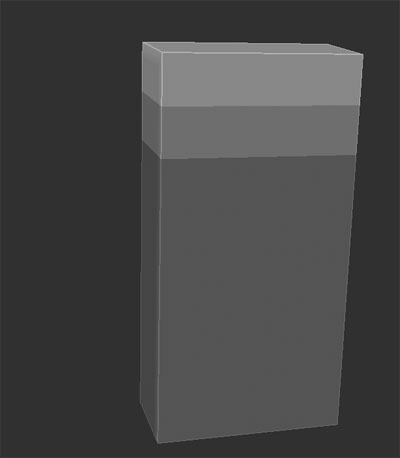
First, lets start up Zbrush 3.5 and create a Cube 3d. The Cube 3d is a parametric object, as evidenced by the “pole” on two two sides (seen below). Parametric objects cannot be sculpted on directly, but are useful for initial startup shapes. Here, once you have the Cube 3d drawn out onto the document and you have entered Edit Mode (hotkey “t”), open up the Tool-Deformation Sub-palette, seen open on the right in the image below.
Step 2
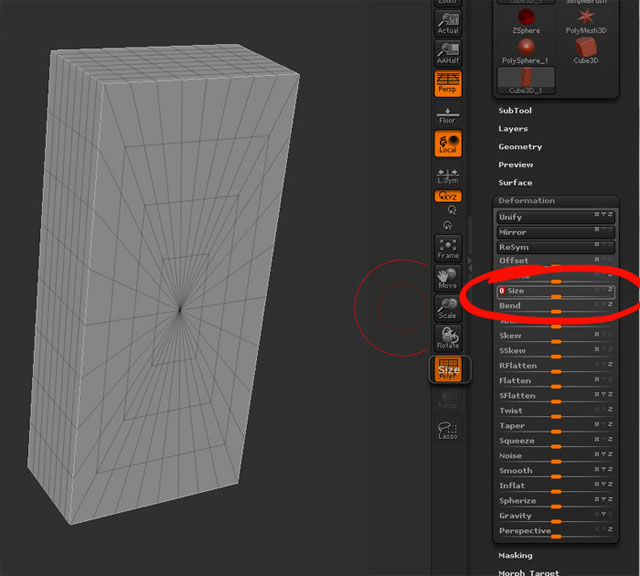
Now, take a look at the Size slider. Make sure only Z is lit by unclicking the other values, and slide the slider so that the depth is shrunk (slide to the left).
Then, make sure only Y is lit, and slide it to the right so that the cube grows taller. We have now edited the initial scale of our object.
Step 3
But of course, we still have that pesky pole with triangles eminating from it. AND, our faces have become stretched and rectangular. Not a good base for sculpting.
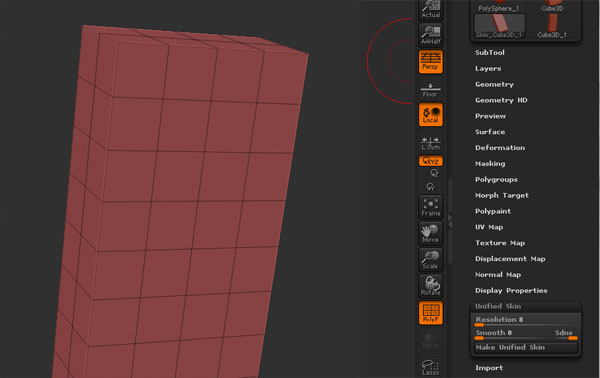
To prep this, lets make a Unified Skin. Unified skins take only the silhoutte information from your parametric object, and create a new shell from it as a Polymesh (which can be sculpted).
Open up the Tool-Unified Skin palette.
We want to set our resolution very low as we are looking to create as simple a shape as we can in terms of polycount. A higher resolution will yield a larger number of quads at level 1, which we don’t want. I also want to set my smooth to 0. If I turn this up to 100, I will essentially make a sphere. 0 leaves it hard-edged.
Hit “Make Unified Skin”. You will notice that if you turn on “PolyF” (polyframe) your wireframe will be square, low in count, evenly distributed, and a color will be assigned to your object. These are all ways of knowing you have properly been switched over to the Unified skin. If you don’t see these things, manually switch over in the Tool Palette now.
Step 4
Ok, I’m making a tombstone, right? I want that classic curved top. So, lets create a mask over the lower section of the tombstone by Ctrl-Dragging.
If you want the mask to be really precise, I suggest first orienting your tombstone to a 90-degree view by holding down Shift while rotating.
Step 5
Once the surface is masked, we can use the Deformation sub-palette to again give some new form to the model. Here I used Spherize only in the Y-axis to top it off.

Step
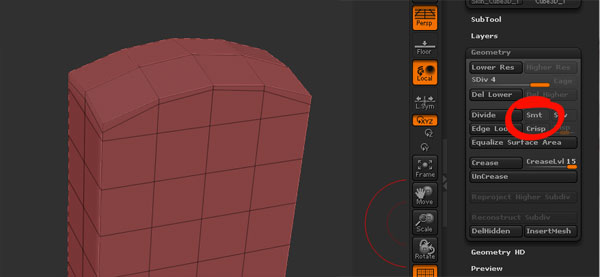
Now to divide it several times. I want a higher polycount so that I can freely sculpt on the surace. I turn off Smt (the subdivide smooth modifier) for the first 1 or 2 “Divides”, then turn it back on and continue dividing until I hit a million or so polys.
Step 7
We going to take a look at some of the new Planar Brushes now. I will use this to lop off some bevels along the edges of this tombstone.
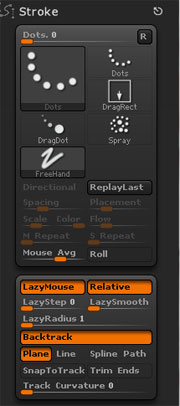
It is especially worthwhile to examine the options found for us in the stroke palette which accompany the Planar Brushes.
I am looking here specifically at “Backtrack” first. This option must be enabled to make planar cuts. It allows you to first establish a plane to cut along, then move your cursor back from that as you sculpt to lop-off parts of the mesh.
Backtrack, once enabled, as 4 sub options listed below: Plane, Line, Spline and Path.
Plane allows you to determine the orientation of the cut-plane with your cursor as it hovers over the normal of the surface.
Line gives you a start and end point, forming something similar to a wire-floss tool when cutting off clay in the real world.
Spline allows you to cut along a spline, defined by two points, where as path allows you to cut across one. For really seeing these difference, I suggest expermentation.
The action of physically cutting away is done by litterally retracing the steps of your cut-line, and does take some practice. I suggest watching the videos linked below, for a deeper understanding of manipulating and controlling these features.
Step 8
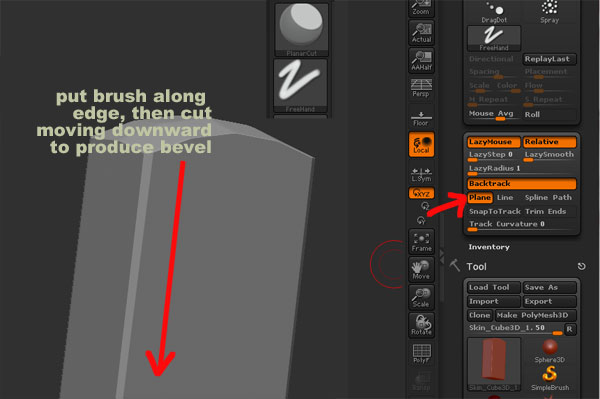
Here, I will choose the Planar Cut Brush with the Plane features turned on. I put my brush along the edge of the surface, then to cut, I move downward across the edge, producing a bevel.
I have x-symmetry turned on here, since I want accurate cuts on the left and right side. This can be turned on with hotkey “x” or by going to Transform-Activate Symmetry.
I do all of this with the Perspective in Zbrush feature turned off. Leaving persepctive on will produce a cut that skews (along the perspective lines)
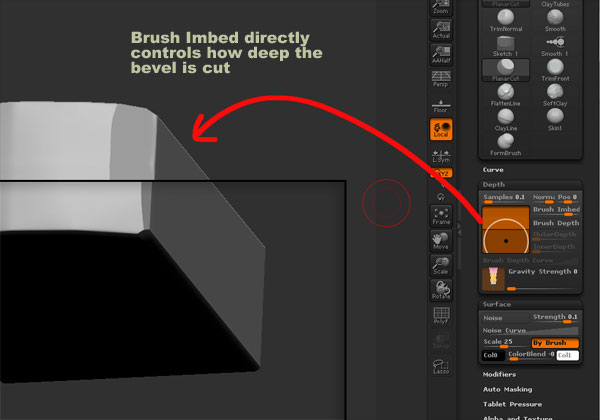
Step 9
It is also worth examining the Features found in the brush palette for the planar brushes. Under Brush-Depth, you will find a slider called “Brush Imbed” and a little graph. Either one of these can be edited for the same effect. The graph shows the relative depth of the brush to the surface as you draw across it. Imbedding it deeper will produce more of a cut, where pulling it up above the surface, less so. In the image shown below, you can see two varriations on Brush Imbed, with the latter (and one shown in the graph) being a deeper cut since the brush was moved down.
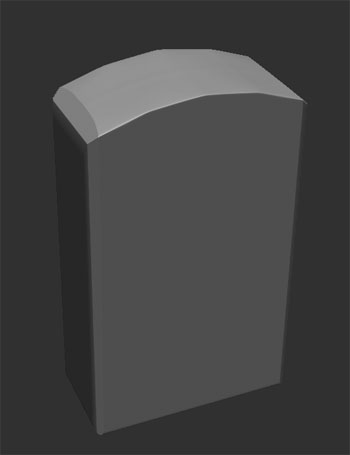
Step 10
After a couple of cuts, I have made my basic tombstone shape.
Step 11
Now lets use an alpha to add detail to the surface. I made this image (below) in photoshop. Yes, I plan on living AT LEAST that long.
I made my file 1024×1024 and gave it a pure black background. Save your alphas out as PSD, BMP or JPG files.

Step 12
I can import the alpha into Zbrush by going to the Alpha Palette (on the side or the top) and choosing import.
I choose the Inflate Brush and the DragRect stroke which will allow me to draw out this alpha at any scale I want.
You will notice 2 problems however:
—— that Zbrush’s orientation space is upside down from Photoshop (and Maya) and thus my text is looking stupid.
—— and that the edges of my alpha are fading out.
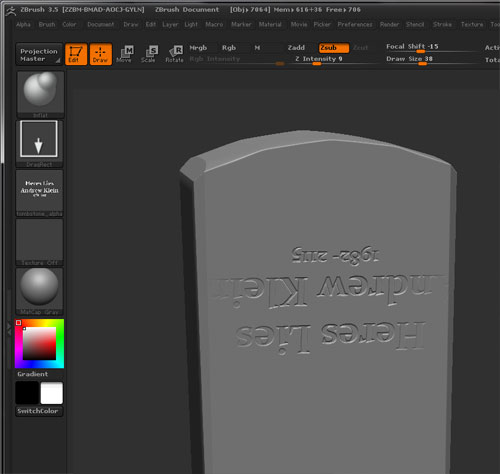
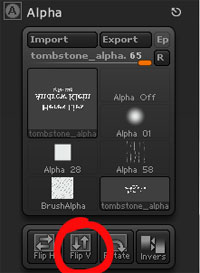
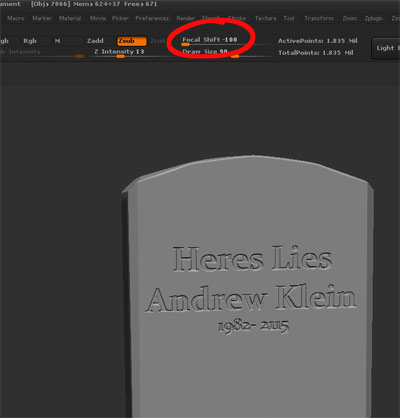
Step 13
In this case, we want to Rotate our Alpha 180 degrees. Flipping it vertically, which would normally be ok, is not preffered here as your text would read backwards. See that red circle for Flip V below? Yeah, DON’T press that one.
To fix the fade issue, set your Focal Shift at -100, this will make the two circles of your brush-cursor come together into one essentially. Your brush is now “hard” to use the Photoshop term.
Align up your tombstone, and drag out your epitaph
Step 14
We can continue to embelish the tombstone with a little bit of sculpting, or you can use the projection master to apply the height information from other models onto the surface.
I first align my surface so that it is completely flat to my camera/document plane (by holding down Shift while rotating).
Then, I enter the Projection Master with the options seen below, and hit drop now.

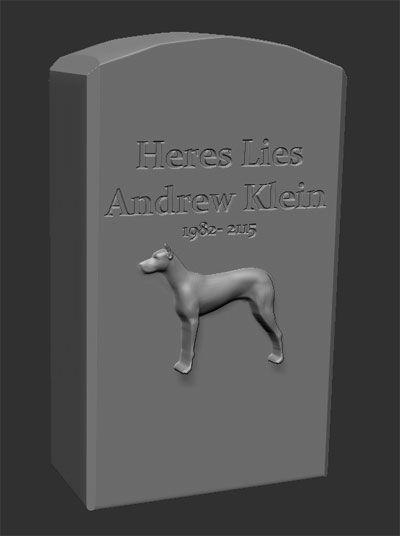
Step 15
I import the default Dog mesh (you can and should do better than this!) and draw it out onto the document infront of the tombstone in Edit mode.
I can leave edit mode and switch to the Move tool (hotkey “w”) if need be to change the z-depth of the model. When you are in non-edit mode Move tool, a gyroscope appears.
Click and drag up or down OUTSIDE of the gyro to move the model forward or backward in Z-space.
Click and drag INSIDE the gyro to move the model around in X and Y space.

Step 16
When I go back to the Projection Master button and pick up the model, I can freely rotate the tombstone again, and you will notice that the dog will have been applied in relief to the surface.
Step 17
Now to give this surface some texture. Zbrush 3.5 introduces a new procedural noise feature found in the Tool Palette under “Surface”.
Open this up now and turn on the noise button, and lets examine some of these features.
At first a fine, small noise is applied to the surface.
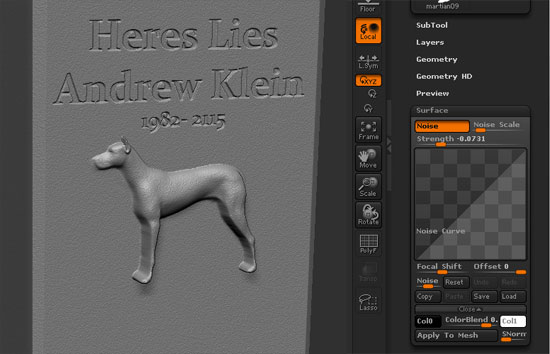
By editing the Noise Scale Value, we blow up the size of that noise
By tweaking and adding points to the graph, I can control roughness and weathered qualities.
Strength is an overall depth modifier.
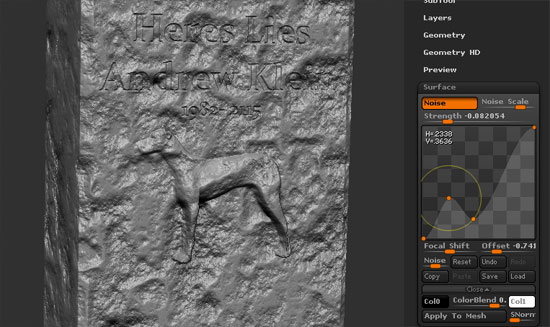
By tweaking Focal Shift and Offset, I can apply this noise of only parts of the surface.
When you have everything the way you like it, you have two options to proceede:
—-1: leave the noise button turned on and you can sculpt on the surface without the noise being effected. If you use the Smooth Brush for instance, the noise will NOT be smoothed out because it is not yet “on” the surface. This can be good for previews if you want the noise on, but still have more sculpting to do.
—-2: when you are done and need to bake this out into a map, or want to add a different level/type of noise to the surface, you NEED to hit “Apply to Mesh” This will “bake” the noise into your polygons. Make sure you have enough division on the surface to handle this when you hit apply to mesh, or your results may end up looking faceted.
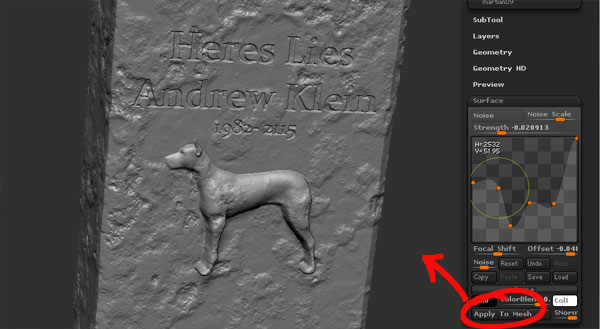
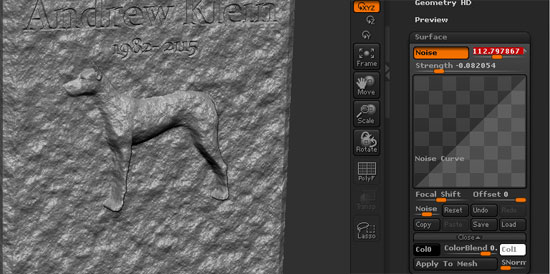
Step 18
Once you apply the noise to the mesh, you can add a different type of noise, and apply again! here I add a small grain on top of the large corroded chunks I put on first.
Again, when done, I hit “Apply to Mesh”.
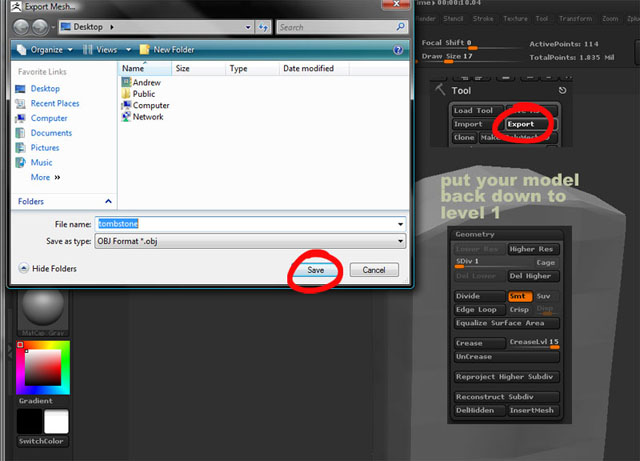
Step 19
Now to create my texture maps for the this tombstone.
Put your model back down to level 1 and choose Export under the Tool Palette.
This will export your model as an Obj.
Step 20
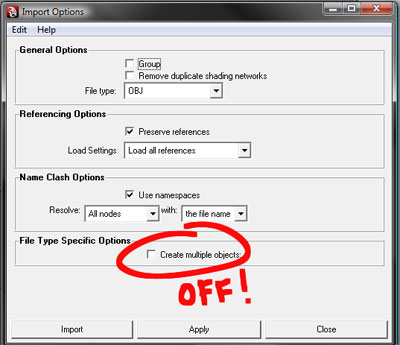
In Maya 2009, I go to the Import Options box.
Set my File Type to OBJ
and under Fily Type Specific Options, set “Create Multiple Objects” to off.
This step is ABSOLUTLEY MISSION CRITICAL. If not done, your mesh will re-order it’s vertex point numbers on import, and when we bring it back into Zbrush, won’t register properly with what we already have.
Step 21
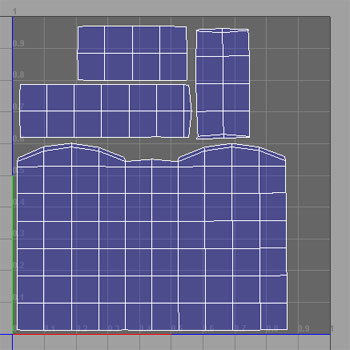
I use Maya to create an extremely quick UV layout, then re-export the model as a new Obj file
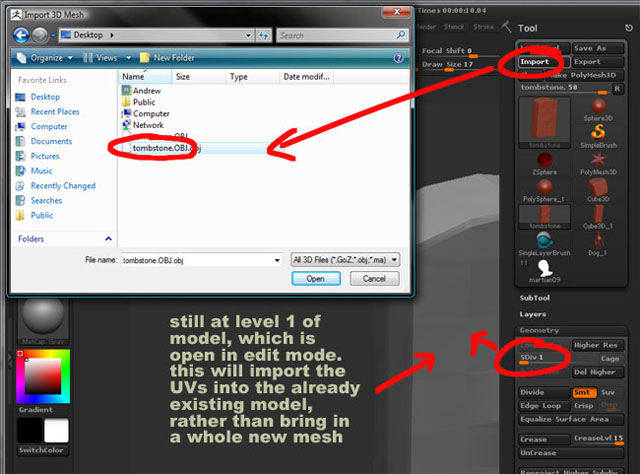
Step 22
With my model from before still open, in Edit mode, and at level 1, I choose Tool-Import. The mesh comes right back in, and it looks in fact like nothing has happend at all.
This is a good thing. All we have done is updated the UV information of this object.
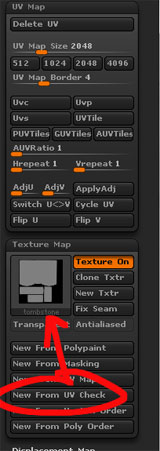
Step 23
To test the UV information, Under Tool, open up “UV Map” and “Texture Map”.
Choose a Map size (2048 in this case) and hit “New from UV Check”. If you see an outline that resembles your UV layout from Maya (but upside down of course), you have done everything correctly.
Step 24
Now you can open up the Normal Map Sub-Palette too. Check Tanget and Adaptive, BUT NOT Smooth UV. Gone are the days of mucking around in Zmapper. This is now all you have to do!
Hit Create normal Map, and with a few seconds (or minutes depending on your machine and the complexity of the model), your Normal Map will be created.
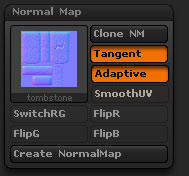
To export the Map, hit “Clone NM”, which will send the map to the texture palette along the side. From there you can hit export, send it to Photoshop, flip it veritcally and save it out as a Targa file for use in Maya.

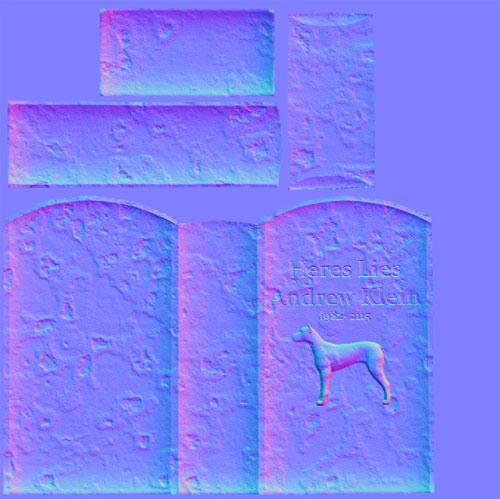
Here’s a look at the map that was generated:
Step 25
Now guess what’s cool? Creating a displacement map is now just as easy.
Open up the Tool-Displacement Map sub-palette
Choose Adaptive, BUT NOT SmoothUV, set your DPsubPix to 2 (if your map is 2048, 1 if 1024, 4 if 4096… you get the idea)
Hit Create Displacement Map.
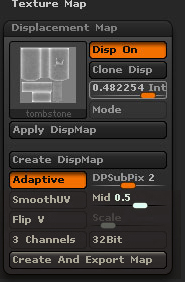
Again, within a short period of time, the map is created.
Hit “Clone Disp” to send this map to the alpha palette, where it can be exported.
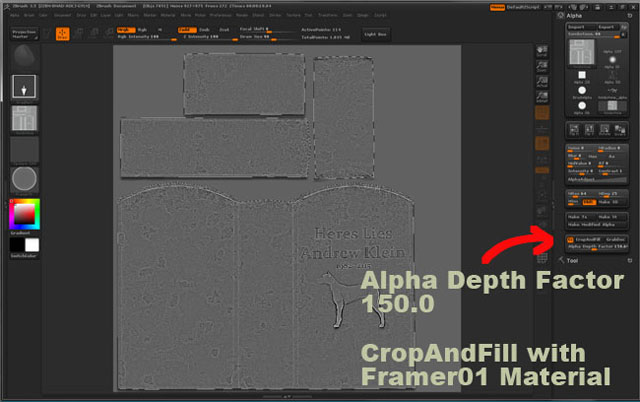
But I am going to do something else with it. Since this map contains height information, and since the Zbrush Materials are so darn cool, I can going to use this map
to crop and fill to my document (Alpha-CropAndFill). By setting different Materials as active, and altering my Alpha Depth Factor before I CropAndFill, I can achieve
awesomely different results.
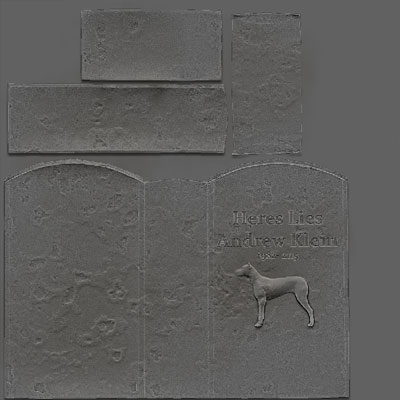
like this:
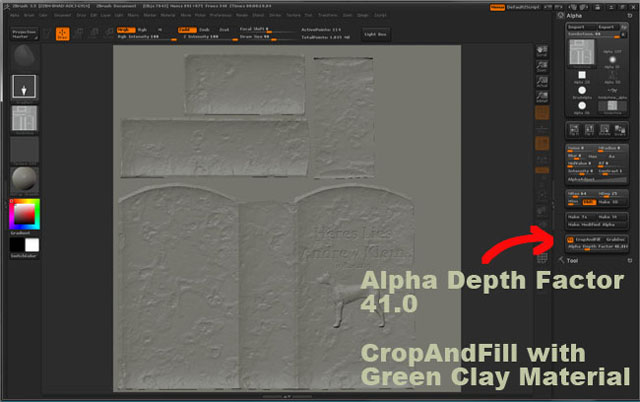
or this:

or this:
I will export these documents (Document-Export) and load them into Photoshop, where I with the eraser, I can overlay and combine them into 1 color map.
Step 26
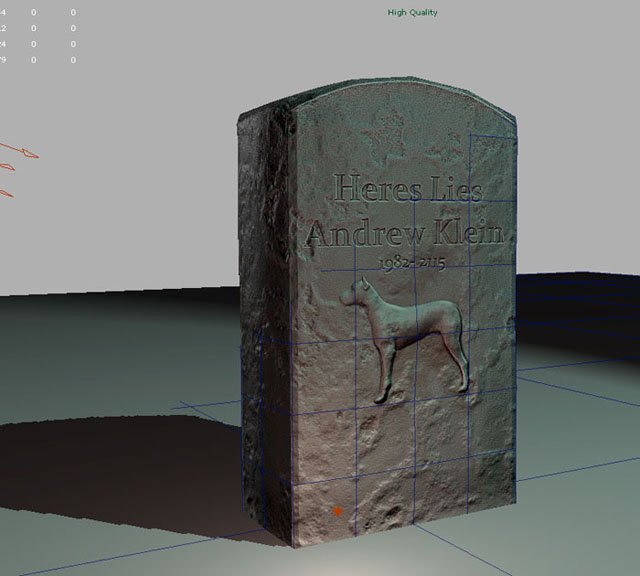
Now all I have to do is load the model into Maya, along with the normal and color map, set up a few lights, and turn on high-quality rendering to
see my progress, and I’ve got a super low-poly object with awesome, SEAMLESS detail!
I hope you enjoyed this look at hard-surface object creation in Zbrush 3.5!