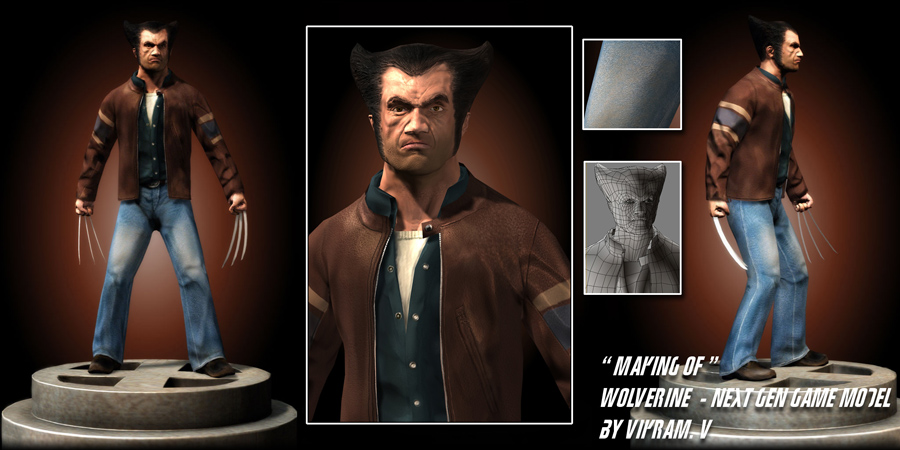
Making of Wolverine
I wanted a completed next-gen model for my show reel, and Wolverine is my favourite comic book character. So, I decided to make a game model of him. I chose this outfit for him, because I felt that among the numerous wolverine models, already done out there, none that I know of has this outfit and in the movies or in the comics, wolverine is famous for his jacket and vest looks. So I decided to model him with his jacket.
 |
IntroductionI wanted a completed next-gen model for my show reel, and Wolverine is my favourite comic book character. So, I decided to make a game model of him. I chose this outfit for him, because I felt that among the numerous wolverine models, already done out there, none that I know of has this outfit and in the movies or in the comics, wolverine is famous for his jacket and vest looks. So I decided to model him with his jacket. ModelingI initially wanted to model him in the proportions of Hugh Jackman like in this picture. But then decided that, the comic book wolverine is a short stout guy, rather than having the proportions of Hugh Jackman. So I decided that my wolverine would have a combination of both real life and comic book characteristics. I started constructing a rough head, all by extrudes. I created a plane and used extrudes to construct the head. I restricted the head to about 2300 tris, including the eyes. Since, we are not going to see the inside of the head; I removed the side of the sphere that is inside the head. |
 |
 |
 |
|
At this point I didn’t worry too much about the overall shape of the head, because I would be taking it to zbrush for detailing, and exporting a final low-res model (1 sub-d level) from zbrush. I then modeled the body. Here’s a snap shot of wolverine without a jacket. I later constructed the jacket, by detaching the torso from the rest of the body, and pushed the vertices around so that, the jacket would fit over the body. Now I had two versions of him, one without the jacket, and one with the jacket. However I concentrated on the version with the jacket more. |
I thank the wonderful artists at gameartisans.org for helping me out through the modeling process. A tutorial on mesh flow that I followed is at http://www.pig-brain.com/tut02/tut02_02.htm. |
 |
 |
UV’sNext came the most uninteresting, yet a very important part, the UV’s. I wanted to make sure there is absolutely no stretching in the UV’s, so I layed out the Uv’s in max, and exported the obj to headus UV layout to match texel density, and brought them back to max. The model has two id’s, one for the head, the jacket and the claws, and another for the rest. Since the head is the area of focus in all models, I gave it more UV space for better detailing. One tip to keep in mind when laying out UV’s for games is to avoid overlaps. Overlaps tend to create problems in the normal map generation process. Overlaps can be done in places where it’s unavoidable. In this case, I overlapped small objects like buttons, claws etc. The more time you spend on UV’s, the lesser you have to worry about stretches in the end. |
|
 |
|
ZBrush DetailingAccording to me, this is the most enjoyable part of an asset creation and the part where an artist can show his true abilities. Having a lot of references will help you a lot in detailing. I downloaded a lot of anatomy references from www.3d.sk, and started detailing Wolverine. I sculpted the entire body first, and kept conducting tests side by side to check out the amount of detail that a normal map can accommodate. Here are some snapshots from zbrush.This kind of anatomy made him tougher and more “WOLVERINE” |
 |
 |
|
|
So the morph target button helps a greats deal in this situation. The original low res mesh can be reverted back using this button, and then the normal map generation process can be done with this as the lowest sub-d level. |
|
TexturingHand painting textures is a very interesting process. Wolverine has diffuse, specular, normal and reflective maps. The maps are 2k resolution. I’ll give a brief description on each map I’ve used here. My overall work flow in the texturing process is as follows: http://www.pixolator.com/zbc/showthread.php?t=30858&highlight=3DS+Max8_TangentSpace_BestQuality Normal map: Generating normal maps can be a confusing and also a time consuming process. For organic shapes, zmapper seems to work out fine, and it’s an overall easier process for generating normal maps, but when it comes to props and other non-organic shapes, I highly recommend 3dsmax’s projection mapping technique. A great tutorial for this can be found at http://poopinmymouth.com/tutorial/normal_workflow.htm,
For my character, I used zmapper with the max config file. After generating normal maps for the various sub tools that I used, I started to remove seams and adding further details to the normal map in Photoshop. In places where the normal map does not generate properly, I use a RGB value of 127, 127, 255 in those areas, and later blur the edges to an extent that, it doesn’t visually spoil the output. I then paint details like strands of hair with black lines, and a one pixel brush in deep paint like in the image below, and then use the NVIDIA plug-in to covert them into a normal map. |
|
|
Have a look at just the normal map on the model, after painting in the extra details in Photoshop
|
|
|
Diffuse: The diffuse map is basically the colour map. I use the finished normal map as a starting point for my diffuse map. I sometimes convert the normal map to grayscale, and use the levels on it, so that it mimics an ambient occlusion map. I then give it a .5 pixel blur. Next, I generate an AO map from the low poly model (using Max’s render to texture dialogue). I use this map for the overall shape of the character, and grayscale normal map for the smaller detailed areas. As an addition to these two, I use the cavity map generated from zbrush as an occlusion map. With these three set in multiply mode, I have a strong base to start painting my diffuse map. Now I paint in the base colours, after which comes the detailing part. I use a lot of reference photographs for the texture, but the overall texture is hand painted. I use customized brushes to spray stuff like stubble, and pores. Specular: I use a coloured spec map that I plug into the spec colour and the spec level channels. The spec colour controls the colour in which the specular is going to show, and the specular level controls the intensity of the specular. It is logical; to use a colour map for the spec col and a grayscale map in the spec level slot, but this seems to work fine. I sometimes use a colour map for the spec colour slot, and a grayscale map for the spec level and the glossiness channel, if I am allowed to use two separate maps. I start the specular with the diffuse as a base. I first adjust the levels on the map and increase the contrast. I usually add a layer in Photoshop and fill it with 50 % grey. I set the mode to soft light, and use the dodge and burn tools to lighten or darken areas. This especially is very useful in painting a spec map. I then add a subtle noise to the map, and other minute details like scratches and cross lines. |
 |
|
Reflective map: I use a mask node in the reflection channel, and connect any sky image into the map channel, and the reflective map into the mask channel. The reflection map is basically a grayscale map and I convert the specular map to a grayscale and paint on it. Since this is not the most important map for a character, I reduced the size of the map to a 512 resolution.
Here are snapshots of the various maps used to texture him
|
|
LightingI used basic three point lighting, and an addition of two omni lights, with ambient only turned on in the advanced effects menu. The BG is a circular gradient, and the render is a scanline render. I decided not to use the direct x viewport screenshots, because I wanted to have solid anti aliasing and also a good BG for him. Here’s the lighting setup.
Finally, here are some renders of him
Here’s a turnaround: http://myotherdrive.com/file/097.004708.16012008.98490.0067fi/wolvie_turnaround.avi About the author
Please feel free to ask me any questions. Related links:
|

 I exported the lowest level mesh from zbrush, and used it as the final mesh file in max. When working on a project or a pipeline though, the low res mesh would often be taken for rigging or some other purposes. The low res mesh would be finalized before the detailing phase in these cases.
 However, if you need greater control over the normal maps that you generate, Max’s projection mapping method is by far the best method


 My name is Vikram. I am a modeling/texturing artist from India. I have a never ending passion for games. I’ve been employed in the games industry for over 3 years now. I have a master’s degree in computer animation from the Bournemouth University, UK. My previous work AL PACINO sculpt was featured on the front page of a few sites.


