Creating a reusable lightbox
How to create a re-usable lightbox in blender
This tutorial is for the blender internal render engine (not cycles)
Introduction
So why use a lightbox?
Well basically, a lightbox allows you to control your lighting, so you can get the perfect photo. (Or render in this case)
Now most external render engines don’t need a lightbox, but I have noticed a large number of blender users still use the blender internal render engine, so this is for you guys, so you can get that fast product render looking sweet.
Ok before we start we first need to look at what the lightbox is made up of.
We have:
Light
The lighting is made up of 4 lights
This is effectively a 3 point lighting system with a big down light to simulate the top of the box.
Down-light: this is the top light of the scene, also the strongest light
Key Light: Shines directly at the object, this affects the overall look of the lighting
Fill Light: a soft even light Rim Light: a soft back-light to light up the rim or silhouette the object so to speak.

Box
Yes the lightbox is made up of a box,
This is basically a beveled box with soft edges.
Well that was easy, now that you know that a lightbox is made up when you put ‘light’ and ‘box’ together, we can get started.
1. Creating the Lightbox
With your default cube, ‘tab’ to get into edit mode and select all,
first we need to make it sit on the floor (G,Z,1) and scale it to fit,
Now the exact scale doesn’t matter to much, a box is a box, as long as it can fit all the lights and objects inside it.
I find a cube with half height works perfect.
scale 1.5, then scale 0.5 along the Z axis,
Make sure it’s still sitting on the floor.

Ok now we need to give it that nice bevel look, Now we are not going to use the bevel modifier here, Because as I learned the hard way, that will shrink the box a little, causing your objects to go through the floor, what you want to do, is add a subdivision surface level 2, you can find this in the modifiers panel.
Now you’ll notice the box is gone a little more like a foot ball, This isn’t what we want, so we will need to add a few edge loops to straighten it out a bit.
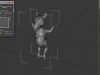
Tab into edit mode, and add 2 edge loops along the x axis, you can do this by hitting CTRL+R, and scrolling up on your mousewheel once. Left click to set these and with them still selected, scale them up along the x axis (S,X) until they are near the edges, this will straighten the box out a little,
Repeat this for the y axis and z axis and you should have something looking like the image below

Ok we are almost done with the actual box!
two things left to do, first is to add a mask, this lets us see whats inside the box while still being able to render it.
Tab back into edit mode, select the bottom rows of vertices(The ones you don’t want to hide), and add these to a vertex group.
You can do this by jumping over to the Object Data tab (next to modifiers), and add a new vertex group by clicking the + under vertex groups,
Then click assign, and your vertex group is all set.
To create a mask, add the mask modifier in the modifiers panel, and select the vertex group you just created
The box will probably disappear, but not to worry, just move the mask to the top of the modifier stack.
Last thing, is to uncheck the little camera icon on the mask, this will stop the mask being used in the render.

Now you have a box that you can see inside!
Ok almost done with this box, last thing is to add a material for it.
pretty standard material here,
White color: (1,1,1), intensity 1
Soft specularity: specular 0.1, hardness 30
This just makes it a nice soft backdrop/floor

And were done!
Well with the box anyway,
Time to move on to the lights
2. Creating the Camera
Position/add a camera at one end of the lightbox pointing at where you will put your objects
Make sure it is inside the box otherwise you will get a blank render.

3. Creating the Lights
The lights are something you will spend a lot of time tweaking,
They will change as to what your rendering, in my example I am using some cups, so I have relatively soft lighting.
Where as if you were rendering something like a car, you might want harsh lighting.
I will give you the locations of the lights, as well as energy settings, but I encourage you to play with them, the worst that can happen is your scene will become over-exposed/under-exposed.
You can see my settings in the images.
The Down light:
This is the biggest light in the scene,
Add a new area light, and drag it up about halfway between your objects and the top of your cube.
We will give this light an energy rating of 0.5, and a distance of 0.75,
Turn on ray shadow, with 4 samples and Constant QMC
This will give us reasonable quality soft shadows,
We will use these shadow settings for all four of the lamps
For your final renders I suggest bumping the samples of all the lights to 8 for better quality.

The Fill Light:
Duplicate the Down light and move it to the top left of the camera facing the object
you want this to be slightly above the objects, with a very low energy setting, as it is to provide a slight even light to the scene, similar to environment lighting.
I use a energy rating of 0.15, with a distance of 0.5
You also want the size of this to be smaller, a area shape of 0.25 is good here

The Key Light:
This light will give some good highlights to the objects,
In short this one needs to be a little higher than the fill light, lower than the down light, and to the right of the camera.
Feel free to swap lefts/rights of the lights depending on where you want your highlights, but as long as the fill and key are on oposite sides of the camera the render should look good.
Duplicate the Fill light and position it on the right side of the camera. I have an ernergy setting of 0.3 and distance of 0.8, with an area shape of 0.25

Rim Light:
Finally it’s onto the last light in the scene.
This light will provide a nice back light to the objects to ‘silhouette’ them, preventing them blending into the background.
Duplicate the key light, and position it on the opposite side of the objects as the key light, pointing at the objects, Note that it is not pointing at the camera, this helps give it that ‘rim’ effect,
Once again this is a soft light, I used 0.25 Energy, and 0.5 distance.
A little higher than normal, but I like a good back-light. size stays at 0.25

And that is the lights all done!
Isn’t this easy.
Time to jump into some world settings.
4. World Settings
Going to be quick here,
In the world settings tab, set ambient occlusion to 0.25 -> multiply
And the environment lighting to 0.25 -> White
And Gather to raytrace.
We will also check Falloff, and set falloff strength to 1, not that it will do much here though.
To explain this, ambient occlusion makes objects darker as they get closer together, and raytrace lighting is better quality.
So in short, more realistic.

5. Adding Objects
Fairly straightforward, add your objects to the scene, place them in the center of all the lights. and make sure they are not too close to any lights.
Now is a good time to reposition things like the camera and lights.

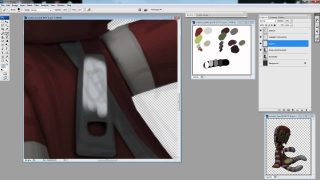
Now here is a bonus step, because i am using slightly reflective material (ceramic)
I want to add in an HRDI map, to give the illusion that it is actually in a lightbox,
Now since blender doesn’t directly have an hdri settings, we will “fake” it in the textures.
for this to work, be aware you need to have reflectivity checked.
I will be using an HDRI map from here
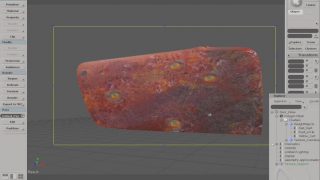
Add in a new image texture,
Under Mapping set the Coordinated to Reflection, and the projection to sphere.
Under Influence uncheck color, and check Mirror, set it to 1.
And your good to go,
Just note that the hdri map texture will need to be added to all the reflective objects in your scene.

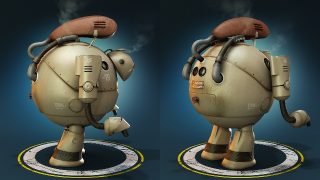
Go on, give it a render.
You should hopefully get something like below,
Try not to go over the top with ambiant occlusion like me :P

And perhaps you want to do some compositing
I added Depth of field, Vignette, and some color correction.

And remember you can throw any objects in here, with any hdri map, with awesome results.
And all within the blender internal render engine.
Now there will be no more excuses for those bland renders with blenders default lighting.


About The Author
You might be interested in