Hull Damage
Want to know how to tear up your favorite starship without actually messing up the mesh? Use textures.
We could start with a sphere but that’d be too easy. Grab your favorite mesh instead.
The easiest way to apply even burn marks over a whole mesh is if the mesh is one attached object. That’s the way this tutorial will work. You could do this with an unattached mesh. Just apply these techniques to each material you want the damage to appear on.

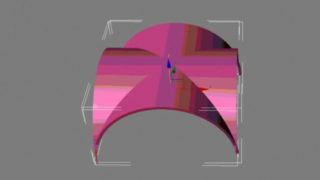
 In your material window you’ll see the texture for your ship. In this case it’s one single texture made up of all the textures that are applied to your mesh. Lovely isn’t it? Let’s mess it up ;)
Click on the Material type window and bring up a blend. Keep the old material as a sub-material.
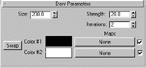
In the Mask slot of your new blend material put in a dent map. The dent will mask off the area of your main hull that will be blackened. You’ll need to set the Strength and Iteration for the Dent map. The Strength setting determines how dense your blackened areas will be. The Iteration setting controls complexity of your Strength areas. I used a setting of 5 for both options on the picture above.
 Use a higher Strength setting if you want your ship to have larger ‘burn’ marks. The size setting is one of the most important. You’re probably going to jump into the thousands with this depending on the size of the damage you want. I set mine to 2000.
In the secondary material slot go in and change the color settings to black. Make sure you set the Specular and Glossiness to zero.
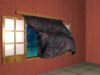
Now render it and have a look. You should see some really cool looking streaks on the hull with a few fairly large blotches. Neat huh? We’re not finished yet.
Now make a blend out of your black material. Here’s the trick. Put in another dent in the mask slot. Make sure it has the settings of your original dent. Why? Well, so your melting hull will appear in the blackened areas instead of outside it or in the edges.
Ok, now that it’s all set up we can finally get down to getting the melting hull plating. Go to your new secondary material.
This will be the area of your texture that’ll be the brightest part of your damaged areas. Change the Specular and Glossiness levels to zero each. Burnt, melted metal doesn’t shine either. Drop down to the self-illumination slot under the map rollout. Put in another dent map.
 Now for this dent map we’ll be doing things a little differently. Go to the white area of your new dent map and make it a bright orange (if your ship would have an orange glow). Go back up and set your Strength and Iteration settings to your personal preference. As for the size, instead of huge like before we’ll make these marks small. I used a size setting of 150. Ok, hop back on until you’re in the map rollout again. Instance your self-illumination to your Diffuse Color slot. This helps the color show up a little more on distance shots.
Now render it up. Cool huh? You could stop there and have a decent effect, or you could play with some lighting and glow effects and come up with a gorgeous image of destruction. The decision is yours. :)


About The Author
You might be interested in