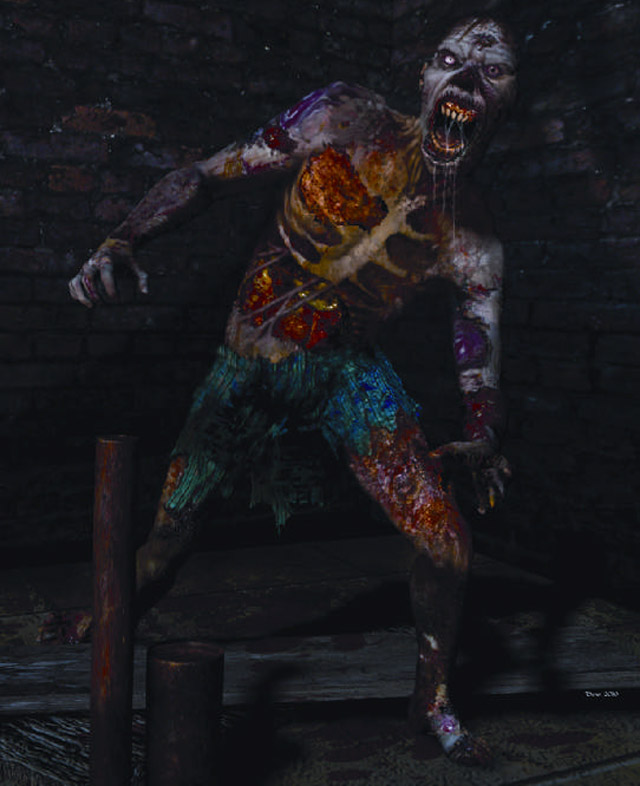
Quick Character Concept: Burnt Zombie
In this tutorial I will be walking you through the process that I use often to layout and create a quick but effective concept character illustration
for client review. I will be using two well known software packages Curious Labs-Poser 4 and Adobe Photoshop
STEP 1
We must determine what look and feel we are going after with our concept character Illustration. Since most of my illustrative pieces are based in realism
with hints of the fantastic this will be the overall look for our final concept character illustration.
STEP 2
I begin doing research and development based on zombies, the dead, facial features or lack there of, burnt skin and clothing, medical afflictions and diseases
etc… I also gather visual information of zombies from horror movie character stills, Halloween masks, movie posters and comics. As well as do a wealth of
sketches to flesh out ideals on the look and feel of the character. Keep in mind this research is not to copy or steal what has already been created, but to use the imagery as a spring board in the process of developing my own original zombie character for presentation.

STEP 3
Once I have established a look for my character. I move on to the next phase in the creation process. In Poser 4, choose the generic model (Nude Man P4) which
is provided by the software. It is now time to begin setting up a pose and trying to lock down facial for our character. Poser 4 comes equipped with pose dials that aid in getting your figure established quickly.

STEP 4
While in Poser we start to flesh out an environmental setting for our character using a series of primitive 3d objects provided by Poser 4. After I am satisfied
with the placement of the background elements I’ll go back and apply the appropriate textures and bump maps to the primitives in order to breathe a little
life and believability to our characters environment. Save the new Poser 4 document.

STEP 5
Now that I have the initial layout established it is time to create our custom texture that will wrap around our Poser 4 character. Locate the generic P4 Man
texture that Poser provides: “MetaCreations\Poser 4\Runtime \Textures\Poser 4 Textures/P4 man texture”. Save a working copy where you will be working and
saving files to. Don’t bother with the generic bump file we will be creating a new one based off of our custom texture once it is created.

STEP 6
Next pull the generic Poser 4 texture into Adobe Photoshop to be customized. This is where having one’s own digital texture and reference library or access to
one or two of the online and free or pay per use texture, photo and reference libraries come in handy. From this point I begin laying out my various textures
that will make up the zombies body, face and extremities, starting with a base texture and using the layers function in Photoshop to layer on new sections of
textures from the base up, refine and change color, apply custom brush textures etc…all of which helps to create a dynamic looking and convincing figure.

STEP 7
After getting our new characters skin to a point where we’re satisfied with the overall look, I save out the new texture as a .PSD file with all the layers in tact for further editing. I also create a merged grayscale version of our texture; this will serve as our bump map that will help bring the look of depth and volume to our character. Open the previous Poser document which contained the posed character and environment. Now apply the new texture and bump map to the Poser character as well as other chosen textures that were selected for the environment.

STEP 8
Now that I am satisfied with the overall look of the environment, I add a couple of new colored light sources for ambience. Do a medium resolution render in Poser 4 to check the characters texture for blaring imperfections such as obvious stretching, mismatched seams and other places that may needs to be cleaned up or re-worked on the custom texture.

STEP 9
Do another series of Medium resolution renders in Poser. Take the time to Jumping back and forth between Photoshop and Poser, re-applying and rerendering
the texture to the figure in order to correct and refine the texture. By taking the time now to get the texture to the point where all the major flaws have
been eliminated will allow you to follow through quickly on finalizing the piece in Photoshop.

STEP 10
The first thing that I do after opening the render in Photoshop is go to the layers pallet and make a duplicate layer called “Zombie Working Layer”, This is the
layer where all my edits and additions to the figure will be made. I save the new version of the render as “Final Render 2.psd” so that I still have my original
render in a safe place just in case. Keep your history pallet open just in case you may need to go back a few processes to make changes. Notice that the render is a little dark and slightly muddy in some areas. This will makes it hard to see both the figure in conjunction with the background, to fix this
I open levels command to adjust the tonal range of the image, I want to lighten it up overall but also keep some of the rich darks and shadows as we work on the
image.

STEP 11
Start by correcting imperfections in the texture; Select from the tools pallet the “Cloning Tool”. Choose a soft brush “Size: 50 -opacity set to 50% – Flow: 100” and begin the process of cloning portions of our texture, cleaning up any imperfections that are very noticeable. At this time begin to lay down additional
textures and enhance the characters anatomy in order to give it a more dynamic, freakish and terrifying look. In this process I use a wealth of various tools from the tool pallet (See FIG.10) and various layer blending options to bring it all together. The object is to work over the whole image and not get caught on small details at this point.

STEP 12
The focus of the character concept illustration is in fact the character itself, the background is a secondary element at this point and although it still needs some enhancements applied to it so that the illustration will begin to work cohesively and add a believable atmosphere to the environment.With more focused manipulation and enhancement to the figures body and especially the new enhancements to the facial features, the character begins to take on a uniqueness and personality of its own. It is at this point we are close to wrapping up our character concept for delivery to the client, but only after a few well placed tweaks have been made.

STEP 13
Now we will begin to finalize our character concept sketch. Save the current version to your drive or folder that you are working from with all the layers still
intact. Since we have a layered version saved, we can merge all of the layers down to one. In the layers tool pallet I create four new layers entitled:
-New Shadows – which will be used to add more depth to the background area in order to push the character forward towards the viewer. In the brush pallet I
choose a “Soft Brush – 241 Pixels Wide – Opacity: 27% – Flow:100”. Next select the “Eye Dropper”, from the tools pallet and sample one of the shadow colors.
The new shadow will be used to tie in the background to the character by blending in sharp edges and hot spots.
Blood 1 & Blood 2 – This is where I add a dried blood texture to the floor around the character. Do this by placing the texture “Blood_Splatter_Alpha” on a
separate layer. Next I got to the drop down menu “Edit – Transform – Distort”, with distort selected I arrange the texture so that it looks like it is in perspective to the floor. Set the layer to “Darken – Opacity: 100”. Duplicate this layer and use it for your Blood 2 splatter layer.
-Spittle – This is self explanatory.

STEP 14
For the Final concept character image, merge the four layers so that you have one final layer to work with. I chose to crop my final image so the new size is “11 x 14 – 300 pixels per inch”. In the filter drop down, I chose “Filter – Artistic – Paint Daubs (Settings in FIG.13)”. Convert the image to CMYK and our image is done and ready for viewing.


