Making of Binah
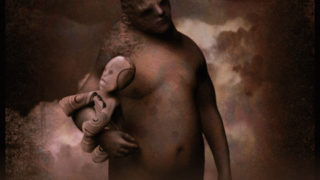
Binah was a difficult and long time consumming project. It was a great challenge for me, technically and artistically. Binah is the third sephirah of the tree of life in cabbala.
|
Binah was a difficult and long time consumming project. It was a great challenge for me, technically and artistically. Binah is the third sephirah of the tree of life in cabbala. After reading many texts about the tree of life, I wrote some sentences describing my vision of Binah: She is the third sephira in the tree of Life. After this process of describing the character I thought about my inspirations and the graphical style I want to create. I wanted Binah to have a soft, pale skin, with some details only in the eyes, mouth and hand areas. She wears a long dark robe, and drapery, and I wanted her hairs to be in the continuity of her robe style. Finally, I wanted her to have a dark, cold and enigmatic glance.
My modeling process is based on the edge extruding technique. During this process, I try to get edgesloops as accurate as I can, so I can manipulate/animate what I do. I principaly use EdgeExtruding method for my characters so I can set up my edloops directly. For the face, I do my best to keep circulars edgeloops over the overall surface. I try to get good transitions between edgeloops too.
For the dress, I use procedural approach in fact. (I was discovering Houdini at the same time …). First I modelised a polygonal patch with few polygons and unwrapped it directly with planar projection. |
|
|
For the dress, I use procedural approach in fact. (I was discovering Houdini at the same time …). First I modelised a polygonal patch with few polygons and unwrapped it directly with planar projection. |
Then I add it an EditPoly modifer to give his main shape. As you can see, the object keeps its uvs. Now It’s time to use procedural approach further to detail it. |
 |
 |
|
Generaly, I add a Meshsmooth/Turbosmooth modifier on top of this hierarchy. And I add a noise modifier too with soft selection on vertices. This create little chaotic turbulences that make the fabric more natural. |
The falloff helps to smooth this effect toward the surface. Then, I add a new EditPoly, to erase the selection of the previous one, and a MeshSmooth to smooth the surface. |
 |
 |


|
This method is very usefull for doing drapery because doing so, you can step back to the first EditPoly and model the main shape, and the Uvs and the overall details will be preserved. Of course there will some little coorections about uvs, and the falloff selection pour the noise modifier, but I prefer to do drapery so, because it is much easier than modeling the drapery and unwrapp it directly.
As you can see, this is the same object deformed, and the uvs did’nt changed, there was only a few corrections to it, and to reselect the vertices in the second EditPoly modifier for the falloff and the noise modifier. Hair were modeled in the same way, and received opacity maps for rendering. I like a lot to put the details more and more accurate on the models, because it makes them really react to the lighting of the scene. So I don’t usually use tricks on texture maps to replace the details of the model. I skinned and rigged the body of Binah to set her in pose. The dress and the other accessories were modeled on the posed body. I spent a lot of time searching the good pose, to give Binah a lot of personnality. Posing is a great way to make a 3D character alive, much more than a realistic rendering.
Due to posing, my modeling process can be long. But since it is posed and well modeled, it is more easy to give a character more a more natural look with Lighting and Texturing. |


|
A good lighting can’t be done if you only bet on radiosity and HDRI lighting. I first setup three Area lights in my scene : Then I put a HDRI dome light, to avoid Black areas in my picture : I generaly set the intensity of this DomeLight very low. Finally, I put some white constant shaded planes around my character to fill the areas that remains too dark. Texturing/Shading : The skin : I wanted Binah to have a cold pale porcelain skin. So, I choose to put details only in caracteristic areas:
The rest of skin remains really simple, with only subtle variations on it. Here is some example of the diffuse texture for the skin
I use the SSS Fast Skin Material from MentalRay to render the skin. I putted the diffuse texture in the Unscattered Diffuse Color and the Epydermal (Top) Layer Scatter Color slots. Then I putted a warmer version of the diffuse texture in the Subdermal Layer Scatter Color.
For the Back Surface Scatter Color, I didn’t putted some textures, and kept the redish color. |


|
I use a specular map, reflexion map, and bump map(pictures below from left to right) for her skin, too.The dark areas of the reflexion map arent really black. It allows my skin shader always reflect some light from the environment, even where the skin doesnt seem to be reflective. The bump map is really subtle as you can see. The details are mainly around lips and eyes area (again to make contrasts on her skin).
|
|
|
For the dress fabric, I mainly used the Oren Nayar Blinn shader from 3DSMax. One of the tricks I often use for fabrics is to put a Fresnel Falloff map in the self-illumination slot of my material.Then I tweak its intensity curve to get the results I want. I do the same for the bump slot.It allows me to have some variations for the bump of my surface. Moreover I always put some reflexion map on fabrics (except the soft ones). Here are some texture examples from the lace areas of her dress:
I used polygonal patch, and opacity maps to create hairs. For the material, I used , one texture in the diffuse slot, one in the specular one, and another ine the opacity slot. Maps see below: |
 |
|
Of course, all this texture and lighting work had to be tested with many renders tests. It took a lot of time, but the more time an artist spend on his image, the more best quality he gets. |
|


|
After doing all this lighting/texturing work, it was time to do the final render of the image. The result was good, but I tough that that specularity of the lace wasn’t strong enough. So I decide to create a specular pass to enhance the lace’s specularity, and used it in photoshop in a layer in screen mode.
|
|
My name is Florian Delarque, and I currently working as freelance 3D Artist for video games and CG animated film. My interests are drawing, CG and jogging. I’m a 3D generalist, doing modeling,texturing , rigging, and animation. I’m use many softwares, mainly, 3DSmax , Maya , and Softimage XSI, and Zbrush. I would like to thanks 3DM3 for giving me this opportunity to show my work, all people who supported me since I posted this picture on the web. And to finish this making off, I would like to give a last advice to 3D beginners: keep working and be courageous, 3D pictures are very time consuming to do and need a lot of attention. The more time you will spend on your work, the best results you will get. Keep working! Thank you all again. Portfolio: http://chokmah.cgsociety.org Email: floriandelarque@hotmail.fr Discussion: Talk about this Making of on our Forum >> |


About The Author
You might be interested in