Making of Fall
After almost 5+ years of experience with mentalray it was a real pleasure trying something new. This was a project I started few years ago, but it never grew to more than initial sketch and simple scene blocking in 3D.
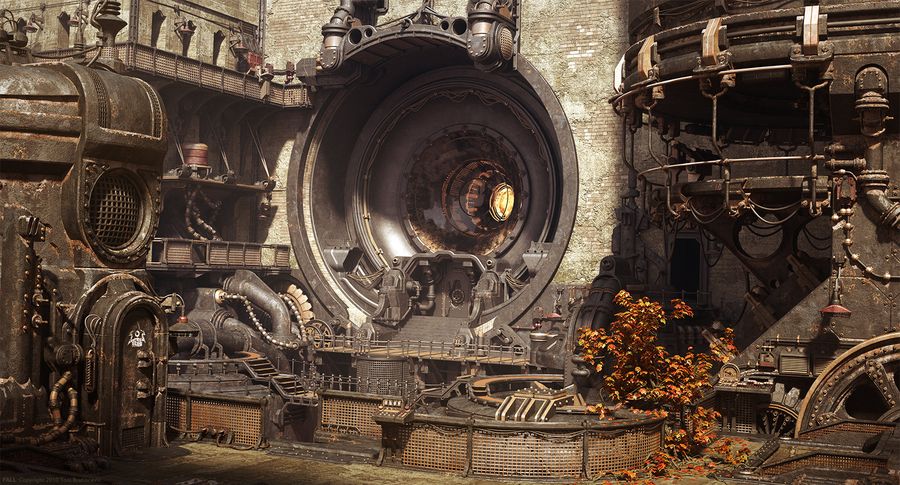
IntroductionFall, my latest project was the first illustration I did using a combination of 3DS Max and VRay. After almost 5+ years of experience with mentalray it was a real pleasure trying something new. This was a project I started few years ago, but it never grew to more than initial sketch and simple scene blocking in 3D. First idea for the image was just to create old rusty factory and something mysterious in that tunnel. But as image developed and grew, the main story was formed and from that point the whole image was shaping around that story, it was my main source of motivation and inspiration. I know some artists just sketch and do illustrations, but my way is to create story first and then create the whole environment around that story. It’s basically just a flow of creative process, and I think every artist in time finds the best way to develop his ideas. The purpose of this making of is to show you my working process and to explain some steps during image creation, it’s not the tutorial and you probably won’t learn something specific like in other tutorials. So, if you want to get some more details about few steps be free to drop me email and I’ll give my best to reply. Concept and Initial scene blockingAfter I got my first idea I made one quick sketch that served as a base for things to come. It doesn’t matter if you are good or bad at sketching, it’s just that it’s fastest way of making a draft version of ideas that you have. This was made in 20 minutes in photoshop using simple brushes and some base textures. It’s recommended to have some painting tablet for this (Wacom is the best) because it just feels so natural. Sometimes I do a quick sketch on paper and bring that in photoshop where I add colors and shading to everything, but since painting on wacom is very intuitive it is also a great way to start. So this is how the first sketch looked like left image below. The initial sketch served me as a starting point for building the scene in 3DS Max. Using some compositional forms from concept I’ve built a few basic shapes in 3DS Max and staged the camera. The most important thing at this stage is to define the most important shapes in composition, because the whole scene will be built around those shapes. Camera is also important because scene is created from camera point of view, and you only need to do what camera sees. If you don’t do this part right it’s gonna be very time consuming to change main shapes in later stages when you get to detailing. As I sad before, this should be very simple and it should represent direction of the modeling to come. It’s also good to place some basic lights and define some materials. I’ve made two materials, one metal and one brick and assigned those materials to all objects. |
|
|
|
 |
|
After 3D scene blocking was finished, it was time to start with modeling… there is supposed to be a lot of details in this scene, so this can take up to couple of weeks depending on the time I have. Sometimes, to make things less messy and help me organizing everything, I export parts of the blocked scene to separate file and remodel that area over there before merging it back to main scene. It’s also possible to do XRefs and keep everything in separate files, but that’s up to you if you want to try it… I only mentioned it over here because for some artists it can work better. ModelingAs I said after scene blocking it was time to get into details and modeling. This time I decided first to model everything I have in scene and do textures-materials later. Sometimes it can be good decision to separate every process(modeling,texturing,lighting), but most of the time it’s not the way I do illustrations because some modeling details can end up in dark areas where I don’t need them but at the time I was modeling it, it seamed like it was ok to model that part. The thing is that in time you just learn where you need all the details and where to not put your effort. After few days of work this was the stage where model was: |
|
|
|
|
| I normally use Edit Poly modifier starting from box, cylinder or some other object, or I just draw the curve that’s gonna serve as a profile and then I apply Lathe or Extrude modifiers. Symmetry tool is one very important modifier in my workflow because you can get so many different variations from your initial model, you can basically reuse same model couple of times without spending so much time building a new one… and the viewer won’t even notice that models have same base object. | |
|
|
|


| When I am done with modeling for that day I usually do one quick render, bring that to photoshop and do a quick draft paint over that image to make a plan for tomorrow. These overpaints look really simple but it gives me a better visual reference of the details that I need to do in some areas. Sometimes I end up doing only 40% of what I sketched, sometimes it’s more, it all depends on how much time will it take and if the new details will fit into the final model. | |
|
|
|
|
|
|
|
Once I was satisfied with modeling stage I went onto the texturing and lighting. It was not complete finalized model, I just decided to stop at that point because it was enough to work with for texturing and lighting stage. It’s always possible to model some more shapes if needed and do another pass of modeling, texturing and lighting. The final model looks like this: |
|
 |
|
|
Background wall is displaced surface and the bricks under the concrete are 3D models. For the bricks I created multisub material with 3 different variations and applied that material to brick model. Using Material By Element modifier I randomized those 3 materials over the brick models to get natural variation. Keep in mind that when you apply Material By Element you need to have those bricks in one mesh because Material By Element is randomly changing material IDs on individual objects inside collapsed mesh. Texturing and MaterialsNothing special over here… I used VRay material for everything. I usually don’t use anything else except this material because you can do almost everything you need with it, except maybe high quality sub surface scattering for which there is new SSS2 material in Vray. The way I am usually working at texturing-material stage is to build one MultiSubobject material with couple of different materials that will be used in the scene. These are some basic metals, like black, red, gray painted metal surfaces, then more reflective metal material like bronze, glass and some basic concrete. |
|
|
|
|
| After I was done defining base materials I did texturing of the image based on combination of those materials. For UV coordinates 80% of the time I was using Box UV mapping from UVW Map modifier. I tried to keep scale of box uv mapping same for all objects I textured so it can have similar texture scales and more realistic look. The problem with keeping everything in the same scale is hard because it depends on the scale of the object… so before I do box mapping on every object I go to Utilities and do Reset XForm. This will keep everything in same scale so you will be safe when applying Box UV Map. Using this workflow, with multisub material and UV box mapping, its very easy to combine materials on surface, you can make couple of different variations in 30 minutes and decide which one looks better for you. | |


|
Of course base materials will be used for some objects in the scene but not for all of them. The idea here was to quickly texture and combine everything and after that’s done, take objects that are most important and most visible and redo the UVs and textures on them. So, for example front right tower was the one object of that kind. I did second UV channel on that object, in Unwrap UVW modifier I did Flatten unwrapping so UVs don’t overlap. Flatten mapping is going to separate whole object in different UV sections based on angle threshold and it will make layout of those UVs so there won’t be overlapping areas and you won’t have distortions. Although this is not very useable for direct painting in photoshop, it’s going to be good for baking dirt on it. That’s the reason why I was keeping this UV in second channel since I was only using it for dirt map. After that I created material setup for baking the dirt into the edges of that object. I baked that dirt to separate folder and used that image to drive Mix map combining black paint with rusty part to get the paint wear of. If you don’t know how to bake textures, it’s in Rendering>Render To Texture. I baked out 4k maps to get as much details as I can … other reason for that is that since I was using Flatten Mapping, a lot of UV space gets unused, so I was compensating that with hiresolution texture. But, if you can spend a little bit more time and create better UV’s that are using 90% of UV space then you can probably go with lower resolution texture for baking. The material setup for baking and textured tower can be seen in the next few images |
|
 |
 |
|
|
|
|
I used same procedure for couple of objects in the scene, and some of them were rendered with base library I created. There was no point of doing rust for every object in the scene because it takes a lot of time and in the end you wont see it. LightingLighting was done with VRays sunlight and one VRay light used inside the reactor. It’s very simple setup, and I tried several light setups during the whole texturing lighting phase. I used several light blockers to get the right shadow placement over the scene. It was done using simple polygon editing to get the shapes I wanted. When positioning light blockers it’s good to switch to light view so you can be more precise select the light and click Shift+4 for that you can get the feeling where your shadows will be cast. The other way to do it is to switch to orthographic view, match the angle of daylight and then place shadow blockers. While I am modeling and texturing I like to develop lighting as I go, so these are some of the images I rendered during that process. Lighting is highly dependant on material so that was a big reason why in the end I switched to completely different light position. First test with lighting.I just put some textures and defined simple material to check how materials and illumination should be used. This was before texturing stage and just after first pass of modeling was done. |
|
 |
 |
| Almost same lighting setup as above was used, but it didn’t work really well. Big part of image is getting dark because I used material that have properties similar to black painted metal. Something needed to be done, like tweak some intensities and possible change of light direction. so the sun intensity was tweaked to get more light in all areas of the image. I also changed the intensity of sphere light in that tunnel, but something wasn’t working right, the center area was attracting too much attention, which, considering the story, wasn’t so good because tree that I will add later will not be the object that attracts some attention, and it should. | |
 |
 |
| Because of that I rotated the sun so it’s pointing more directly at the environment making everything a lot brighter and better lit. Central sphere light doesn’t grab image so much, but I still didn’t like it, it was just too big and too explosive, and it should be more like a mystery. That’s why in final image I remodeled central part of the reactor. This eliminated that big central round shape making it more mysterious, like some eye or wormhole to another world. The tree has a little bit more saturation than the rest of the image, so two main elements (bright core and tree) are put in nice composition and relation. | |
|
|
|


RenderingAgain using VRay, and DMC sampler. I used lightmapping for secondary GI bounces and irradiance mapping for primary. DMC sample tends to behave better in situations where you have small details in models and textures and a lot of glossy reflections so that’s the reason I used it. GI Irradiance map was set to Hight quality preset and Lightmap to 5000 samples (default 1000). That was more than enough GI to get into every part of the scene. DMC sample setup was: MIN samples to 1, Max to 6, Adaptive Amount set to 0.95, Noise threshold to 0.01. I used VRaySincFilter with size set to 1.5 (default value). Since I was using Linear workflow from the start, In Color Mapping section I set Linear multiply, Gamma to 2.2 and turned on Don’t Affect Colors (adaptation only) … what this will do is that it will decide where DMC sampler will use more samples based on gamma corrected image value, but at the same time it will keep RAW image in linear space and save it in that way. I saved everything to Open EXR file format so I can get zbuffer (included by default) information which can be used for all kinds of effects and color corrections in post-processing phase. Final rendering was done in 5k resolution, but all previous test renderings were done in 2k resolution. For the 2k renders I was doing before final high resolution one it took VRay around 1 to 2 hours which is pretty fast when you look at the complexity of the scene. |
 |
Post-processingOpen EXR provided me floating point values and Z Buffer information in one file. After I imported file to Fusion first thing I did is applied color corrector with Gamma 2.2. This gave me gamma corrected image that has nice exposure on screen. After that I used ZDepth to add some FOG, one color corrector and one color gain to make color corrections to initial image. If you want to keep linear workflow all the way to the end, you can leave gamma for the image at 1 (no color corrector with 2.2) and use LUT table in Fusion to do on the fly gamma correction for the screen. You will find LUT button on the screen above flow area. Click on it to turn it on… then click on arrow next to it and click edit, type in 2.2 in gamma and that’s it. Then, just before saving the file, you can put one color corrector with Gamma 2.2 applied and it will save image with good exposure when viewed on screen. Remember that LUT table is just to correct it before it goes to the screen in Fusion, it’s not gonna bake gamma to image. Using LUT table is technically right way to do it … and I suppose I will practice this more and more in the future. Post processing is always a crucial part of my image creating process and it should be practiced on almost every rendering. Why would you spend 10 hours trying to get same effect in 3DS Max when you can do quick tweaks in Fusion or some other post processing software. It’s like trying to fake global illumination with custom lights when you can use Irradiance mapping and save couple of days of work. |
 |
End wordAfter I was done with the image, it was time to promote it on internet. What’s the reason of doing something if you don’t share it with other people. There are a lot of great galleries on internet where I usually send my latest illustrations. Sometimes I get useful critiques and ideas that make me think a little bit about what I did and how it can be better. When working on something personal for more than couple of weeks people tend to loose objective perspective of their work. I know I do. So it really helps to see how other people will react to the image. I just want to say thanks for every comment someone gives, it doesn’t matter if it’s positive or negative, it helps. Related linksEmail: toni@interstation3d.com Web-site: www.interstation3d.com Profile: http://intercepto.3dm3.com/ |


About The Author
You might be interested in