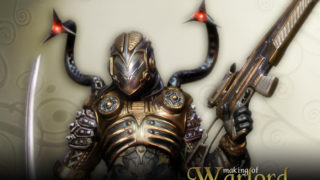
Making of Amazon Warrior
Fabio Bautista shows us how to create a female amazon warrior
CONCEPT
This project started as an entry for a Sculpting Challenge. The brief of the challenge was to create a female amazon warrior and I thought about doing something with the proportions of comic book characters, a tall young woman with slender figure but at the same time looking like a strong warrior.
So first task was to gather references and Google’s image search was great for this. Amazon warrior and native women images were my primary research goal. This gave me some ideas for the design of the character.
STEP 1: CREATING THE BASE MESH
I usually start working on a base geometry in Max, but this time I decided to use a different technique. ZBrush gives you different methods to create a base mesh and one of these ways to do it is using ZSpheres. With ZSpheres you can create easily structures that can be converted into a basic form. It uses the Adaptive Skin feature that creates a surface of polygons around these ZSpheres structures. Well, I started selecting the ZSphere tool and drawing on the canvas. Then I went to the Edit mode and added more ZSpheres building up the structure of the body. Once it was completed I used Make Adaptive Skin to convert the figure to an editable mesh. Although the distribution of this geometry was not the best, it was a good starting point (Fig. 01).

I used the same method for the hair, but it was created as an independent Subtool. An important thing to note here is that by creating separate objects, the memory resources are used in a better way. This give you the possibility to increase the subdivision of each object much more than using the whole model. Thus, each subtool can have a different subdivision level and you can work with a greater level of detail on objects that need it.
STEP 2: FIRST STAGE OF SCULPTING
After the base mesh is finished, I started searching the overall proportions using the Move brush. As the idea was to achieve a slender figure, first I extended a little the neck and trunk and adjusted the limbs according to them. The key to a well-structured body is to pay special attention on the proportions and shapes. Here for example, I used as reference the joints of the arms and the waist to shaping out the legs and the overall body.
After getting the overall shape, I increased the level of subdivision and began to adjust the overall details of the body. For this task I used mostly Move and Standard. Later I added a subdivision more to refine each area of the body. Here, I used the Standard, Clay and Smooth brushes. Then I divided the model one more time to get more definition on the face and chest (Fig. 02).

When I was happy with the shape I exported a version of this early model to Max to optimize and retopologize. There I adjusted the distribution of geometry and created the base mesh for the accessories starting from primitive objects. Finally I exported the model with clothes and accessories to ZBrush (Fig. 03).

STEP 3: ADDING DETAILS
Back in ZBrush and once established the overall details, I started working on each specific area of the body. At this point, I focused especially on the face. I wanted to give it some thin features, but at the same time it proved security and strength. Then I added two subdivisions to the model and began to get some more definition to the face refining the eyelids, ears, nose and lips. To carry out this task I used mainly the Clay, Inflat, Pinch and Standard brushes (Fig. 04).

The same process was used to give shape to the other parts of the body, this time I focused on areas like the torso, hands, knees and feet, but without adding too much detail or skin imperfections, for a smooth and soft look (Fig. 05).

After this, I went up one level of division more and continued refining the face, giving some more details (like in the hair, eyebrows and lips) and then working in the same way with the rest of the body (Fig. 06).

Clothing was the next step. I divided it to five levels of subdivision and added some small details to clothing and the other accessories (Fig. 07).

As for the hair I paid special attention first to define locks of hair to add some fluency and dynamism. For this I used the SnakeHook brush to create the tips and give shape. Then I used a customized brush created from the Standard brush, to block in and define the layers of hair. To complete this process, I added details on the hair using alphas and Lazy Mouse mode (Fig. 08).

At the end of the sculpting process, the model was at level six of subdivisiуn and already had all the detail that I wanted. It was ready for the last step. (Fig. 09)

STEP 4: POSING THE MODEL
The final step was to give a pose to the model. As it was consisted of several elements, it was a little bit difficult to adjust one by one. So I used the Transpose Master plugin. It is found in the Zplugin menu and you only need to click on the TPoseMesh button to create a low resolution mesh conformed of all subtools included in the original high-res model (Fig. 10).

With this low poly mesh, the task of posing the whole model was pretty simple. At this point I used the Transpose Tool to reshape and adjust the model This tool is activated by pressing any of deformation modes (Move, Rotate or Scale). The process consisted of making a selection, shading the part which I did not want to deform and creating one Action Line to deform the model. So I used the Move and Rotate modes to adjust each part of the body (Fig. 11).

Once I got the final pose of the model I went back to Transpose Master and used the TPose>SubT button to transfer the changes to the original model (Fig. 12).

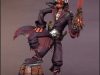
I also tested some other more dynamic poses for the model by using this method (Fig. 13).

Finally this was the result after some little tweaking in Photoshop (Fig 14)

Thanks for reading. Cheers!


About The Author
You might be interested in