Making of Sandoje
Sandoje character is made in cartoony style and is full of wonderful details
Introduction
My name is David Arberas and I’ve been studying special effects for two years in my native town, Donostia.
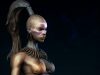
The idea of making in 3d this model came when I was searching for a good quality 2d cartoon character artwork and I found zurdom’s (www.zurdom.com) awesome artworks. I fell in love immediately with Sandoje character, because of its cartoony style but full of wonderful details (fig01), so I sent an email to zurdom asking for permission to make it in 3D and he kindly answer that I could do it.

Understanding the artwork
Well, I’ll not fool anyone, this is my first attempt to make a 3d character based on an artwork. Because of that I took a great amount of time to analyze the artwork in order to discover things like: the monster-like hand is biting the sword, the barrel is somehow connected to fuel through the tube, what the hell is written in barrel’s little cartel… that things are little concept details, but at this point also I start thinking in technical details I know I’ll have to face: must I use textures for all objects?, in that case, how should I group objects to pack in UV islands?, which programs I’ll need to use for sculpting, texturing…?
I don’t want to bore you, but only explain how my mind works when I face a project like this.
STEP 1: Modeling- sculpting
In this step, the main question was if I should model the character directly in the artwork pose or T-pose. I didn’t spent much time thinking about it: I wanted to make a 3D illustration, not an animated scene, so I decided to make Sandoje directly on pose (fig02).
First thing to do was to configure correctly the camera so it fits the perspective of the artwork while I model. The first object I model was the barrel (fig03), this helped me to configure more or less the camera perspective. Anyway, while I continued modelling I changed or made some minor adjustments to the camera so it fits perfectly into the drawing (fig04).
Other thing to take into account is that during this process I spent a lot of time switching between ZBrush and Softimage in order to fit all the details (such as cloth folds and so on) I made in ZBrush (fig05). To make this step easier I make custom script buttons to import into Softimage middle resolution meshes exported from ZBrush much faster, only one click.
I had to sculpt 28 objects, so the organization of the ztools was very important. I decided to group all the objects in 7 different ztools, all of them with some subtools. For example the right boot ztool (fig06) has 4 subtools, the low res subtool is the pieces I didn’t want to sculpt, all the other subtools are objects to sculpt.
When I finish sculpting, I started to decimate all the high res objects with decimation master until I found a good balance between polygon count and quality of details. Then I imported back all the decimated meshes to Softimage.


STEP 2: Texturing
I want to explain a little bit my workflow with ZBrush and UVs. I love the idea of first think and work all the forms in ZBrush, and then deal with UVs, so normally, what I do is, sculpt, then unwrap UVs and import back objects to ZBrush to transfer them to subtools.
Due to the fact that I had more than 100 objects, organisation was basic, so I made 3 groups for UVs: one for the skin and clothing, another for the rest of the body objects and last one for the barrel (fig07). Once I unwrapped object’s UVs with Softimage’s unfold, I started importing back to ZBrush like I’ve said.
Then I switch to Mudbox for texturing because I’d never textured within it and I love the fact that texturing works projecting and not polypainting, like in ZBrush. When texturing, I thought it wouldn’t be a good idea to paint microdetails but maintain the cartoony style of the artwork, because of that I felt comfortable painting and I focus only on giving color variations to textures. Fortunately I could finish painting more or less 120 objects in one day.
When I finish painting, I thought it would be a good idea to bake cavity and occlusion maps to use it later in the shading process. I use xnormal for cavity maps and Softimage’s renderMap for occlusion maps (fig08).


STEP 3: Shading – lighting
When I thought about shading and lighting I knew that I had to make a critical decision…and I made a mistake which fortunately I could fix in compositing. If you look to the artwork, you’ll see that concerning to lighting it has not shadows, but that doesn’t mean it hasn’t got volume, in fact it has, it seems like the artist applied some type of painted occlusion.
Anyway, I tried to achieve that look, and for that I thought lighting the model without lights. It sounds a little bit crazy, but if you thought a little bit it isn’t. The key is to use a constant material for the base color with some layers (occlusion, cavity, specular) to give volume (fig09).
To get specular I put around Sandoje a lot of different exclusive lights (without diffuse), and this is because I wanted to get specular highlights similar to the artwork (fig10).
The mistake I mentioned before is that I didn’t realize which the main idea is when you make a 3d image based on 2d one: you must base on the artwork, not copy it. And that’s why later when I started compositing image I decided to add an overall occlusion effect to give Sandoje more volume, because without shadows the image looks a bit poor.


STEP 4: Render passes
When it comes to split the scene objects in render passes I tend to split them enough in order to have a lot of control when I composite. Anyway in this case I tried not to split so much because I wanted to work with object labels channel. This way I could change object colors in Fusion only with one rendered image, but when I prepared and tried this channel in Fusion I found it was a really frustrating thing, I could not find any image format which worked well between Softimage and Fusion.
Because I didn’t want to waste more time with it I continued and make it “the easy way”, so I split the scene in many render passes (fig11).
Thanks to the baked ambient occlusion maps, I could “fix” the problem I told you before giving the final image more volume: I made custom passes using this maps to work later with them in composition (fig12).
Apart from making that render passes I made two matte passes for the cloth to control the color of two areas, a special one to control the glow of the sword, one to make the sword darker at the beginning, a depth pass and another one to add occlusion to the floor(fig13).


STEP 5: Composition
complexity is because I had 26 passes.
The biggest problem I had here was trying to achieve the glow effect on the sword, so I’ll try to explain it. First problem I found was that the sword’s render pass seemed plain till I realized that it hadn’t specular highlights, so I added one exclusive light to fix it.
When I do glows with Fusion, although it has two powerful nodes for this specific task, I found that for best results usually is a good idea to combine two or more nodes like color correctors and so on: this way you have more control over the effect.
First I merged directly the sword render pass, added a color corrector and merge with darken blend mode to adjust the color, then sword gradient pass helped me darken the bottom of the sword, blending it in multiply mode. Finally I added another color corrector to accentuate the cavities and the desired glow node in normal mode and half blending (fig15).


STEP 6: Final touches
Normally when I make a 3d image I don’t start thinking in the background image till I finish the most of the composition in Fusion. I decided to make a semi-sphere like object and textured it within Mudbox. Then I made some color gradients in Photoshop and add an alpha to the image so I could make a perfect crop in Fusion.
Within Fusion I added twice the ambient occlusion pass of the floor to get stronger effect (fig16).
Finally I adjust the color in Photoshop and add a border to polish the image (fig17).


I hope you find this making of useful!

About The Author
You might be interested in