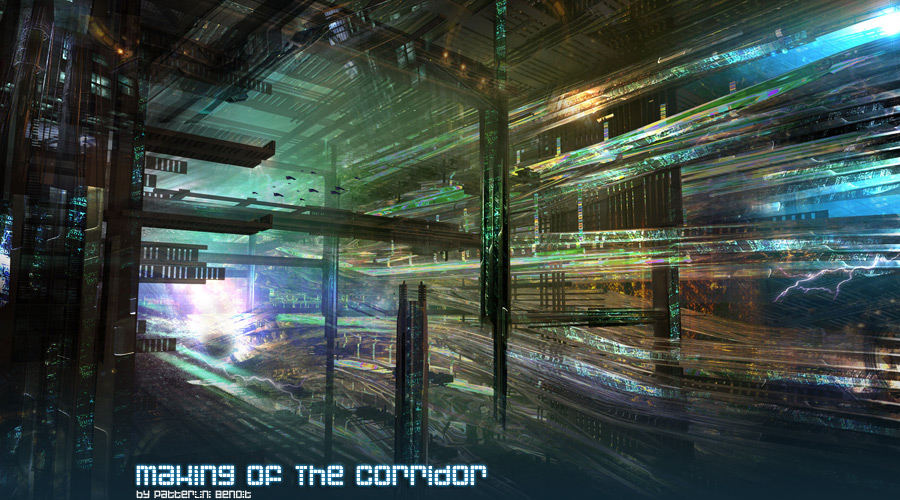
Making of The Corridor
On this project I used lightwave 3d for modeling.Lightwave is really good to design amazing and organic shapes.
InfoI wanted to create a spectacular sc-fi scene with architecture. On this project I used lightwave 3d for modeling.Lightwave is really good to design amazing and organic shapes. First I modelise the whole shape such as the glass structure on the right and the metal structure all around it. |
|
 |
 |
| Shows you the glass structure ( in grey ) and the metal structure ( wireframe black ). | Shows you the wireframe. I modelized 4 or 5 different elements, than i modify and duplicate them to create this big glass structure. I was inspired by squids and octopussies for the whole shape. |
 |
 |
| An other detail from the glass structure. | The metal structure is made of simple elements duplicated, they compose an intricate structure which gives dynamic lines for the final camera. I wanted to create a structutre like the famous architect Renzo Piano. He works with simples elements and gives to them a fonction which create an attractive shape. |
| This structure contrast with the organic glass shape. | |
 |
 |
| You can have a look on details, they show you the simple design of the structure. | |
The camera choiceThis step is really important and decisive in my work.The camera defines the forground the second ground and the background.I mean, in this way , I modelize details for the forground and add some new elements which are going to create an attractive point in the picture. The second plan is the one where the story takes place: the glass structure. The back ground is simplified ,because it is not necessary to have the same detail than the other grounds. Underneath, you can see the different cameras selected for the second step. |
|
|
|


TexturingI wanted to explore different elements in this scene, such as glass, metal and energy. The main textures are simple but they have to be real. For the glass, I wanted to have a perfect transparence with the good refraction index. For the metal, I wanted it to be really rough. For energy, I wanted to mix fire glass. Then, I added metal elements in the glass structure. Thanks to maxwell render, I can create basic materials really realistic. |
|
 |
 |
| Structure material is a standard material in maxwell. | Glass material |
 |
|
| Material used for energy ( incandescent ). This is a material from maxwell database on internet. | |
Lighting and Rendering.Thanks to the multilight the lighting with maxwell is very cool.. You can have different renders with the same multilight file. Each lighting source is a distinct canal which can be turn off or on and increased to 1000 percent. The render time is not really fast, but with patience you can have several athmospheres (night an day) for the “same price”. If you want to render with Maxwell you must have a good computer, as a quadcore. But the render time is about 24 hours!!!! When I want to render fast, I use fprime from morley plug-in for lightwave. |
|
 Render options in maxwell |
|
|
I render thus several layers, also multi-alpha channel and z buffer channel.
Here, render with all emitters: |
|


|
This layer is the basement for the final compositing in photoshop. |
|
 |
 |
| Render layer: only one emitter with incandescent on the right | Render layer: just with sun light. |
 |
 |
| z buffer: this one is very important to add atmosphere and effects in photoshop. | Multi alpha layer. This one when I want to recolor and edit each different material. |
Post editing with photoshopNow with photoshop, Icreate the picture.It is very easy to create a story with photoshop. It offers good compositing options and higher end editing tools than 3d programs. When I work with psd, I feel like a DJ mixing a set.I sample light effects, depth of field and reflection effects all thanks to layers. I write psd scripts to increase my productivity and reduce the needless repetition that prolongs the process.
I isolate each render layer and contrast it using luminosity /contrast, after which the desaturate option is used a little on each layer.
I add depth of field effects thanks to zbuffer channel. I had a mask layer: You have to create first a mask layer. After, you copy the zbuffer and click to select the mask with the alt fonction key. Third, you paste the zbuffer layer in the mask. |
|


|
Now, you can create a sc-fi atmosphere with fog and light effects.
We can add architectural details and light effects:
For this step, you have to create your own detail library, which can be a combination of your old 3d works or photographies with your camera. You mix them with differents fusion fonction layer,and that’s the way to have an interessant artwork.
The corridor.
About the author:
Take care and thanks to 3dm3 crew. Profile: http://noart_1999.3dm3.com/ |


 Patterlini Benoit aka noart: I am a freelance architect working for a variety of international compagnies in Paris. I have been a fan of comics and science fiction since I was a child, and I hope to have my comic art published in the future. Although a commission will often start with lightwave 3d, a computer graphics program for 3d modelling, animating and rendering, photoshop is the most important tool in my workflow.
About The Author
You might be interested in