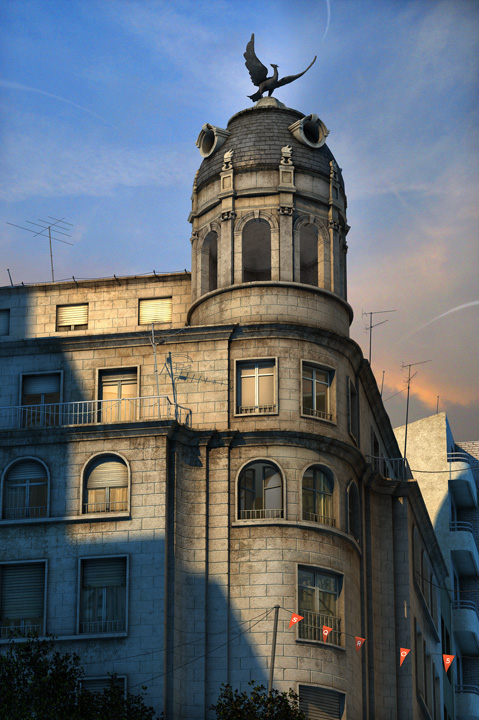
The Making of Phoenix building
In this tutorial I will go through my usual workflow with simple steps (trying to make it as simple as posible), to build a scene, from the preparation for the project (Pre-Pro) untill the final render, as always using Discreet 3D Studio Max, for the modelling, mapping and lighting, and Photoshop/Bodypaint for the texturing based on the great 3D total collection of textures.
 |
||||
 |
September 19, 2005 | Stryker In this tutorial I will go through my usual workflow with simple steps (trying to make it as simple as posible), to build a scene, from the preparation for the project (Pre-Pro) untill the final render, as always using Discreet 3D Studio Max, for the modelling, mapping and lighting, and Photoshop/Bodypaint for the texturing based on the great 3D total collection of textures. A good habit from the beginning is to create a special folder for the project, another subfolder for the textures and another for the references.
|
 |
 |
 |
 |
||||
|
I start with the modelling extruding the floor of the building, then I make cuts on the geometry with the “slice plane” tool or also the “cut” tool, and then I extrude the in negative to make the windows, each time I finish the modelling of one of the elements I also finish the UV mapping, I don’t like to accumulate the UV mapping for the end, a couple of parragraphs below I will explain briefly my tecnic with the mapping. In this kind of symetrical buildings is very useful to apply the “symetry” modifier, in this way we can save a lot of time and work also this guarantees the perfect location of the windows in both sides. If the composition of the reference picture satisfyes me, i usually lay the 3D model over the picture as perfectly as possible, in this way I can fix proporion issues, with the hotkey “Alt X” I make the object transparent to make the overlaying easier. |
|
 |
||||
 |
For the antennas and cables I usually model it with renderable splines, making sure that I activated the automatic mapping, I also watch my the poly count, I know for experience that a cable of 4 spans is enough if its going to be from a medium/far distance of the camera.
|
 |
 |
 |
 |
||||
|
For some reason I found more simple to deform the bird neck with some bones, and a skin modifier, in this way I could move the bones in a interactive way to decide the final pose of the animal, (always using the rendering camera, so it has more strenght in the composition. |
 |
 |
||||
 |
The mapping is without a doubt the heaviest and most boring process when it comes to creating the scene. It is a necessary but not too creative step, also the UV maps are not something spectacular to show around saying “Hey check out my cool UV map”. But in the long run, uvmapping it’s more like a puzzle game. (it has its charm). To describe briefly my mapping process, you just have a few simple rules: 1 – You should not have overaying UVS EVER. A good way to begin the mapping, is using planar maps to unfold the object and then stitch the individual pieces together, also you could equally stitch the pieces from an automatic mapping, I assigned the hotkey”S” for “stitch” in that way I can select an edge, and hit “S” and I can stitch pieces really fast. Always remember that if you put a lot of efford into the Uvmapping it will be less likely to have problems ahead once we painted the textures in Photoshop.
|
 |
 |
 |
 |
||||
 |
When I have all the geometry modelled and mapped I bake the Mental Ray ambient oclussion map, I usually end up using that map as a dirt map, this map is very very important because I use it as a base to fake the GI, reflection masks, specularity masks and transparence masks, (when it comes to cristals and windows). The mentioned “baking” can be done with the “render to texture” in Max7, which is finally compatible with Mental Ray Ok! lets think that we dont want or we dont know how to bake the ambient oclussion map (maybe you have not Max7) what we can do is use it on the diffuse level slot of a ONB shader (making the roughness 0) We can combine the layers in Photoshop, underneath the color, then the baked AO, in “multiply” mode and in top, in “screen” mode the capture of the UVmapping which we can obtain thanks to the free plugin Texporter. The next task is to include the textures that I have choosen from the colection of 3dTotal, in the mentioned layer of color making them overlay with UVmap capture from Texporter, normally I also use photographics maps in grayscale which you can find them in TotalTextures Volume 5th, include this layers on a top layer so you multiply them. Naturally you have to make a lot of touch ups with the Photoshop brushes by hand, so you can paint non mathematic dirt, cracks, and something like that in the building, I also highly recomend a graphic tablet, I use a Wacom Intuous 2 A5.
|
 |
 |
 |
| It is very tough to make the textures overlay perfectly with the model if you dont have good continuity on the UVs, what I mean by this is that if the uvs have not seams you could always use Bodypaint so you can paint directly into your model or use the clone stamp as well. I usually bring the model to bodypaint to make the final touches adding dirt in those places where the math calculation of AO does not happen, for example, the oxide rake that leaves the rain under the iron elements. |  |
|||
| To light the scene I decided to use a target spot light very far away from the models with area shadows on with a yellowish-orangish color, I activate the ambient lighting on Vray with a little blue color, I also activated the GI with some predefined values (I think the preset “High”) on the irradiance map.
As always,I modeled the shadow casters with the help of the “light” viewport (Shift+$) so the shadows are projected exactly in the desired place. |
 |
 |
||
 |
Finally I start the render at a 3000 px resolution and adjusted little details in Photoshop, like levels and a couple of brush strokes in the sky as a “final touch” as always I conditionated all the work as a result more approximate to an illustration where the focus is the beauty of the form and color instead of an accurate representation of the building. All the textures of this image were taken from the huge colection of total textures of 3dtotal, the color maps, the bricks, wood and concrete as well as the dirt maps. 
3DM models creation
|
 |


