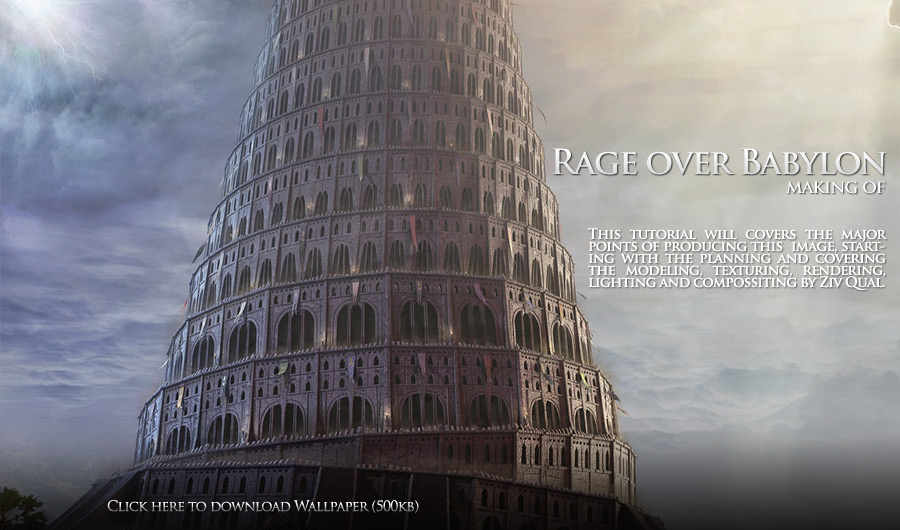
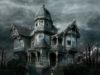
The Making of Rage over Babylon
This tutorial will covers the major points of producing this image, starting with the planning and covering the modeling, texturing, rendering, lighting and compossiting.
|
10 November 2006 | edit by Stryker
Rage over Babylon was made for CGSociety’s contest “spectacular” and won the grand prize. This tutorial will covers the major points of producing this image, starting with the planning and covering the modeling, texturing, rendering, lighting and compossiting. I will also share a few tips and tricks as I show the process.
When I first read the contest’s guidelines I immediately knew that my entry will have to portray something very detailed, with lots of things happening and with the sense of scale taking a major role. I took a week just to go through several ideas and when I locked on my idea I started “sketching” out the composition in my mind to the finest details evan before I set down and started working on the concept sketch. That happens to me quite often. After I get an idea going in my mind, I’ll already have most of it planned out before I evan start on it. Once I knew I was going for the Babel tower, the first thing I did was to go through as many references as I could to get more inspiration about the architecture, atmosphere and evan specific props and details. I went through films such as LOTR and Troy several times to get ideas on which items would fit the scene. I knew I would have to make the city very small compared to the tower to enhance the sense of scale and I knew this image needs to hold up the details in high resolution, this meant I really have to come up with allot of different items and allot of variations for them. One of the challenges was to avoid having anything look duplicated – each flag on the tower was hand tweaked, I made over 100 different vase types ( 10 different textures X 10 different models with different stretching), most of the textures had dirt masks as map channel 2 and were tweaked after positioning so that textures wouldn’t be repetitive either and so on. Another major challenge I knew I’ll have to face was the hardware issue. 32 bit shows it’s limits when you are working with millions of polygons and hundreds of textures and especially when you are trying to render them. I knew this will be a major issue (and it was, my renders really crashed over 100 times because they run out of memory!) so I realized compossiting was the key here. I planned ahead to break the scene into smaller parts and render lots of things separately and then composite them together in the end as I will describe later on. |
 |
|||
|
Iam covering the modeling and texturing together because I realized that in this case it would be better to texture everything I model right after I finish modeling it instead of first model everything and then texture everything. The tower – Here’s how I basically built the tower – * I’ve started with a base model, I made sure its all quads there so that I could easily tweak things later on. it has around 2500 polys. * next up, I added meshsmooth modifier, changed it to classic SD and set it’s strength to 0.15 so that the edges would become slightly chamfered (I often use this technique to automatically chamfer edges quickly, when I know I am done modeling I usually delete the modifier and do it manually to save on polygons). model has around 10,000 polys. * here’s where the symmetry modifier takes a big role – I’ve added four symmetry modifiers, each one has double the angle than the one below it to make the wall go evenly round. The model stands on around 150,000 polys * after the base level was ready, I used array to clone it 20 times ontop of each other with each level non uniformly scaled. One important thing to notice is that I made the cloning as INSTANCE and that makes a big difference on the hardware calculations. the tower stands at around 3 million polygons. * I slightly rotated all the floors so that the tower would seem to go spirally. After that i’ve started working on each floor locally to make variations in the details. I broke the instances on the lower floors but kept it on the upper floors. When I added the details, I only needed to work on one part of the floor and the rest would update automatically cause of the symmetry. To save as many polygons as I could, I ended up breaking the symmetry and deleting any polygon that wasn’t really visible to the camera. I also removed the meshsmooth modifier and chamfered just the visible edges by hand. I ended up adding more details but going down to about 2 million polygons. * when I was done, I scattered the flags and torches by hand and worked allot with masks and mapping channels to make variations in the tower’s textures. The props – Like I said earlier, this is a massive scene, and in order to keep it interesting and not repetitive, I needed to make a very wide range of objects, buildings, trees, people and animals. I am not going to cover every single thing I modeled, just a few interesting points – * I’ve made 9 different variations to the bricks that make the well so that evan the bricks won’t look the same. * Before scattering all the flags, I’ve prepared a bend and a twist modifiers to them so that no 2 flags will look the same,I’ve * also made allot of actual symbols that represents the different cultures. * The temple is modeled pretty much the same way as the tower. it was placed right in front of the tower to enhance the Sense of scale – notice that it is four stories tall and yet it doesn’t reach the height of one level of the tower. * I’ve made variations in the fire parameters of each torch, and I also changed the color and intensity of the lights they emit. * I gave all the characters a basic rig so that I could pose each one differently. * As I already mentioned, the vases have over 100 combinations. The mapping is the same in all the vases so that each vase model can go with 10 different textures and with different stretching (non uniform scale). The materials – I’ve been asked allot about the materials. Evan though I used mental ray, the materials are actually pretty Basic. Almost all the objects in this scene have the max’s standard Multy-layer material. I like to use the multy-layer shader simply because it gives me control over the diffuse LEVEL (not color) and because it gives great control over the specular. most of the objects have matching color maps, diffuse level maps, specular maps, and bump maps. I often used mix maps with masks with map channel 2 (and sometimes 3) so that I could easily change the mapping of the masks differently for duplicated objects to create variations easily.
|
 |
|||

|
First of all, I’m going to talk about the biggest challenge I’ve had to face when I worked on this image – rendering it. Right at the planning stage, I knew I am going for way more details than what my computer can render at once, that meant I had to plan where to break the composition into pieces and render each piece separately. It meant I had to first prepare everything in the viewport and at a certain point decide that the camera angle and general lighting setup are final. After I did that, I’ve started working on two main parts separately. in the viewport – the tower and the city, both parts had to have the same “connection point” which was the first 2 floors of the tower. Besides some effect passes, the tower was pretty much rendered at once, but the city was more complex than that, it had too many polygons and textures to be rendered at once so it was rendered in pieces as well – the city, the market, the ocean, trees and effects. It was quite nice to put everything together and see that things actually worked after I finished rendering all the pieces. The renders crashed allot because of memory run outs and it was a relief when it worked out because I was on a tight deadline. when I had all the geometry rendered, I started rendering a few different passes to enhance the image at the compossiting stage. The main passes I rendered were occlusion (you can see here how I work with an occlusion pass) for the city and the tower and dust for the city and the tower. When I rendered, I didn’t really use any of MR’s fancy features. To light the scene, I mainly used MR’s Area lights because they give excellent soft shadows and work well for large scenes. I used 2 main lights from the left and right to set the warm / cold contrast and about 5 fill lights with variation in area size, color and intensity. |
|

 |
||
|
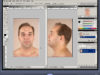
Photoshop took a major role in this artwork, this part covers it. The first step was obviously to put all the geometry renders together, flatten the layers and add the effects layers. once I did it, I had a better view on the entire composition and I could start doing the final color correction. This is something I do with every artwork I make, I start with levels or curves and then I go through color balance to make the general adjustments. after that, I like to use selective color. I like selective color because it gives control over every color separately. and allows to make some changes to a smaller range of colors without changing others. Another trick I like to use often, is to add another layer ontop of everything and paint the general colors I want in each part of the image, then set it to soft-light and lower it’s opacity. This is usually among the last tweaks I do to an artwork. There’s quite a bit of paint over work in this piece. The main things I painted over the renders were additions to the skies, the raging lightning effects, the birds and the additional cracks on the tower. I did the paintovers using edited photos and custom brushes. Ultimately, the skies needed to justify the lighting, being cold on the left and warm on the right which also symbolize the two sides of god. The additional cracks that were added are meant to suggest that the tower is just about to crumble into a bit pile of bricks and dust, same goes for the birds who fly away to the warmer side. I would like to thank all the gr8 M8’s over at the forums who supported me in those two months of free-time working on this (you can checkout the WIP thread over at CGSociety). The hard work sure paid off, besides the CGS grand prize, this artwork has also been on the cover of CADESIGENR and PIXEL magazines, It was selected to be shortlisted on 2006’s CGOVERDRIVE, and won rank one in animago among other things.
3DM model creation |
 |
|||
 |
 |
|||
 |
 |
|||

About The Author
You might be interested in