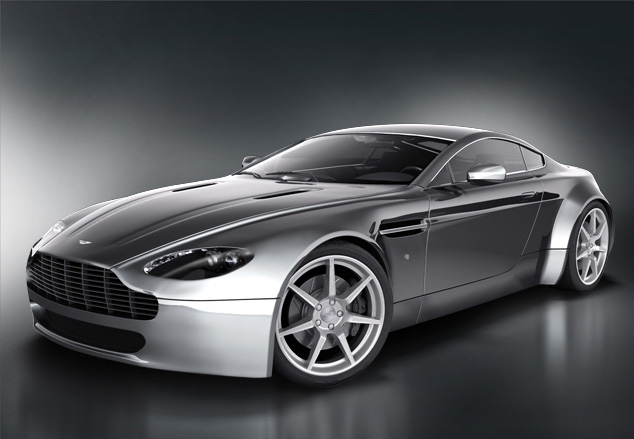
Making of Aston Martin V8 Vantage
This model started as part of a school assignment in a course I took a couple of years ago, which focused on hard surface modeling
Introduction
This model started as part of a school assignment in a course I took a couple of years ago, which focused on hard surface modeling. After the course was done, I didn’t feel like working on the car again, since I thought it was finished and presentable (and besides, I had so many headaches modeling it that I didn’t want to see it again!) Anyway, a year later I decided to re-render it for my portfolio and I discovered a few mistakes, which I fixed. At the time I didn’t notice that it still needed much more fixing and I didn’t touch it for yet another year. So a few months ago I jumped back into the project and found out how much re-modeling, re-texturing and “re-everything” it needed ?
I wanted to make a better render, first using HDRI with backplates and then I wanted to take it further with a studio lighting rendering.
Since the focus of this project is on lighting and rendering, I will leave the modeling part brief. You can find many tutorials on the web about car modeling.
STEP 1: Modelling
Before starting any project, I collect reference about the subject I’m going to work on either for inspiration, or in this case, for accurate modeling (Fig.01). For me, having as much reference as possible is very important as a modeler, since the more informed you are, the better and easier it is to get it done.

FIG1 (REFERENCE)
The modeling method used was the one we were taught in class by the great Tom Meade. First, we started with a spline cage (Fig.02), which was then used to create the NURBS patches one by one (Fig.03). The most important part is to have good continuity between the patches, as well as clean topology. Of course, the advantage of using NURBS is that everything is always four-sided.

FIG2 (SPLINE CAGE)

FIG3 (PATCHES)
After that was completed, the patches were converted to polygons for final detailing, like adding extra loops at the edge of each the panels to keep them tight (Fig.04). Also, most of the smaller details like the rearview mirrors, windshield wipers, tires, etc. were done straight in polygons. NURBS is very useful if you are doing nice, curvy surfaces.

FIG4 (DOOR PANEL EDGELOOP)
STEP 2: Texturing
Since the car is mostly composed of shaders and a few textures, I spent most of the time tweaking Maya’s mental ray shaders. For the car paint, I used the mi_car_paint_phen shader and I did many test renders to get it just how I wanted it (Fig.05). The best way to use this shader is to make little changes as you do test renders. If I liked one particular configuration, I would duplicate the shader several times and kept testing on these duplicates, so that I would always have it in case I wanted to go back to it.

FIG05 (CAR PAINT)
As for the wheel rims, windows, lights or basically anything with any kind of reflection or refraction, I used the mia_material_x shader. Once you know what the values mean, it can be tweaked to a variety of materials, like glass, plastic, metals, etc., and it has the advantage of coming with a bunch of presets in case you don’t know where to start (Fig.06).

FIG06 (PRESETS)
STEP 3: Lighting:
My focus then became the lighting of the car, which in the beginning was my main goal for reworking the car. After seeing lots of beautiful car renderings, I found out that they were based on real-life studio lighting setups (Fig.07). As you can see, these setups are all different from each other, with all types of lights and backgrounds. So there is no “golden setup” that can be used for every render you make.

FIG07 (REAL STUDIO SETUPS)
After a bunch of research on the net, reading 3d car forums and tutorials, and lots of experimenting with area lights, light cards, and HDRI studio images in Maya, I decided to take a simpler approach by using a black and white gradient to light the scene. This method was suggested in a couple of forums, and it was the result was satisfactory. So in the end, I used a gradient and a soft spotlight on top of the car to light the car (Fig.08). Sometimes less is more ?

FIG08 (Car, background and spotlight)
In order to set up the gradient, you have to open the Render Settings window, go to the Indirect Lighting (make sure Mental Ray is the current renderer) and click on Create on Image Based Lighting under the Environment rollout (Fig.09).

FIG09 (Render settings and IBL window)
After that, change the Type to Texture and create a Ramp .The most important part is setting the V value for the white part of the gradient above 1 so that it has the strength to light the scene (Fig.10).

FIG10 (Ramp)
As far as the spotlight goes, it is set far away from the car in order to get almost parallel rays (as it is with a directional light), with a low intensity and soft raytraced shadows (Fig. 11).

FIG11 (Spotlight settings)
STEP 4: Rendering
The rendering consists of just 2 passes: one for the car and the other one for the shadow on the floor, which is just a cylinder with a neutral gray material. For the car pass I just rendered everything, floor included, and then rendered out a mask of just the car by itself, so that I could later isolate it from the background. In order to get the mask, I just deleted the floor and assigned a Lambert to the car model with Incandescence set to white and rendered that out (Fig.12).
I made the shadow pass by assigning a Use Background shader to the floor. This shader was used to “catch” the shadows below the car. The advantage of it is that it also “hides” the floor from the final render so that you only have the shadows to work with, which are stored in the alpha channel so just make sure that when you save it that you use a format that saves alpha channels, such as Targa or TIFF. Also, in order to just get the shadow and no car, I selected the car model and set its Primary Visibility to off. I could have also have assigned a Lambert to the car model and set its Matte Opacity to Black Hole, which in turn would have cut out the car’s shape out of the shadow, but I decided that I wanted the entire shadow below the car because I was having issues with a thin white edge showing up between the shadow and the car when I did the compositing in Photoshop (Fig.13).

FIG12 (Car mask and lambert)

FIG13 (Shadow pass)
The rendering settings are shown in Fig.14. Final Gathering Accuracy is set to 600. It is important to notice that I changed the Multi-Pixel Filtering from Box to Mitchell, which results in nice, crisp edges.

FIG14 (Render settings)
STEP 4: Compositing
Compositing was done in Photoshop. It was simple, just requiring the few passes I mentioned before plus a background I painted (Fig. 15). Of course, I did some color correction, and a bit of levels correction, as you should do with any render you make! On the figure below you can see that I also did a few fixes, like adding a reflection on the headlight, which I thought would give it a nice touch. Also, I lightened the rim cap and the blinker on the front fender. All of these could have been corrected in Maya, but since this was a still image, it was quicker to make them in Photoshop, especially the headlight reflection, which would have required lots of testing in Maya to get it right. So yeah, I believe that most, if not all of the professional renders you see around have a lot of Photoshop done to them. And it’s not a bad thing at all: it’s just a tool used to improve your renders!

FIG15 (Compositing)
The final renders are shown on Fig. 16. So, in conclusion, I learned a lot by working on a model from the first polygon in 3d to the last touch in Photoshop. Every stage is completely different from the one before. Modeling is all about observation and studying the subject. Texturing is about understanding the materials: what they are made of, how they reflect light, their properties, etc. Lighting requires lots of patience, hehe, because you’ll be doing lots of test renders! And rendering and compositing are the last steps where you bring everything together to make it nice and shiny
Hope you enjoyed this Making Of and feel free to e-mail me if you have any questions or comments.

FIG16 (Final renders)


