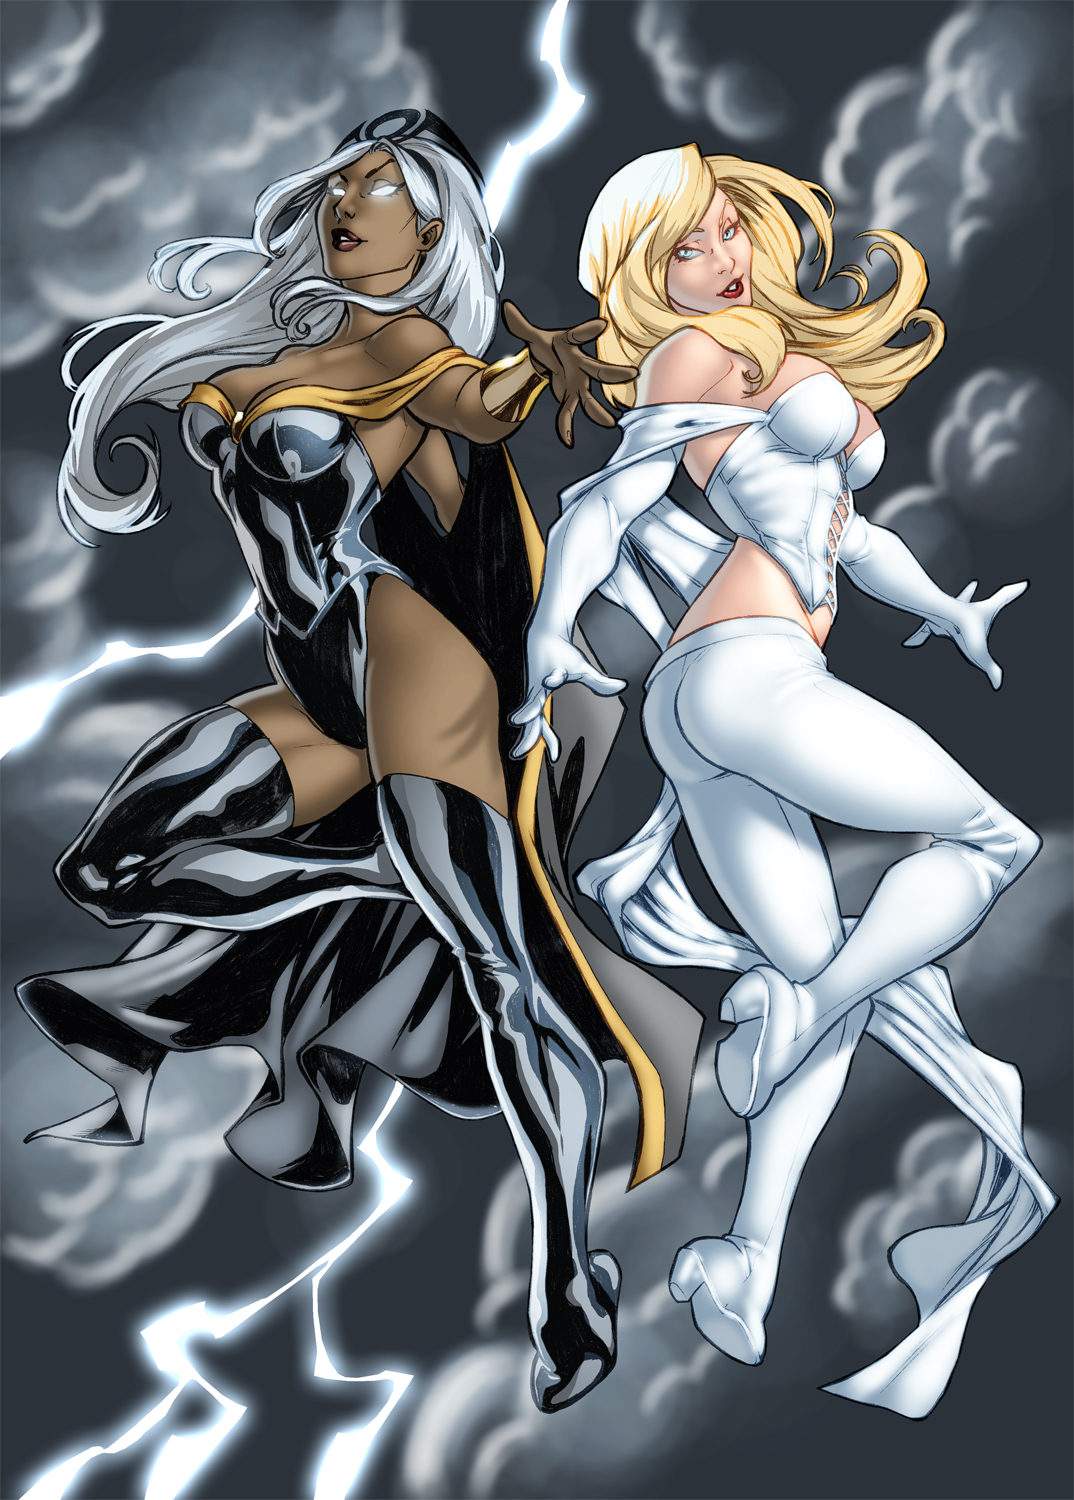
Tutorial “Coloring classes:Emma Frost and Storm (Part 1, 2)”
First off I would like to welcome everyone to this tutorial on how I currently color images. I hope you find this tutorial helpful!
Part 1 : Preparing Line Art & Flats
Introduction
For this tutorial I will be using Adobe Photoshop CS4, although every tool I use can be found in Photoshop from version 7 up. I will also be using techniques and methods that I feel most comfortable with when coloring. I suggest that after following this tutorial, you find out what works best for you.
This coloring process can be done with a mouse (as my friend Andy Pool who showed me this technique can attest) as well as a Wacom tablet.
Here is a quick explanation of the Photoshop window (CS2) with the names I’ll use throughout the tutorial (Fig.01).

Fig. 01
Preparing Your Line Art
So you’ve found the line art you want to color, or someone just commissioned you to color something for them. You open the drawing and you realize that the contrast between the white and lines isn’t very good, or in the case of this piece (which was done directly from pencils) it’s usually got pencil lines or the lines are too grey. Luckily the artist who drew this image, Carlos, has very tight pencils, but to give it a bit more contrast, let’s do the following:
Go to Menu > Image > Adjustments > Levels (Fig.02).

Fig.02
In the pop-up window, introduce the following settings (Fig.03):
Channel: RGB
Input Levels: 68 – 0,72 – 208
Output Levels: 0 – 255
Now your line art is darker and more defined. This technique can be applied to any line art, whether inked or penciled

Fig.03
Next, go to your channels window, which can be found with the layers window. Or you can open it by going to your menu and Window > Channels. Select the Blue Channel and right click to choose “Duplicate Channel”. (Please note: I like to work in RGB mode and then change it to CMYK at the end)(Fig.04).

Fig.04
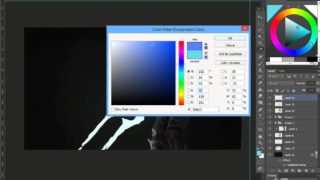
In the pop-up window put the following settings (Fig.05):
Name: Outline
Color Indicates: Spot Color
Color: Black
Solidity 100%
Select the RGB channel at the top – this will select all of the channels except the new outline channel – and fill it with white. Make sure the outline channel has the eye next to it, then go back to the layers window and you’ll see that the outline is there. Now, no matter what you do on you page, nothing will happen to the lines/inks (Fig.06).

Fig.05

Fig.06
Now your line art is ready, and this is a great way to always have a backup of your lines. It also makes the file a little lighter. I do however have to point out that if you save a flattened image the way it is now, the line art won’t show up, but we’ll come back to that part later on.
Flats
For those that don’t know, flats are what a colorist uses to select different parts of the art without affecting others. Although this is a very tedious part of coloring, it saves you a huge headache later on, as we’ll see. Sometimes when working with a larger publisher or team, you might receive the pages with the flats already done, but since that isn’t always the case, let’s work on that too.
Normally all the flats are done in one layer (the background layer for example), but since we’re going to be creating the background, it’s best if we put the characters on one layer and the background on another. This is done easily – in the layers window, press the “new layer” button found at the bottom of the window. This will create a new layer; let’s call that layer “flats-characters”. Now double-click on the background layer, click ok and rename it “flats-background”.
Make sure the “flats-characters” layer is selected before continuing to the next step.
Now we start laying the flats using the Polygon Lasso tool, which can found in the tools menu (Fig.07). Select the tool, zoom into your line art and start selecting along the lines. Be careful not to select outside the lines; it will make it all look messy further on. And make sure the settings in the sub-menu are as shown in Fig.08.

Fig.07

Fig.08
The process is simple: click along the lines until you have the object you want to fill selected and then fill it with the paint bucket tool.
A quick word about the way I prefer to do my flats. I pick the color that’s going to be used most on the character and fill in my whole character with that color, as seen in Fig.09. This way, when I want to add the other colors, I can select more loosely. If I select a boot very tightly along the leg, for example, and then select part of the background, when I click with the bucket on the boot, only the parts with the same color will fill with the new color – the background won’t be affected. This can be used with all your flats.

Fig.09
Now, use the same technique to lay down all your flats on the characters and then do the same on the background layer until you have something similar to what I have here. It doesn’t really matter what colors you use here, because you change them at any time (Fig.10).

Fig.10
Part 2 : Creating The Background
So you’ve got your line art prepared and your flats are laid down… where to go from here? What I generally like to do, is finish off the background first. That way I define all the light sources and colors that will influence the page.
In this piece the artist has left us without any concrete background and I thought that instead of just adding a gradient or simple background, we could create a background. And what better background then some storm clouds (because of Storm of course!)
So to start, let’s turn off the character flats layer and the line art, which basically leaves us with the background flats (Fig.11).

Fig.11
Creating The Lightning

Fig.12
Select only the lighting by going to your flats layer and using the Magic Wand tool with the settings shown in Fig.13.

Fig.13
Go back to your Lightning layer and fill the selected area white with the paint bucket tool, or by pressing CTRL + Backspace (if white is your background color) or ALT + Backspace (if white is your foreground color).
Next right click on your layer (in the layers window) and select Blending options (Fig.14).

Fig.14
In the pop-up window go to Outer Glow and use the settings as seen in Fig.15. Click OK and that’s your lighting do

Fig.15
Creating The Storm Clouds
So now we want to create volume in our background, so let’s get cracking. Create a new layer above the flats layer and below the lightning layer and call it “Clouds”. Fill that layer with a dark, grey blue color as seen in Fig.16.

Fig.16
Select the brush tool and choose a hard round brush from the list, with the following settings (Fig.17).

Fig.17
Now, using a lighter blue, lightly create some random shapes to give some form to the clouds. Remember to vary the size of the paintbrush and try not making it too logical – clouds aren’t geometrical. (For those that have a Wacom tablet, you can change the size of your brush with the “[“ and “]” keys.) The results of this can be seen in Fig.18.

Fig.18
Fig.19 shows the contours that we’re going to follow.

Fig.19
Now, pick an even lighter blue and start creating volume along the shapes you created in the previous step (Fig.20).

Fig.20
Something to keep in mind: the clouds have more volume where the light hits them and fade off the further from the light they are.
Now we’ve got nice fluffy clouds, but to give them even more definition, select the color white and go back in with a smaller paint brush. Just follow the contours of the clouds, varying between large and small curves.
Next you go back in and do the same thing in some of the lighter parts of your cloud (Fig.21)

Fig.21
At this point your clouds are basically finished, but if you feel they’re a bit rough you can blur them a little by going to the top menu and going to Filter > Blur > Gaussian Blur (but be careful not to overdo the blur).
Also if you want to tweak the contrast of the clouds, then, also in the top menu, go to Image > Adjustments > Brightness/Contrast.
I did just a little tweaking with those two options and then I turned my line art and character flats back on, and the result I had so far can be seen in Fig.22. (Don’t worry about the lines destroying your great lightning; we’ll fix that later on!)

Fig.22
Stay tuned for the next part in the series!


About The Author
You might be interested in