Making of Waiting
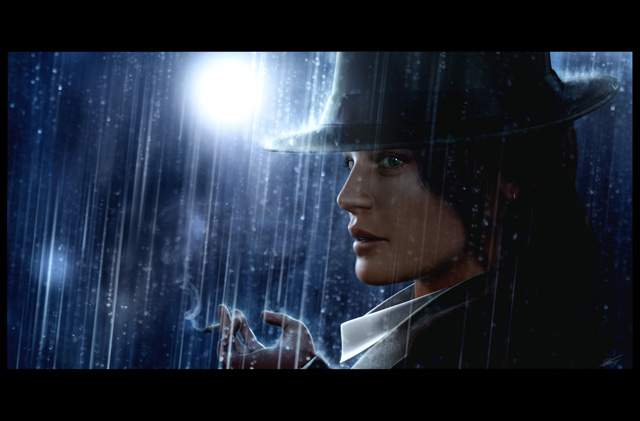
The idea behind this was to create a render that looked like a still image from a film noir movie.
Introduction
Hi everyone! Quick presentation of the project before starting. The idea behind this was to create a render that looked like a still image from a film noir movie. With that in mind I pictured a woman, standing, waiting for something, someone?, in the rain. I took this project as a way to learn and experiment new techniques (I had never really done a woman in 3D, textured the way I did for this etc.).
Few specifications; everything was done in 3dsmax and Photoshop and was rendered with Mental Ray. No real limit poly wise as this was done only for a still image. The textures were done in 8k and 16bit color depth and the final image was rendered at a 5475 x 3600 resolution (I really, really love HD…).
STEP 1: Modeling
First stop, modeling. For this project I didn’t do anything fancy with the modeling and everything is pretty straight forward. I used the good old poly by poly technique. For the head, I know alot of people start with the eyes but for some reason I prefer starting with the nose. I just layed out a couple of polys to get a very rough nose shape and moved on to the eye socket, mouth, etc. It started a bit generic looking but with lots of tweaks using smooth selections I started defining a bit more the aspects I wanted the face to have. I didn’t have anyone’s face in mind so I experimented with different versions by using morph targets until I found something I liked. This took quite a while but was also quite fun!

The same technique was used for the rest of the modeling process, always starting with a simple quad.

STEP 2: Texturing & Shading
For the texturing process I used a collection of head photos I bought on 3d.sk a few years ago. To create the head texture I decided to test a projection technique. Let me first say that there is probably an easier way to do this using projections but, I don’t know it (feel free to contact me if you do!) so I kind of worked myself into this not really knowing how it would work out. My technique consisted of unwraping the UVs like a normal UV layout but also unwraping them from a front, side, back, under and top view. On each UV layout I assembled bits and pieces of the photos I had, in Photoshop, until I had a full head for each view. I then switched back to 3dsmax and baked each view on to the final UVed head. All I had to do then was assemble the baked results in Photoshop to make the final texture. It might seem a bit of a pain to do all of this but it’s the easiest way I found to prevent stretching on textures.
I used this map as a base to do the bump and spec map.

The shirt texture was done using a simple fabric texture I found on the internet and painted the details. The coat and hat textures were done procedurally with the same fabric texture used for the shirt as a base.
For the shading, I used the Mental Ray skin shader for the head and hand and the Arch&Design for the clothing. Not much to say expect that it’s really important to take some time to test the different options of the shaders to really get what you want. When starting work on a new shader I always deactivate everything and put every parameters back on zero and play with them one at a time, even on shaders I know and have already used. This way I can really test out everything again and make sure I « know » what I’m doing. I remember when I first started 3D, it was a real pain for me to do shader work but now, I really enjoy it.
STEP 3: Lighting, rendering & post
Lighting wise, I just used spotlights and a tad of final gather to « erase » some nasty black shadows near the eye and nose. I knew I wanted a night shot with a nice rim light so I just went and did what I had in mind without really testing other lighting scenarios (probably not the smartest move, I have to admit it).
For the rendering part of the project I decided to explore the power of compositing with as many passes as possible. To do that I broke down the render into the following passes for each object: Diffuse (for all the lights), Specular (for all the lights), Reflections, SSS, Color, Ambient Occlusion and Fresnel.

The renders where done using the default settings in Mental Ray. I didn’t use the Render Elements tab as it wasn’t giving me what I wanted so I created individual materials for each render pass.

I then assembled everything in Photoshop using the transfer modes (diffuse, specular, reflections etc. are « added », color is « multiplied » etc.).
With that many layers I had full control over the image lighting and shaders inside Photoshop and was able to tweak things very easily without having to re-render. The only downside of this was the huge file size and very long saving times for the Photoshop file.
I used this process for every object and after that, I started painting the hair. I started with a really rough pass, using only a big brush to define the mass of the hair on where it was going to go. I then started refining with a smaller brush (still big compared to the final hair size) more strands and clumps of hair and continued refining using smaller and smaller brushes until it got to the point where I was painting each individual hair. To finish, I added some loose hair here and there and reinforced a few shadows to make it less flat.

The character was finaly done and I moved on to painting the background using standard brushes in Photoshop and some photos for the rain and very blurry pictures to add variations here and there.

For the final touches, I rendered a Zdepth pass and used it in Photoshop to add a bit of depth of field. I also added some grain to the whole image to simulate a bit of the grainy look in movies and finally added a photo filter to unify things a bit more color wise. I continued tweaking things here and there until I had the result I was looking for.
To conclude, I’ll simply say that this was a really fun project to work on even though it took quite a while from start to finish. I hope you guys can find some things here and there useful in this brief overview and please, do not hesitate to contact me if something is unclear or if you want more information!
Guillaume Vialaneix


About The Author
You might be interested in