GP2 Modeling, Rendering and Compositing Tutorial
In 2006, I was introduced to Mr. Peter Thompson, owner ofMeritus Racing by Paul McAusland of UrbanImaging. He had recommended my 3D visualservice to Mr. Thompson and from then on I was creating the visuals for MeritusRacing sponsorship campaign.
The visuals I have created required photorealism anddelicate compositing of rendered image to the photography plate.To accomplish the big task of visual realismI used the tool I have been using since 1996 when I started at game design KLightwave 3D. The package has all the stuffs and shaders I need to get the taskdone. Occlusion was new to me at that time and soon as I’ve tried the shaders,the effects on the final renders are clearly the realism I was looking toachieve.Although Lightwave’s internalrendering is very good, the limited time and amount of renders I needed means Ican’t spend 3 hours for one image alone. The solution I had is to use a 3rdparty rendering plugin. With the use of FPrime and its real time renderingoutput, I was able to be productive and meet the tight deadline of submittingthe visuals for sponsorship presentation on schedule.
Modeling:
I was commissioned to create 3d Models for 4 differentformula cars, namely, BMW Formula, Renault V6, A1GP and GP2. I was able tocomplete one car in 10 days total and spent about 1-2 hours a day.
The task of modeling was incredibly time consuming but itwas a lot of fun. I am meticulous and had always been clean with my models, apractice I’ve inherited since starting with low polygon modeling for games. Iused subdivisional modeling since this is far simpler than the precision requiredby spline modeling.
Car out of the BOX
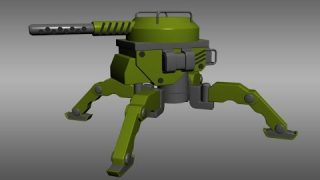
In this article Ichose to present GP2 formula car.
I always treat modeling as if I were sculpting in real clayor marble, whether be it characters, organic form, building, cars etc.With GP2 I chose to start from a simple box withmultiple segments and placed the plan views respectively on XYZ axis for myreference.
First I loaded the blue print of GP2 on to a plane polygons. I prep the modeling windows by opening the Layers, Polygon Stats and Numeric windows on the right hand side. This 3 windows are very important as I can see all the functions I will use. I always starts with Polygon (ctrl+H) and Symmetry on (shift Y). Symmetry is very handy tool as it reflects everything that I do on the right side on to the left side or upper part to down part. It is also important to rememnber to place the object orientation to exact 0,0,0 values at the start for the symmetry to work.

I started with segmented boxes as shown below. This segments aremy control point on how I will mould the basic shape of the car body.

After few tweaks here and there I press “tab” to activate subdivision, below is the basic shape I have created. This will be my working plate which I will modify until I get the finer details.

My modeling technique is very organic, most of it involves extruding and segmenting the polygons by using BANDSAW PRO. This tool is very handy, you can find it under Multiply tabs from the top menu of the modeling window.


I typically use SMOOTH SHIFT (ctrl+f) if I need to extrude faces both inward or outward. The engine funnel is smooth shifted inward and both sides of driver panels I extruded a bit to getprotrusions and shaped it according to reference.

I smooth shifted the top surface downward to carve the driver’s seat.

Sidepod again was created using box, the same process I did with the body. This basic shapes are really quick to create, the most time consuming part are creating details on the object.

More work done on the driver seat, head rest and the inner part refined. This object is clearly symmetrical so just I worked on only one side of the sidepod and copy (ctrl+V) it to the other side on the final stage.

The front wing was again created from the box and shaped according to the blueprint.

Unhide the layer body and sidepod to get the overall view.

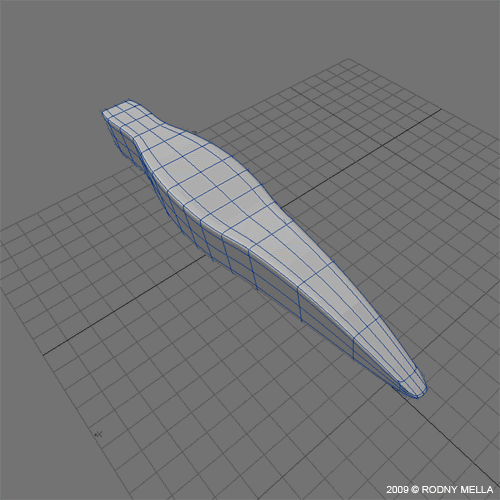
Modeling the wheels
I draw the outline of the wheel mug in Illustrator, it is also important that the drawing is symetrical as you will see in the progress of the model. After I have created the vector drawing I saved it as EPS and imported the EPS in Lightwave with closed polygon & polylines and auto axis drill checked. The image below is the imported object.

After getting the flat polygon, I extruded (ctrl+e) the object. I always like my model clean and seemless so I removed the top polygon and I begun the grueling part of reconstruction, “patience is a virtue” as they say!

To reconstruct the top surface I select four points and press “p” to make polys, four points polygon is always nice and clean to see on models. This is where the correct symmetry I did ealier in illustrator applies. The corresponding points on the outer rim and the inner are in exact same amount, this will give me clean four point polygons.

After reconstructing the top surface I generate new segments so as to get the right amount of curvature, I have culled the segments near the edge so i can get a nice beveled curvature on the wheels.With bandsaw pro tool I can control the amount of segments to use and percentage of distances between eachsegments, see below image. Red line on the middle mean I will get a median segment over my object, where ever the red line lies its how the object will be segmented.
Here below is the non subdivided polygon mug wheel. I have extended the outside of the rim and also the inner side of the rim. I beveled (b) the top rim to get a nice detailed portrusion.

Below is the result after hitting “Tab” to turn the polys into subdivided polygons.

Below with metallic property and textureapplied to the rim.

Completed GP2 tire with rim.

Small parts that are quick to model.

Wheels are all in proper places, the only difference from the front wheel and the rear wheel is the thickness, the rear wheels are slightly fatter.

Mirrors

Camera mounted top engine wings.

GP2 slowly taking the shape without the rear part.

Refining the sidepod, emphasizing the creases, dents and curves are crucial in to making it realistic.


I have extented the rear part and reshaped it accordingly, I added the red color as my clients wanted to see coloration update on the car.

Objects with flatshade colors.

This sidepod funnel took a while to do because of some technical parts. From the vector drawing I imported, I did the same process as the wheel mug. I extracted the shape and after couple of hours I was able to form the correct shape as in the blue print.

To get a proper balance, after modelingone side of the sidepod I copied (ctrl+v) and input value of 0,0,0. This will make exact same copy symmetrically on the right side. Afterchecking and comparing with the blue print I deleted the right side and continue editing the left sidepod.

I added gills on the sidepod funnel.

Sidepod wings added, again created from box.

Below is about 85% done model.

Rear wings added. Noticed the side panel, once in a while I use bolean operation but as much as possible I limit the use as it’s too ugly to look at.

90% done, rearview.

Here’s a quick model of the driver, no frills.

Driver inside the GP2.

100% done, overall perspective view.

The texturing for this object is planar mapping with slight use of UV mapping on surfaces that are placed on curves, specially on the sidepod.

Completed textured solid mapping.

Rendering for Compositing
Below is my global illumination object where I am going to place the GP2 car.

I added the lighting object. This object will be reflected on the car and helmet.

In the object properties I checked the UNSEEN BY CAMERA button, this will hide the actual object from the renders and unchecked cast shadow so that the object will not cast any shadow but will still be reflected on to the object.

Suface texturing
Car texture is one of the challenging object to textures, thankfully lightwave texturing has shaders that deals with this problem. I used angle of incidence, fast fresnel, layers of light incidence under specularity, OCCLUSION for the shades of shadows and so on. Usually its a trial and erroruntil I get the correct feel for the car painting. There are also a lot of preset surfacing on the net and Lightwave forums.

Lighting for this render is very simple, 1 directional light just for the purpose of specular highlights and 1 area light for the soft shadow casting. Both lights are placed on the top of the object.

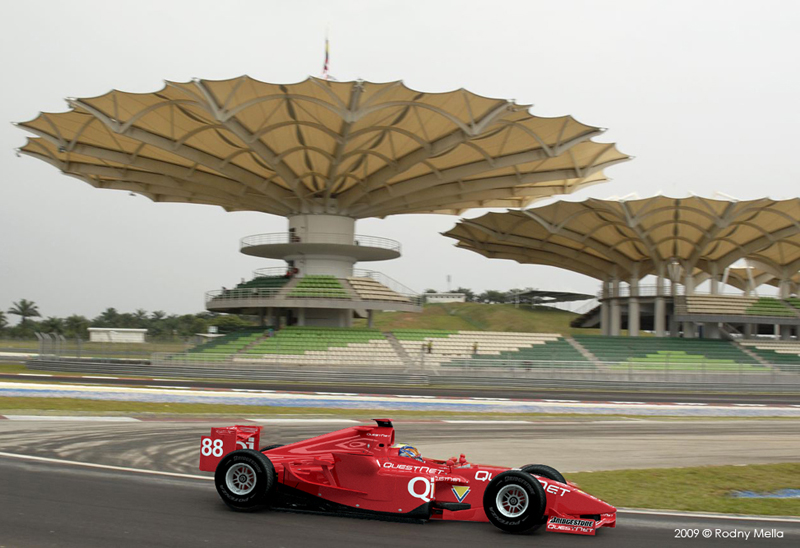
Since I am going for compositing, this means I have a template photo to superimpose the final render. I followed the correct lighting position to cast the correct shadows according to the photo. For the camera, I took the EXIF info from the photo template and applied it to Lightwave camera, I input the same focal distance, focal point, depth of field etc.

After getting the correct values in place I turn on the Fprime 3rd party plugin from WorleyLabs, this plugin renders the scene in real time. Below is the quick render of the object while I am still fixing the amount of lightings, the angle of the camera and focal points.

After making sure I have everything in place, I press enter and create keyframe for the camera. Since I have bunches of renders to do I put the camera and lighting in correct places and created keyframes for all angles. After setting everything in correct places I hit renders on Fprime and save the final render as TIFF.

Since I need to cast shadows on the composited image, I render the shadow separately by unhiding the object from camera and turning on cast shadow. Here below is the shadow cast. After setting this I again rendered just the shadows and save as TIFF. Next step is compositing the rendered images in Photoshop.

Compositing: Photoshop Magic!
Compositing requires a meticulous eye specially if one is to achieve realism. I have been doing digital painting and compositing for more than a decade and had developed this sense. Here below is the process I did for compositing.
I cleaned up the photo and removed the existingcar from the originalby using CLONE STAMPtool. It’s in the tool bar menu or you can press (S). First I click the image I want to clone then clone the images on top of the car. I repeated this process until i was able to remove the entire car and I was left with an empty roadtrack. Iwill be using the edited photo to composite the rendered GP2.

Edited the photo a little bit and adjust saturation, contrast and hue to blend with the photography plate.

The scene was rendered in Fprime with alpha channel, this means in the CHANNELS layer in Photoshop I can select the alpha. After selecting the white part I then go to back to layers and select the rendered car.

I then apply masking on the render below.

I added another layer of the rendered shadow just below the car and then made the layer to “Multiply”. I loaded this composites to the edited track plate. Here below is the composite.

I edited the second car, same process as above.

Selected the alpha channel.

Apply masking to the render.

And add the layer on the track just below the first car and applied motion blur to get a depth of field. Below is the final result of the composited image.

Got to next page to view gallery of composited renders.
I then apply masking on the render below.
I added another layer of the rendered shadow just below the car and then made the layer to “Multiply”. I loaded this composites to the edited track plate. Here below is the composite.
I edited the second car, same process as above.
Selected the alpha channel.
Apply masking to the render.
And add the layer on the track just below the first car and applied motion blur to get a depth of field. Below is the final result of the composited image.
Got to next page to view gallery of composited renders.
Gallery rendering composites of GP2


About Rodny Mella
Rodny Mella is a currently working as seniorproduct designer at ArtaPower Hong Kong Ltd where he has been designingtoys and home products for the past 7 years.? As head designer he havecreated numerous products for Disney UK and Disney Tokyo, Petsmart, series of collectibles toys for Avon US, Applause and many more. He also created original products and characters manufactured by the company of which licensed and sold to Happy-House of the Netherlands, Hearthsong, The White Company UK, Nature & Decouvertes. As freelancer he has been designing for Meritus Racing of Malaysia,of which he had designed series of formula cars from 2006 to 2009racing campaign, including the company image, formula racer suits andprint adverts. He was also commissioned by Praxis Advertising of Dubai in creating 3D character for their car protection ad campaign.Some of his current freelance works includes designing headphones,earphones for Laccess, lamps and home styling for HomeAdorn.
Website: http://www.artofrodnymella.com