London National History Museum
First I want to thank you again for giving me the opportunity to make this tutorial.
I hope I will make a good tutorial because this is my first tutorial ever and my English is not so good. I hope I will make myself understood.
My name is Sorin Bechira and I live in Romania. I graduated the “West” University on Fine Arts from Timisoara and I’m a graphic/multimedia designer with more than 5 years experience in the field of graphic design. Lately I’m more interested in mattepainting and compositing.
For this tutorial I used Adobe Photoshop.
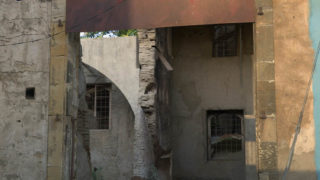
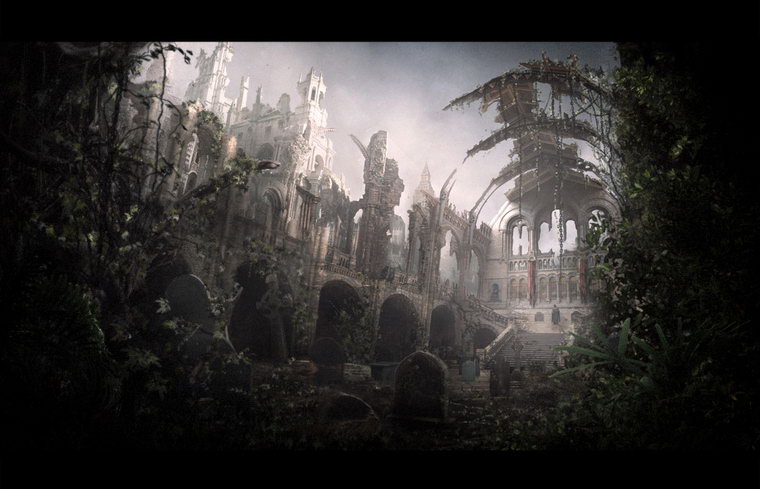
Description: This is a digital mattepainting for the MattePainting Challenge on CgTalk. The challenge was to show the museum in a future destroyed world. A plate was provided and the contest had 3 major steps: cleaning the plate, make a set extension about 50% bigger than the provided plate and finally the mattepaint.
Concept: I wanted to show a concept where the London National Museum is ruined but also to put it in a fantasy like environment, and the passing of time is emphasized by the deserted cemetery within –so the viewer can imagine that more than 2-300 years has passed since present days.
But there are 2 more steps(cleaning the plate and extending it to at least 50%) to accomplish until then, so lets begin with step1:
STEP1 – CLEANING THE PLATE
In this stage I’ll have to remove all the people, signage and all other modern stuff.

I begun with the cleaning of the right upper part

removing the people. So I cloned some clean parts (bricks and pillars) and blend them over – just copy/paste and adjust the edges with a basic soft-rounded brush (since the image was 3k wide and I was working at 2-300% zoom, it is almost pixel perfect). The same basic technique was used for the people on the left stairs
Next I worked on the upper left side; had to remove the reflectors, signage and also the light coming from reflectors

For elements removal I used the clone brush with a basic soft-round brush at 100% opacity. For light removal I selected the highlighted areas with the lasso tool and I used replace color tool to replace the highlights with a brownish color. On the central stairs

I cloned the stairs and put them in the right perspective. Also the right …….was cloned on the left side and the…..was painted this a basic brush. Next, the left side was

cleaned after I looked over other photos of the museum to understand better the architecture. Everything was copied from the clean parts and pasted over. I didn’t wanted to use the clone brush to have more control over the pasted areas. The right pillars were also cloned from the upper side and fit into the right perspective.

Next the signage, since the surroundings areas were very poor in detail, was removed by painting over with a basic soft round brush. Moving on the floor

first I tried to clean it with the clone brush, but I didn’t liked the result, so I made a gray square and i added some noise to fake the ground completely. I put the square in the right perspective with the perspective/distort transform tool

Next I added some reflections

on the floor by duplicate the upper part of the image and flipping it vertically. Everything was erased with a soft brush until the desired effect was accomplished.
The next step

was to add some shadows by painting them with a black soft round brush with 20% opacity. Still felt the need to “turn off more lights”

It was done with the replace color tool on selected areas (to avoid the color replacement for the back windows and ceiling) and color burn tool set on highlights with 20% opacity. More shadows were added. So the first stage is complete. Next is the set extension.
STEP2 – SET EXTENSION BY AT LEAST 50%
After I establish the vanishing point, I started to extend the plate on the left side. First, I duplicated the top windows

and distorted them to match the perspective. Next I duplicated the …… and started to put them in place to match the perspective.


Had to keep in mind that I had a 3 point perspective and also the…..became wider as approaching the viewer. I used the distort and warp tool to fit them into place. Next I had to refine the ground floor

by making some simple lines that matched the perspective and also I made some top adjustments, between windows. Next, moving on the right side to make an extension for the pillars


had to import new front pillars from references and make them match the perspective and also had to refine the base of the pillars by cloning and painting new base.

STEP3 – FINAL MATTEPAINTING
The first step of this stage was to block in the new ground.

Next

is to refine the ground a little by adding new mixture of grass and stones from other photos and also a dirt layer for the front pillar set to overlay, just to suggest the ageing. Next, I added some crosses from different pictures

Note that the position of the crosses will change until the end. Next step was to expand the set more on the right, left and bottom

I also started to cut out parts of the building to open up the scene. This was made by painting the mask with a hard round brush with 100% opacity. Added more crosses and some grass. Next was to make the sky

I imported a picture with a cloudy sky and since it was too bright, I had to play around with the hue/saturation until I managed to make it as I wanted to be.
At this point, had to remove all remaining lights from the left extension

by painting over with a basic soft round brush set to saturation. Now it is time to give it some atmosphere and depth

With a big round brush with 14% opacity I started to paint on the fog. This also helped to decrease the contrast for the background and to achieve some aerial perspective. Next, a little color correction just to take out the greens from the scene

with a color balance adjustment layer. Next, some final tweaks for this step: I applied some noise on the sides of the set and also a 3 pixels gaussian blur to make the main focus on the back of the image – the stairs, not on the front elements. To emphasize that I made a subtle vignette effect.


by painting the margins of the set with the same basic soft round brush with 10% opacity. That’s it for this step. Next step is the fun part.
Next I had to make the background buildings


Imported some building – cathedrals images and crop them and distorted them to fit into place. And also cut out an ivy from another picture and put it on the front pillar

I also painted some shadows to give it more volume. At this stage I had the main elements blocked in, but on a second thought I started to make some changes

on the buildings on the back and also I refined some parts of the left side of the museum. A fog layer was added between background buildings and the left side of the museum by painting with a white soft rounded brush with 10% opacity. Next

I used hue/saturation adjustment layer to desaturate the image and bring more blues into the image. Now it’s time to make the foreground elements.


I cut out some branches from another images and painted over some leafes and chains –from barontieri brushes- you can find the set on his site under goodies section – he is an outstanding artist! (http://www.barontieri.com/atelier.htm)

but the brushes were modified a little with color dynamics “on” and the slider for the saturation and hue set between 5-10% to achieve some highlighted/shadowed leafes and also to have a little color variation.
More leafs were added

I had to go with more leafs on the ground and pillars and also some grass with the same settings to make the scene rich in details. I decided to paint

two red flags to have some strong color spots in the focal point. Next I imported more plants

and in the same manner as in step2, I painted the fog/light layer to give it some depth and mood. Next

I duplicated a few times the new imported plants and also used the curves adjustment layer to attenuate the intensity and brightness of the light. At this stage I made some subtle image adjustments to emphasize the atmosphere

and also added a vignette effect to take out the interest from the corners of the image.
In the same manner as in step2, I added some noise and blur

to the image, but not in the center of the image and also some image adjustments to take out the greens from the building and bring in some more reds

and finally we are done:

Thank you for your time and if you have more questions please feel free to email me at: bechira(dot)sorin(at)gmail(dot)com.
Profile: http://sorin-bechira.3dm3.com/
Portfolios:
http://www.bechira.com
http://bechira.cgsociety.org/gallery/
Thank you


About The Author
You might be interested in