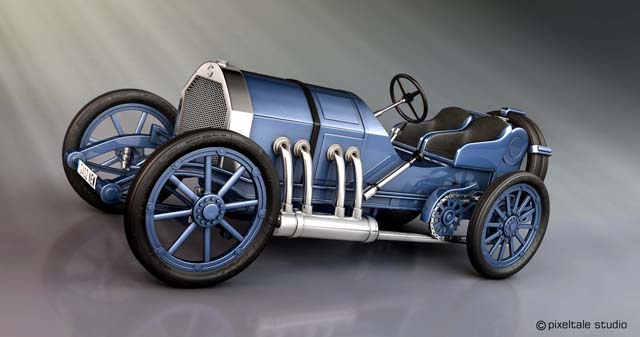
Making of “Mercedes GP 1908”
In this image I wanted to represent the beauty that all the classic cars have, as veritable jewels of the world of the automotive industry.
Introduction
I have always been attracted by the cars of the early 20th century, because of their beauty and design. A simple design but extraordinary, in any case.
That is why I made the image of the Mercedes GP 1908. I am delighted with classic cars. This is one of the first models in the motor world. One of the best cars ever made.

When designing, I like to look at every detail. I try to give my images a unique and very professional quality. It is very important to me the phase of collecting information about the model: photos of reference, some blueprints, history and other things that can be necessary to make a good and trustworthy image. Although I always take some “licence” to give the model its own style, and make it really interesting.

I often use blueprints images to obtain the measures and correct proportions. I like to create my models as real as possible. But as stated, I always like to give my personal touch.

This design was made using Avid Softimage XSI 6.5. Modelling was simple because I used polygonal modelling, starting from primitives or from a view, I made the profile and then I created extrusions, adding polygons and creating edges, etc.

As you can see, the rest of the objects are based on cylinders and spheres, very simple to model. The most complex part to model was the wheels, especially the back ones, having more parts and a system of chain as motorbikes and bicycles have. I modelled the pinions of the chain and other gears, like the axes. I did not model the relief of the tyre, because I added it by means of a map of bump when texturing.


The majority of the textures are Phong and blinn shaders and I used the Car shader for the bodywork. These classic cars did not have a metallic paint, but I wanted to give this appearance to give it a touch of modern design.


The grid of the radiator is also a texture. I did not model some details of the radiator because it would be an extra work that wasn’t necessary. With the texture it looks perfect.

For the illumination I used mentalray, a powerful render motor included in Softimage XSI. I used a HDRI environment image which, together with finalgathering, obtains an effect of illumination similar to a picture made in a photographic studio.


The image I used has white and black tones to emphasize the reflection of metals. The lights are Spotlight, with arealight activated, thereby giving more quality and creating smooth shades.
In the scene there are 3 different lights, placed more or less alike the rule of the three points of light, to obtain a light a more uniform light and quality. The ground also has a Phong shader with a very smooth reflection with a little gloss.

The camera is close to the ground and slightly turned, giving more importance to the car and making a more creative background.


Once the scene was created, I made some tests of render when applying the textures. I did not texturize the complete scene and then I began to render. No, I always prefer to make renders whenever I texturize. In this way I correct the errors in the textures and the materials. In the rendertree I created the materials and I applied the textures. Some of them were created in Adobe Photoshop or taken from libraries of textures, giving a greater photorealism to the image.
When rendering I have used several passes in order to have more ease and freedom to merge them in Photoshop and place the reflection, alpha, AO, etc,.., as I like.


I made several passes: ambient/diffuse, shades, AO (ambient occlusion), reflection, specular, refraction, DOF, volumic and the alpha channels, one of the car and another one of the background. By this means, the final image can be mounted in a better way.


Using Adobe Photoshop I merged all the layers. I made some adjustments of the colour, saturation, brightness, resistances and I applied the effect called Bleach bypass. Very interesting.

Rendering is my favourite part, because I can change the values or settings until obtaining the effect I want. I like to make many tests and to create various atmospheres and then choosing the one I like the most. In this image, I finally added the layer of “depth” to create a slight defocusing of the back part, simulating therefore a camera that focuses on the front and central part of the car. I added a slight noise layer and then I applied the layer of volumic, in a smooth effect to create a warmer atmosphere, more magic and give the car a touch of magnificence.
I am satisfied with the final result of the image, because although it is not a very complex model and it is placed in a simple plane, I wanted to create a scene as it was a new “conception” of the car, something present, with all the improvements and comforts, but being faithful to the original. I did not want to make just a copy of the car. I wanted to give it a personal touch, not to create “another scene” of cars. Thanks.


About The Author
You might be interested in