Making of Tidus
This tutorial is best suited for those who like to see a rough model from the start and then refine into detail as you go.
Introduction
Hi, my name is Rishi and I am a 3d Character artist. In this article I am going to take you through the making of Tidus …., my inspirational character. This tutorial is best suited for those who like to see a rough model from the start and then refine into detail as you go. I’m not gona cover every step of the creation process of this image. I assume you have some basic knowledge of Maya and Zbrush.
Inspiration
Usually I always like to put my own concept or story for character but this is something I always wanted to do. I am always impressed by the quality of Final Fantasy Characters. So I thought to give it a try but in a different way. This is not my concept .I am making ‘Tidus’ which is from Dissidia Final Fantasy.
Modeling
For modeling, I have used Maya for base mesh and Zbrush for detailing. Before starting the model in Maya i always do some research and collect as many reference as i can.
I usually model my characters from a cube. It’s a quick and very effective way of modeling. Some people prefer edge extrusion method which is also very good but a little bit time taking.
I uploaded a simple line drawing of a character in Maya and quickly blocking out the basic shape. Right now am not concentrating on the face details. I will correct the shape and details in Zbrush.


I start with a cube and through edge extrusion and split faces, i block the model to match it roughly with the image. I am not concentrating on the line flow for the body since this model is not being animated.


Adding more lines and rounding of the shape

I always model palm, foot and head separate because it gives me more freedom to add lines wherever i want.
I add some more lines and shape it accordingly.

A very basic palm modeling in Maya

I am not modeling the foot because I plan to suit him with boots.
Before starting the face i thoroughly search the net for anime and manga references. I have taken references from the final fantasy game also. So always spend some time in research before starting any character. I have taken human references too for the expressions.
I am starting the face also with a cube.


Similar things also apply to face too. I have front and side references loaded into Maya and start to model the face beginning by a cube.
Distinct lines are made and important land mark places like mouth, eyes, nose and ears are taken care of by proper line flow so that we get nice and smooth facial expressions.

After working on it a bit more, I got the shape am looking for.

Adding more lines, am fleshing out the face .Did some topology adjustments too on the neck to match it with the topology of the face. No need to merge the palm because we are going to make that in gloves later.

So, i have a basic body in Maya. Now it’s time for the cloth and props. Below is the image used for reference.

Again am going with a similar approach, am taking a plane and thro edge extrusion am building the base for the cloth and accessories. Below are a few images of the building of cloth n accessories.


This is one of the accessories that is on the hand of Tidus. Here, I have taken a sphere and selected alternative columns of faces.

The faces being selected, they are deleted to get something like the picture below.

Apply Twist deformer found in Animation menu/Deformers/non-linear deformers and apply it to the sphere.

Duplicate the twisted object and again apply the twist deformer, but in the opposite direction. Now move the vertices of the objects in the places of the intersection such that they are interwoven.

Modeling all the accessories in similar ways, we get basic accessories that need to be worked on later in Zbrush.
Below is a image of the sword of Tidus.

So, finally all the accessories and the cloth of Tidus are ready for detailing in Zbrush.

As the below image shows, I have imported everything including body as different subtools in Zbrush

For the body sculpting, we hide all the other subtools (including the palms) that have been imported into Zbrush except the body. Most of the body is covered with cloth so I don’t need to work on the full body, just hands, legs and face.

Let’s start adding some forms to the body. I have used standard brush with combination of clay and smooth brush for adding muscles. Firstly, subdivided the body. Then start sculpting and molding it according to the references u have collected. Please make sure u fully utilize the extra polygons resulted by subdivision.

I think it is sufficient for now and will add some more details and tweak some more muscles when we pose the character. So let’s do the posing before starting the detailing on the cloth.
Posing
I have taken the pose from the game poster.
Now to go about the exact method of posing. Firstly, I mask all the areas that don’t need the effect of transpose. Then using the transpose tool, I pose the character in Zbrush.

One after another, each part that need posing is selected and transpose used on it to get the below pose. After posing i have done some muscle correction on the body and scaled down the neck because it was looking a bit long.

Now that the body is posed, cloth is also posed in a similar fashion.
Here’s the final posing with cloths on, and all the accessories imported including the sword.

CLOTH DETAILING
First am going to shape the shirt according to the reference i have taken. I am using move brush here with the combination of standard (with gravity on), slash 2, pinch and smooth brushes. I have subdivided the mesh. Will do the detailing in each level one by one.

Here are some images of progresses on each level:


After detailing the small props and cloth, this is what I got.

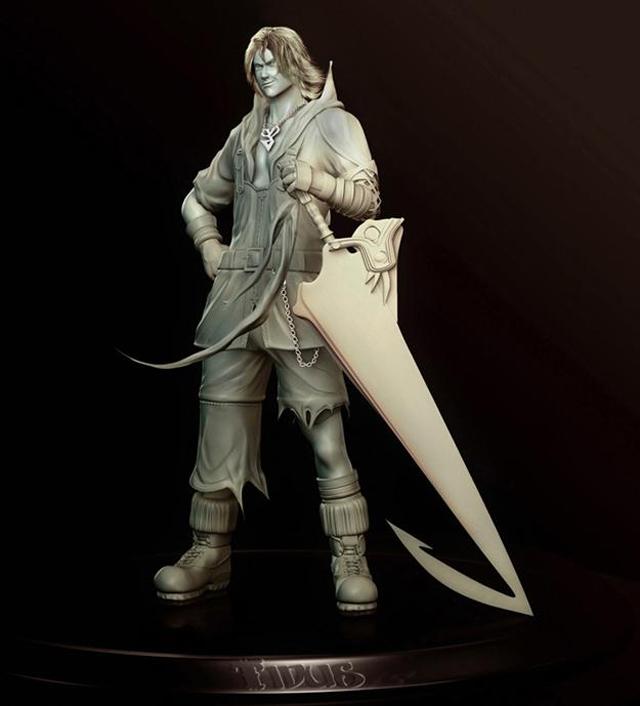
I have saved a rendered image of the character in Zbrush. Importing this image into Photoshop, I give it some nice colour effects and some hair too. You could experiment with different styles and effects in Photoshop until you are satisfied with the output.
So, here we are with the finished image.

Some suggestions from my experience that I would like to share with you guys.
When you’re sculpting, don’t try to subdivide it to high level right after you put it in Zbrush, always try to get maximum details in low level, when you’ll be quite happy with that, then just move to another level and add more fine details.
Don’t worry about the shape of the model in the beginning, u can always change it later.
Always add some gravity when you are dealing with cloth wrinkles.
Knowledge of anatomy is important but don’t let this restrict you to experiment the different characters you want to portray because you can always change the anatomy details to make it more visually enhanced. That’s the beauty of working in 3d.
Hope you enjoyed this making as much as I did while making it. Happy sculpting.


About The Author
You might be interested in