Snowy Mount tutorial from Polyman
Creating a Snowy Mountain—Texturing Based on Slope

Some Notes:
This is 3ds max tutorial, but it was inspired by LightWawe. LW can use slope as input parameter. Though, there’s no such option in Max. So, to get such effect – you need to improvise. Here’s how:
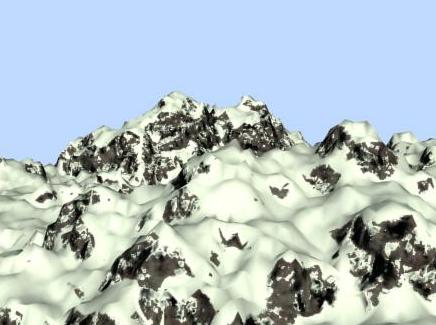
Preview:
In this tutorial you’ll create a mountain model, and texture it with two colors – white & gray. Why just two? Well, the purpose of the tutorial is to show you how to place snow & rock texture depending on the slope. If you want, you can add more complex textures later.
Step 1.
Create 60×60 plane (see picture below). Convert it to Editable Poly (note: this step is optional). I like working with Editable Poly, and it has integrated Mesh Smooth option which you can use to get more detail. If you want more complex mesh – 1 iteration will do just fine.

Step 2.
(Make sure that your object is selected, and) Add Displace Modifier. You can find it in Modifier List, under Parametric Modifiers group; or in Tab Panel, under the Modifiers tab (see the picture).

Step 3.
In the Parameters rollout add displacement map. I used this bitmap (pic. on the left):


Then increase the Strength parameter until you get something like on the picture above.
Note: If you want to use some procedural texture as displacement map, click on ‘None’ button under ‘Map:’. It will open Material/Map Browser.
Step 4.
Ok, this is the important part! What we do now is this: we use Falloff map to do the trick. Add it as Diffuse Color. Set the first color to white, and the second to gray or brown. Change ‘Falloff Direction:’ to World Z-Axis (or to Local Z-axis, in case you want to rotate your object for some reason), This sets the map vertically.

Now to adjust the Mix Curve: Click on the third button from the left and add two control points. Using the first button, place them like on the picture.
Render the scene to see what this does: it sets the white color only on areas with low slope.
Step 5.
The last step – adding some bump to increase realism.
Copy your Falloff map from diffuse slot to the bump sloth (just drag).
I used Noise map for bump. In Falloff Parameters, add the Noise map as color 2 (next to the gray).

Set Noise Type to Turbulence & swap the colors. You should get something like on the picture above (Note: I increased the sample size so you could see the map).
The End
Render. The final result should be something like this:

I hope this tutorial gave you some inspiration. Now you can add more complex textures, or play with the parameters. It’s now up to you and your creativity…


