Making a image look evil
This tutorial is all about making a image look evil and pretty dark. Yeah we gonna take a look at dark side of art, shall we? I have downloaded a picture of actress Livtyler. here it is.

If you like above picture just copy and use it for this tutorial its free of cost only thing is after applying these tricks in tutorial I wonder what she going to say about her face!!! OK first things first . we can go step by step . I assume you know Photoshop very well because I am not gonna show pictures of each and everything instead I will write Shortcut keys. I think you got above image open in Photoshop. okay? (If u want some change in art go with a different image anyway girls photos are preferable. Guess why?)
Step 1.
Hit Ctrl + U in keyboard and make saturation value to -90 then Enter key
Step 2.
Now everything is so clear time for you to make things little mysterious. Add Blur to the image as shown in below:

Radius value 0.5 pixels
Step 3.
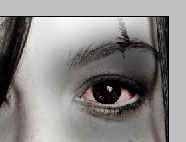
Here come our real witch tool. In this step we gonna make her really look bad. Yeah Burn It! Hit ‘O’ to select burn tool make Range to highlights and exposure to 100% and add some darkness below upper and below her eyes and also little bit around her mouth and rest according to your needs and in some places try reducing exposure .your results may look like below image:

Step 4.
Now add a new layer name eyes . And being in that layer select her eyes using polygonal lasso tool and fill selection with color R 76 G 14 B 11 and make the fill amount in layer to 50% and layer blending options into color burn . Now she got eyes of ghost, isn’t it?
Step 5.
Now the tricky part. If u got some nice evils faces in your computer then borrow that textures. anyway I am not gonna discuss about any external help we will do everything inside Photoshop. Take brush, Hit ‘B’ a take new layer and make blending options to overlay and replace default brushes with faux finish brushes and take below show brush and place a cut mark where ever you want. color R 52 G 7 B 7
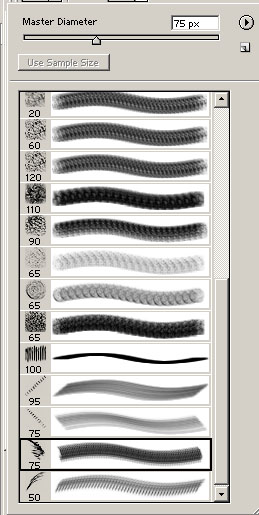
Ok now we need to try out some other brushes in the same preset my pick was that 90th see in above picture and scratch it everywhere in her face remember you have to make opacity of brushes to 15% color with any dark color u want I went in same color above I have used for that cut. You picture look something like this below:

Step 6.
Now its time for you to add some evil tattoo in her face hit ‘U’ to get tool called shapes and select following highlighted shape
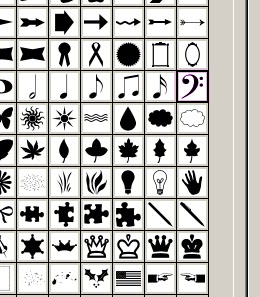
Add a new layer and place it where ever you want. I used transform tool to rotate it. If you don like to use shapes then get some kool brushes in assorted brushes presets in Photoshop. Anyway I have played with both of them to get picture below:

Step 7.
I feel like something missing if u feel so go for this step. Take a new layer and select following brush its in assorted brushes presets.

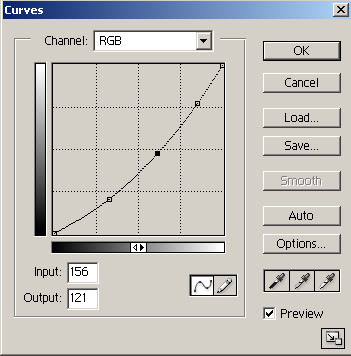
Make size of brush really big it should cover half of her face and paint it centre of her face and with color R 8 G 52 B 7 and make opacity to 12% see her veins huh? and now we come to end of this tutorial so now you select the background layer and hit Ctrl + M to bring up curves window and make the curve as shown as below:
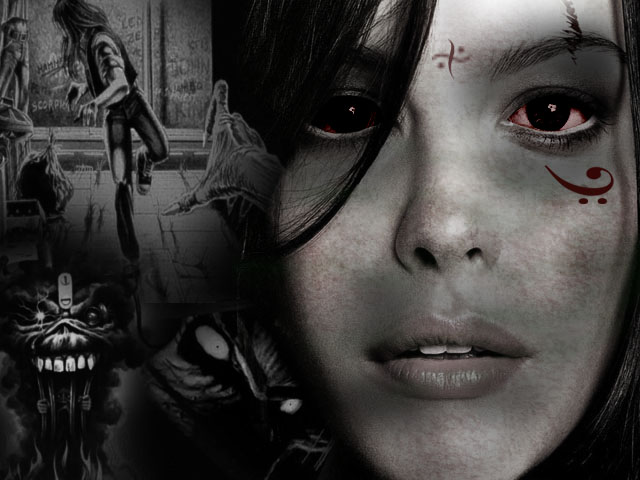
Here is the final picture I have ended with (just added some iron maiden album pictures to her left side to get some interesting evil effect).
Hope you enjoyed this tutorial I think you have learned some new tricks of evil art. And if you got something to say please mail to me at metalrahul@yahoo.co.in
Best of luck dudes
Rahul.


About The Author
You might be interested in