Making Of ‘Finding Unknown Kadath’
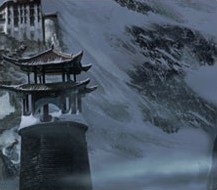
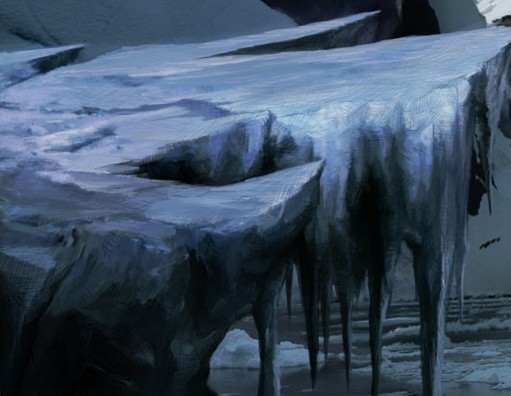
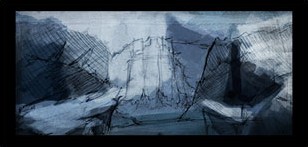
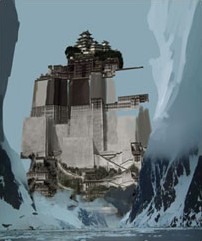
“The Dream-Quest of Unknown Kadath” is a story about Randolph Carter, a mystic who has the ability to enter a fabulous world through his dreams. Carter isn’t content with merely shuffling about a dream world; he wants to track down Kadath, a fortress where the gods live and play. Carter’s quest takes him through endless adventures where he faces both good and evil realms. Carter goes to the moon, talks to cats, sails on the seas, and encounters weird creatures – both helpful and harmful. All of this brings him steadily closer to his goal. This story is a synthesis of many of Lovecraft’s other stories, such as “The Cats of Ulthar”, but I was mostly interested in the idea about Unknown Kadath. Before starting, I searched the Internet for reference images to clear my imagination and to ensure that I would get the right idea for the concept (Fig01 and 02). I wanted the scene to be set in a snowy climate, so I also searched for reference images of snow, too (Fig03 and 04). The concept sketch was drawn on white paper. I then turned the horizon line to achieve an effect similar to that of a film camera. I scanned the sketch and opened the file up in Photoshop (CS2). The black and white picture was showing, and then I built up on top of that on a Multiply layer. I created a new layer under the sketch as the fundamental colour draft, with the opacity set to 60 percent, and then removed the black and white sketch as I no longer needed it. The main object in the sketch was too clear, and initially Kadath’s fortified wall was being “squeezed” by two cliffs, so I decided to move them apart on to opposing sides. For this piece, I used photo references of mountains without a sky. I removed the sky from the mountains by looking at the colour channels from the original image and selecting the one with the most contrast between the sky and the rest of the image. I duplicated the blue channel and used the Curves to increase the contrast until the black and white image separated the sky from the foreground. To create texture on the mountain on the right, I used a photo of an iceberg (Fig05) and created a clipping mask layer (ALT + click between two layers) on the layer of painted ice. I changed the upper layer’s opacity to 60%, and then cleaned things up using the Eraser tool. On the left, I used another photograph of a mountain (Fig06) and rotated it. I also painted from the icy mountain in a forest, using Fig07. To paint Kadath, I used a clear-cut, jitter brush, and the Clone Stamp tool, taking reference from the photographs which I cut up into three parts. I painted the walls and lengthened them; I hand-painted and copied the stairs several times to increase the imposing height. Painting the snow and ice was very tedious. Most parts of this piece were painted using a hard brush (between 1 and 4 pixels in size). The block of ice in the foreground was painted thoroughly using a small standard brush (sometimes as little as 1 pixel), and custom brushes with 50% opacity to achieve cross movement (Fig08). The picture was finished off with lots of mist to achieve a good depth of field. I also decided to add an observation tower to increase the interesting features of the composition. The man in the boat was also hand-painted. I created a new layer for the shadows, at 50% opacity. I used a firm brush, with the opacity set to 35%, and painted in the needed areas: in the lower right area and on the mountains on the left, because the sunlight could not reach there. I then created adjustments layers with alpha masks; that is, Hue/Saturation and Brightness/Contrast, to achieve a single gamma. I painted onto the adjustment layers on the mask to create the different tones and contrast areas on various sections of the picture (Fig.09 – 18)


Concept Sketch


About The Author
You might be interested in