Making of Monster Head
In the following material I’ll explain the most important steps in creating this alien monster bust.
Introduction
Hi all in the following material I’ll explain most important steps in creating this alien monster bust. This project started as an idea for polypainting practice in ZBrush, but I decided to start with a completely new object .
Concept
One of the important things for me when starting a new project is to have idea or concept. For the monster I have few sketches of monsters with massive external bone structures and I took one of them as a starting point. The beginning is always to start with a base mesh, personally I prefer to start with the default polysphere or using zspheres. Using Move, Standard and Smooth the rough form is created with low number of polys.

STEP 1
With adding more subdivision levels I continued to detail the head. I use the classic approach in sculpting with the usage of Clay and Smooth brushes to define the form and add more value to the sculpt. Additional brushes which are used are Standard, Dam_Standard and hPolish. The more subdivision levels were added the more form of the creature was detailed.

STEP 2
At this stage my PC reached it’s top performance, the tool was at level7 with about 3 million polys and I could not subdivide to next level, which wasn’t enough for me to achieve the desired detail of the sculpt and also it won’t be enough for the next stage of polypainting. Here come into help “ReMesh All” function which you can find in Subtool palette of the Tool. The function is very useful because it redistributes the polygons over the mesh equally. In the image bellow you can see the exact options which are used most commonly.

STEP 3
The new tool is created with about 300 000 polys which I could subdivide to level 3 with 5 million polys. The next step was to project the details from the original tool. The best practice achieving this is to make this step “ProjectAll” at every subdivision level of the newly created mesh, so that result in better accuracy. Thus the new tool is ready for final details before polypainting. I proceeded sculpting in the usual manner till I was satisfied by the form and the look of the sculpt. My idea was sculpt as more details as I could and to be used in the process of polypainting. For this reason I created a custom alpha for skin details and with the help of the standard alphas included in ZBrush I achieved the skin and wrinkles of the monster.

STEP 4
The bone structures were created using a different technique which I prefer for sculpting Rocks and bones. First define the form and then with hPolish brush on Z Intensity 100 I make sharper edges and planes which resembles massive bones. Then with PlanarCutThin and strokes set to Spray I gave the look of layered and old material.

STEP 5
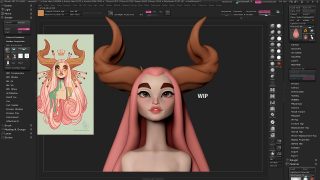
Next big step in this project was the polypainting process of the sculpt. My initial intention was to recreate the look of more humanoid skin, which will be changed later as you will see. I used a lot of photos of human skin and other leaving creatures whish reaveals the subsurface effect of the skin. There are great number of tutorials in the web which describes in great details the steps to create SSS effect with painting in 2d mode, so won’t go into details about this. The main methodology I use is standard brush set to RGB mode, spray stroke and Alpha 23 from the alpha library. Whit these settings I play with the opacity of the brush and various colors for making the skin shading. Another important option that I use is the Smooth brush in RGB mode which makes smooth transitions between the colors where needed. The other tool that I added is the eyes which are simple spheres with polypaint.

STEP 6
One of the techniques I use for adding more realistic details in the color is “Mask By Cavity” and “Mask Ambient Occlusion” in the “Masking” palette. They helped me to add darker colors in the small cracks of the bones, and in the skin details. This steps adds final touches to the colorizing process.

STEP 7
Giving the polished look of the monster requires postproduction in external app, in this case I used Photoshop CS3. But before that I had to create renders with different materials. Bellow you can see 6 renders which I took and the used materials. The light setup is made with only one sun light with sharper shadows and ambient set to 0.1.

STEP 8
Next step as I mentioned earlier is postproduction in Photoshop which mainly means combining different passes from ZBrush. You can find different approaches in many tutorials in the web, but I personally prefer to have one or two for the main shading and more for the reflection and lighting especially for organic looking renders. Here I also used lots of photos for reference. But the mask layer is mandatory in case you want to play with the background. In cases where you have more complex shaper and objects you can use more mask as selection sets for more detailed shading. For the bone shapes I made a second mask in Photoshop so I can treat them separately and achieve more realistic effects. Bellow you can see how I combined singular passes and their blending modes.

STEP 9
At this stage I wasn’t completely satisfied by the view of the monster, and decided to use more of the functions which are available in Photoshop. I added “Color Balance”, “Hue/Saturation” and “Curves” adjustment layers and combined them to achieve the final result.
Hope I was useful to some extend for you, and don’t forget to learn and develop constantly. If I forgot to mention something or you have further questions regarding this process don’t hesitate to write me. Thanks for reading


About The Author
You might be interested in