Making of Punk by Vikramvr
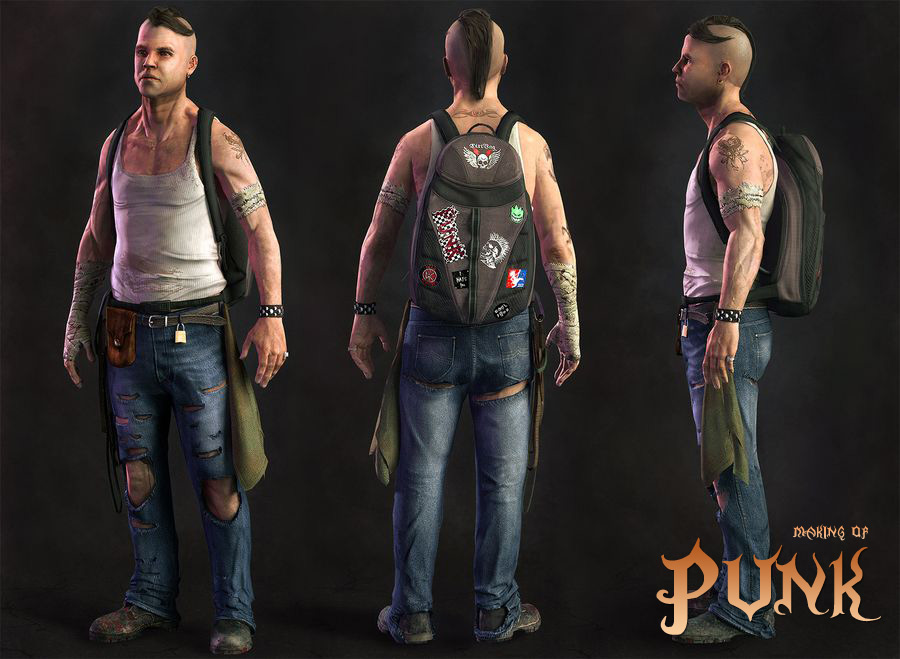
“Punk” is a character inspired from one of the models of 3d.sk. The intention was to make a character aesthetically pleasing, stands out from the rest and has a unique design. After some research I found out that, there were not many models of punk type characters, so I decided to go in that direction. In this article, I will try to explain the process I followed to create the character.
Introduction“Punk” is a character inspired from one of the models of 3d.sk. The intention was to make a character aesthetically pleasing, stands out from the rest and has a unique design. After some research I found out that, there were not many models of punk type characters, so I decided to go in that direction. In this article, I will try to explain the process I followed to create the character. I collected as many punk references as possible from the internet, and started out the modeling process. My base mesh was Nick Zuccarello’s free ztool model available in his blogspot http://nickzucc.blogspot.com/. This base mesh is constructed of all quads, and is relatively dense. So, it serves as a good starting point. |
|
|
SculptingOne of the most interesting parts of character modelling is sculpting. To flesh out a character I use the clay brush or the claytubes brush most of the time. Somehow, I cannot get around using the standard brush, it seems to be destructive in a certain way, and if used with too much depth, it tends to take away the control from the artist. Claytubes brush, on the other hand has an additive way of adding detail. It adds flat details to a surface, so it works like traditional media. During sculpting, the most important thing to do in my opinion is to keep turning the model and viewing it from all directions. This is most important during the fleshing out process because; here is where the silhouette and proportions of the character is resolved. Once I was happy with the detail in the character, and it’s overall proportions, I went on to model the character’s attire. |
ClothingI created a mask for the vest, and used the extract option under the subtool palette, to create a new subtool. I retopologized the extracted subtool, to get a desired polyflow, deleted higher subd levels, and started to sculpt it into a vest. I use the lazy mouse, along with the gravity feature under the brush settings to make a fold flow with gravity. |
|
|
Pants and shoesI created the pants in the same way, extracting, retopologizing, and sculpting. The only major additions for the pants are the tears. The tears were easy to sculpt. I made selection masks for the tears, pushed them inwards (the body will be viewed over it), and used the snake hook brush for the strands. |
|
|
|
|
|
|
|
ClothI made a plane with high subdivisions in max, converted it to a cloth object, made a simple simulation and collapsed the stack and exported the mesh to Zbrush. Bag The bag was fun to create. I started from a cube in max, made basic cuts in the geometry, and split the bag according to its material. I split them into 8 or 9 different parts, took them separately to zbrush and detailed each part. I later constructed the threading that holds all the parts together, and also the zippers. There was lot of to and fro between zbrush and max for the bag. Once all the parts were detailed separately, I combined them all into one subtool. Even when the bag was a single subtool, the polygroup feature enabled me to select each part separately, and detail it if necessary at a later stage. This was especially helpful in selecting and shaping the straps to conform to the body. |
|
 |
|
| So, one by one, I brought in all the parts into zbrush, and sculpted them. I used various alphas for pore details on the face | |
|
|
|
| I exported the face in its lowest subdivision to max for modeling the hair. I used the line tool, and started constructing the hair. I switched on “enable in view port” under the rendering tab, and set the rendering method to rectangular | |
|
|
|
Lowres ModelingI used the decimation master on the subtools and exported a decimated mesh to max for modeling the low res. I either constructed a completely new the lowres from scratch, or edited the highres. The aim right now was to get a lowres completely conformed to the highres, so that the generated normal map is most effective. |
|
|
|
|
Uv UnwrappingI used the standard unwrapping tools in max to unwrap the model. Only tip I can think of here, is to straighten the edges of the various parts, and hitting the relax modifier with “keep boundary points fixed” option. This helps in fixing seam issues, and also fastens up the texturing phase quite a bit. |
|
|
|
|
Normal Map BakingXnormal was used for baking the normal maps. I imported the decimated highres into xnormal, along with the lowres. I used the ray distance calculator before baking, and entered the values in maximum frontal ray distance, and maximum rear ray distance. Once this is done, xnormal is able to do a great job of producing normal and ambient occlusion maps. I also flip the y value under the Normal map options (Max uses a flipped green channel). TexturingOnce I got the Normal and occlusion maps baked out, I used the occlusion map as a base to block in basic colours. |
|
|
|
 |
|
I use Dave Nagel’s photoshop brushes found at http://graphicssoft.about.com/od/photoshopbrushes/Free_Adobe_Photoshop_Brushes_to_Download.htm These brushes do a great variety of operations from mimicking skin and cloth patterns. I also used photo references, but a majority of the textures are painted in. I started refining my texture by painting in skin details, pattern fabrics, dirt and grime. It slowly started to take shape. The jeans pattern and the pattern on the bag were done by overlaying photographs on top of base colours. I added some stickers on the bag to make it more Punk styled. To view my textures, I put on a directx shader in the max viewport. I also used the Marmoset toolbag (www.8monkeylabs.com/toolbag/toolbag_install.exe), to a get a feel of how the character will look ingame. By doing this, I got a solid feel for the direction I needed to push the texture in terms of detail. Above a directx screenshot with three omni lights. |
|
| Here’s a snapshot of the completed texture: |
 |
|
I desaturated the diffuse map, and used that as a base for the spec map. I first blocked out the larger areas that shine more, with a soft white brush. Then with a grime brush, I created tone variations for patterns and skin. |
|
|
RiggingI was looking to set the character in a relaxed pose. So I created a very basic rig for it, just to relax the hands, face and legs. Once I was happy with rigging and posing the character, I started to think about the lighting and rendering. Lighting and RenderingThe scene was lit with two area lights and two omni lights, and the rendering is done with mental ray, along with final gather. I set the rays per FG point to 300, and the diffuse bounces to 3. I rendered the shadow and diffuse separately, as I wanted to add a floor to the scene. So I rendered out two separate passes, and combined them in photoshop. Here is the final render |
 |
Final ThoughtsI started very vaguely on this character, not having a concrete idea, on what I was aiming for. I feel it is very necessary to get the character concepts on paper, before starting the actual modeling. Polygon budget wise, the character stands at 17k triangles. It might be slightly over the top, but this kind of budget helped me achieve desired silhouette and structure. A turnaround animation for the character can be downloaded from http://www.vikramvr.com/img/gallery/3D/Punk.flv I thank everyone who has helped me create this character, and hope you enjoyed reading my making of. |


