Making of Cargo
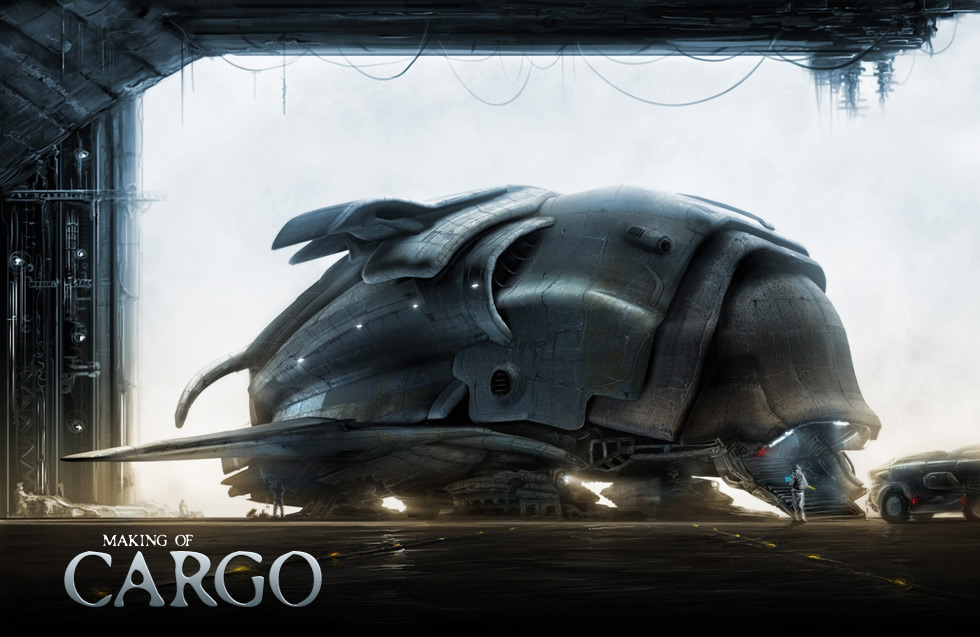
I imagined a large air vehicle and huge cargo ship for this scene. Since the air vehicle has a great volume and carrying capacity, I draw the loading doors markedly large.
 |
IntroI imagined a large air vehicle and huge cargo ship for this scene. Since the air vehicle has a great volume and carrying capacity, I draw the loading doors markedly large. I made 3d modelling of vehicle using sketches that I prepared for preliminary study. Only the vehicle was 3D modelled, and all other details and planes were 2D painted. I designed the scene as grouped layers by considering angles of light during the day. It can be painted as night or winter scene if needed. ModellingI modelled the vehicle using mesh and poly modelling technique with simple box form. In modelling period, using the mirror technique I have modelled also the other half with instance copy. With this technique, I could highly command the general form while completing the vehicle. Sure it was not a problem to create big plates and surfaces. On the other hand, I created fine and complex forms by using extrude and bevel techniques in (small) details. MappingI made use of some photographs for mapping. After correcting the colours and some details I transformed them and add to the model. To display the plains realistic and richness in details I used bump effect in low level. I rendered it in high resolution after making necessary dimentions and light adjustments on preview screen. After rendering, I save the view with alpha channel. This procedure is one of the most important point in before the working with Photoshop. |
 |
|
 |
|
PaintingIn carrying the scene to photoshop page I could easily pick over and placed with alpha channel. Now we have simple mapped model ready to paint. This step includes procedures that increase details and realism. Light, atmosphere and texture effects will produce the completed form. In this step, we should study with many layers. We will have more independence of managing the study as we have much layer. I made scene lightning begining from 3D Project. We had to support the Hungars top lightning and backlight effect also in Photoshop. In this step, multiply and screen layers locally realized the needed light effect. |
|
 |
|
|
|
I used small brushes in painting hangar walls, small cargo car and human figures painting. The important point is in this, the colours used in painting and saturation should be related with space. Only this kind of placed objects can integrate with space. I had to add some details to add the vehicles body. Fort this purpose, I used fine brushes in different style. I should add some dirt and dust effect. Because to be more real, the materials should be corroded in time. At last the final scene has appeared by adding light, texture and details in photoshop. |
 |
|
Related linksOmur Ozgur’s Profile: http://omur-ozgur.3dm3.com/ |
|


About The Author
You might be interested in