Making of The Dragon
Detailing,and texturing, rigging and many more things… At the end we will render andfix in Photoshop till we get to the end of this. I’ve decided to make it moreinteresting and make something like Making of a dragon’s tutorial with usefultips and tricks :)
|
Ok let’ssay a few words before start. I was inspired to create this dragon from adragon scene. In deviantart of a dragon Which iswatching very madly the camera. We will start with the modeling of the dragon,and then we will continue to Detailing,and texturing, rigging and many more things… At the end we will render andfix in Photoshop till we get to the end of this. I’ve decided to make it moreinteresting and make something like Making of a dragon’s tutorial with usefultips and tricks :) Steps:
For theconcept art I’ve used a photo of a dragon from the side this will be our onlyreference at the beginning. I’ve used a reference from FirstKeeper. Note:http://deviantart.com/ is very useful site with many things like Photoshopbrushes and blueprints and references and you can find anything you want there.And the artists will be happy to have they’re own concept made on 3D as wellIt’s become useful website for me. Ok now I’veused this photo as reference.
After I’veset up the dragon in to the background of my front position I’ve startedmodeling in 3d’s max . I’ve wanted to make the base mesh for the model. In lowpoly version.
I’ve startedmodeling from a cylinder with 8 sides set up from the top. Because I’m making adragon to save time I’ve decided to make symmetry to the other side afterfinishing the modeling of the base body part from our view:
Then forthe leg I’ve extruded one of the polygons and made it a leg and then I’vestarted adding some lines to the leg of the dragonby connecting edges. To fill in with some shape:
And at theend of the modeling of the leg I’ve started to extrude the please where thedown part of the fingers and the leg must be and started adding detail.
|


|
The otherthing was to make the head of the dragon in the same way:
And I’veadded some spheres to see the eyes as well.
For themaking of the wings, I’ve watched little vampire wings to have in mind how tocreate the wings. I’ve keep in mind the main reference for the dragon’s body.
Keep inmind that we must keep the silhouette of the model because if we’re going tomake this for games or something like that we will have many things that aren’tright. (for example: if we have details on the legs we will see the roughsshape of the model when we apply the normal maps on the model).
We’re doingthis because the legs and the other parts of the body must have some detail.When we add detail to zbrush we must keep the same shape of the model. That’swhy it’s so important to have good detail of the legs in low poly version, andstill keep having detail. Now for fin of modeling chapter let’s collapseanything to the stack and weld vertex if there are. Any left, this is usefultip because when we start unwrapping such things will be very annoying for youin any modeling process. Ok, nowwe’re done with the modeling. So let’s continue on to page 3 |


|
We’re doingthis because we will save much time unwrapping the model after we finish themodeling we will use symmetry and move the other unwrapped parts. Now we applythe UVW Unwrap to the model, and start detaching things. First I’ve select the dragon’smain body and I apply an uvw planer to it.
AfterUnwrapping the body we continue with the wings. They’re going to be unwrappedby the same way:
I’ve selectthe one side. I apply planer and place it in to the head two.
Note: applythe chess material to see how’s the unwrapping going.
It’s goodto unwrap until you have anything. This is the photo of the unwrapped parts ofthe body.
I’vecollapsed the stack and export the model to Deep UV. To use the relax therebecause the algorithm of deep UV is very strong.
Afterplaying little with the uv’s and so on I’ve come up with this final solutionfor the unwrapping this is the final picture of the unwrapped coordinates forthe 2 sides of the model.
Note: Don’tforget to check for overlapped of edges!
Now let’sadd some detail on our dragon. |
 Before webegin unwrapping let’s delete the half of the model.


|
I’vedecided to make some of the details on our dragon before the textures, when wehave the UVW’s we can start with anything from there on… So for me it’s goodfirst to make the detail of the model, but you can start with the textures, itdepends on you. So I’veapply an tessellate modifier to the model.
The meshsmooth was to show you what happens when we divide the model. If the tessellatemodifier wasn’t added to the model. You can seethat without it, how the mesh divides. Make a few experiments and you’ll see. This help’sus to keep the shape of the mesh when we divide it in Zbrush. And you don’thave to worry for the unwrapping, the uvw’s are keeping the same coordinates.So when you get back into. Here aresome useful things when you export/import in zbrush and max. Export from3ds MAX.
Import inZbrush:
You can doany thing you want to make the detail of your dragon for my dragon I’ve wantedit to have some.. Weird parts of his body. To be more like chicken, and in thesame way funny and angry looking. And this is my final version after detailing The model.
I’ve madethe texture of the displacement of the dragon to 4800×4800 to keep my detail aswell. Later, we will make a normal map with our displacement map. Note: you canmake your normal map in Zbrush if you wish but I’ll show you a few tricks for creatingthe textures.
So let’smake some textures to the dragon.
Ok nowlet’s paint some details on our model. Well I’ve watched some dragon photos inthe net because I’m making my first dragon. And I’ve never had experience howit looks one dragon so.. Take a look of few dragons to see how they look orjust use your own sketches. I’vepainted the dragon’s texture directly in zbrush it’s much easy to paintdirectly on your model, you save much time with this type of painting and youstill have a look of your detail for your model witch is very nice.
Afterfinishing the texturing I’ve saved my diffuse texture again in 4800×4800 pixelsto keep my detail
I’ve usedthe shadier to make my own normal map of my texture in Zbrush and saved it on4800x4800. All of my textures are High-Resbecause the model is released for purchase and so the client can use it with HighRes detail. But anyone can make a low-res_photos of it if they are needed. Forgames and other things like that. After our model is done and here are the textureswitch I’ve edited in Photoshop to make the secular, bump, and Spec_level. I’veoverlayed the normal map of the texture with the normal map wich I’ve made fromthe displacement map using the NVIDIA Plug-in, this plug-in is very useful forcreating normal maps. If you don’t have it you can download it from here: Overlayingthe 2 layers of the normal maps, is adding more detail on our texture. So thisis useful trick for mixing normal maps for games and other things like that.
Now ourtexturing is done and now we can continue forward. |


|
Ok, nowbefore we start this chapter. We must start thinking how and what are we goingto do, to make this dragon to move. The human body haves…have some type ofskeleton, but the dragon well we can guess only how to make the jointing andthe bones for our model. I’vestarted with the body to have main skeletal for the model or unless to havesomething to start with. I’ve used my own concept for rigging the model. I’veused lines and controllers to make the wings, the legs the head to have oneheavy and hard look when it’s animated.
Now, whenI’ve showed you how I’ve made the bones. We can go on with the scene settingup.
I’vestarted with preparing the camera and the dragon’s position. Then I’ve movedthe bones to this position:
I’ve wantedto have angrier look like he’s going to fly away or he’s just laded and it’slooking mad… The nextthing I’ve made is I’ve set the materials and the textures for the scene.
I’ve addedrocks with displacement. And normal maps so they look much natural. I’ve usedone of the free textures from DisplaceIT website. Now we cancontinue with the rendering settings.
For therendering I’ve used Vray. Here are the settings of the scene that I’ve used.
I’ve usedan HDR for the lightning and target an direct light to have an direct light forthe sun to simulate the environment as well. |


|
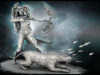
And here isthe Final render image:
And hereyou can see the steps that I’ve been through:
I’vecorrected the colors of the photo with color correction and added blue color.And fitted the two colors of the rocks, and those of the background. Now I’veadded camera focus on the photo using my Depth map (zdepth map).
Note:Remember when you’re making zdepth map in max to check out the min and the maxsettings, it’s good to have a focus of your main object and fading effect inthe background. Note: Don’t forget to save your alpha channels in composinglike this it’s importent to have control on everything till you’re making photomanipulations. And here is the final image:
Graphicdesigner and make 3D Characters and tutorials in my free time. This modelwas made for one project, after I’ve finished I have published here. Hope thatthis making of was much useful for you like a tutorial and hope that the tipsthat I’ve submit ware useful for you. I want tothanks on Striker for allowing me to share with you this making of. If you wantto contact me or ask me something feel free.
|


 I live in Bulgaria, I’m still yang, and I’m only on 18years old. When I was a little I’ve started work with 3D studio max R2.5
About The Author
You might be interested in