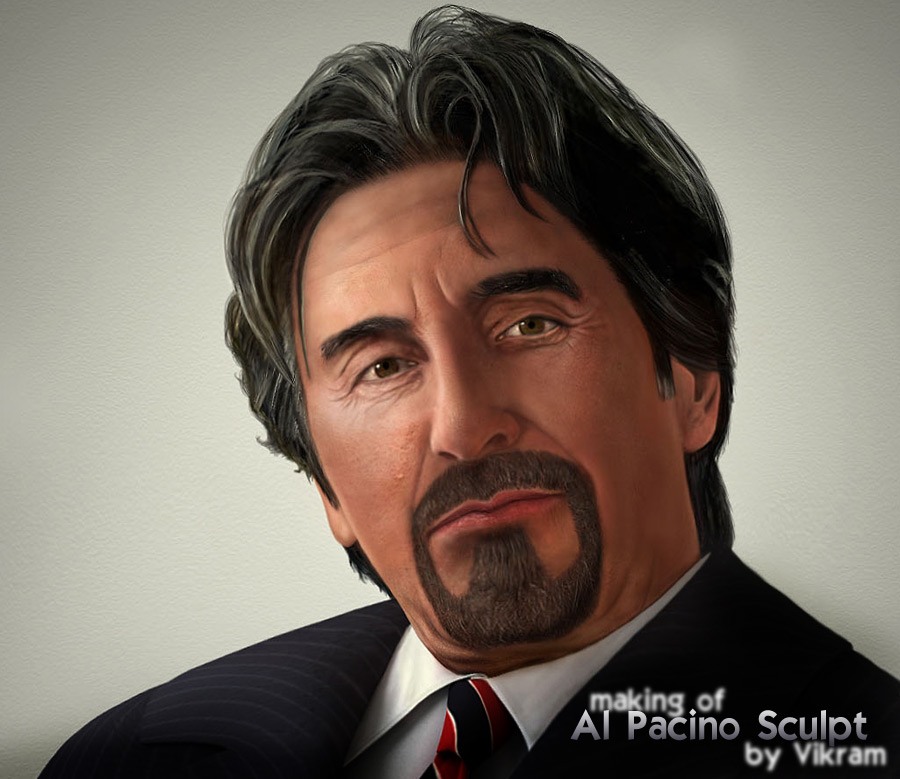
The Making of Al Pacino Sculpt
My modeling process is simple. I start by creating a plane in the top lip, and keep extruding edges, maintaining shapes in both side and front angles, also looking at it from the perspective.
 |
|
I first started off by collecting lot of images of Al Pacino in different angles –> I chose an image from the movie “two for the money” (second image, top row), and started working on it. MODELINGHere are a few snaps from the modeling stage. My modeling process is simple. I start by creating a plane in the top lip, and keep extruding edges, maintaining shapes in both side and front angles, also looking at it from the perspective. This method also helps in getting the edge loops to flow in the desired direction: |
|
LIGHTINGI don’t like to complicate my scene by using a number of lights. I used three free area lights and two bright planes, with self illumination set to a value of 100. Since the main source of light in the image is from the right, I set the intensity of the key light to a high value, and also a mild brown colour. The fill light is a mild blue, and the back light is white.
Here’s a clay render
TEXTURINGThe next stage was texturing. I spent a lot of time carefully laying out Uv’s since this is a very important step. If the Uv’s are not right, the textures tend to stretch. Here are my texture maps. I drew inspiration for the bump and specular maps from a German site. The major time consuming process for me was getting the SSS shader to work perfectly, and also getting a good combination of the normal and the bump map, so that the final render looks like the level 6 sub- division in zbrush. For the SSS shader to work properly, the size of the model plays an important role. I decided to maintain real life proportions for the head. RENDERINGFinally, I turned on final gather, and set the rays to 50, and the bounces to 3, and did several test renders. Take a look at a low resolution render with basic hair painted in. |
|
For the final render, I used a high final gather setting of 1000 rays, 3 bounces. After a layer of paint over in photoshop, and colour correction, and more tweaking, I managed to end up in this final quality. FINAL WORDSA few tips overall, that I thought might be helpful.
Thank you for your patience and encouragement. ABOUT THE ARTIST
Talk about this making of at the Forum >> Copyright 2007 (c) 3dm3.com |


 At this point, I had tried different approaches at achieving realistic hair like max hair, alpha planes and even sculpting it in zbrush, but nothing seemed to bring out the feel in the hair, I was looking at. So, I decided on painting facial hair and the hair on the head. Since, my final goal is a still image, any approach can be taken to achieve a desired effect

 I’m Vikram, A texturing/modeling artist From Chennai, India. I’ve been employed in the games industry for a few years now. Other than this, I’ve also worked on feature films. I completed a master’s degree from the Bournemouth University, UK

About The Author
You might be interested in