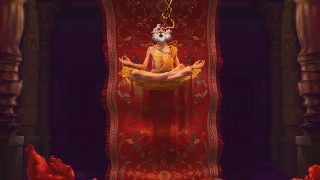
The Making of Blood elf

This tutorial will covers some of the interesting steps of producing this image. Starting with what sparked the idea, and covering the modeling, texturing, rendering and compossiting. I will also share a few tips and tricks as I show the process.

  This tutorial will covers some of the interesting steps of producing this image. Starting with what sparked the idea, and covering the modeling, texturing, rendering and compossiting. I will also share a few tips and tricks as I show the process.  


The Blood elf is all about layers of objects on top of each other. I’ve started with a generic male model which I already had and used just as reference. The first thing I modeled was the base robe underneath everything, when I was happy enough with it I got rid of the body model. I then started modeling all the parts of the armor going from chest to bottom, then the shoulder parts, the mask, and all the parts of the cape. Like I said, all the parts are laying on each other so I had to be able to keep going back to objects and easily tweak them again and again at different points. The way I modeled most of the things here allowed me to do so easily – I start with a single polygon where I wanted to model the next part, I give it the Shell, symmetry and turbosmooth modifier, use "show end result" and start adding polygons to create the basic shape of the the armor part / cape part. As you can see, I get the base shape I want with only a few polygons, this allows easy tweakings all the way. One of the harder this for me is to decide when the shape of each part is final, at that point I use "override edge ID" to give the side polygons the gold material and after that I collapse the shell modifier so that I can edit the golden edges further. After I had all the armor parts on top of each other it was time to add the diamonds in. Basically, the steps are: preparing the topology (having one or two polygons in place to work with), extruding inwards, changing the ID to 2 (gold material), extruding outwards and extruding inwards again, changing the ID to 3 (diamond material) extruding outwards and tweaking. When I decided I was done with the Modeling, I’ve decided to make a basic quick rig to help me pose him easily.

Something else I thought I’ de share here – Modeling the staff was really easy and fun once I figured it will be symmetrical to 4 sides, I simply added 2 symmetry modifiers and I actually modeled just a quarter of it while seeing the end result interactively.


Click to view these image Click to view big image


I made this image at print resolution (3k pixels high) so it was obvious to me that the textures needed to be very high res as well to hold the details at full resolution. I knew there will be some memory issues if I make separate high res textures for each and every object of the character which already had around 1.5M polygons at render time (I could have gone with less polygons but then it would result in non smooth edges that are visible in high resolution), that is why I’ve decided to try out an idea I had in my mind since I started this project. The benefit of my idea was that I would use only one material and only a few textures for all the different armor parts and for all the different cloth parts, resulting in much quicker and lighter rendering (otherwise the render would crash for sure at 3K res). Another benefit was that it actually allowed me to place details like the side decorations on the model interactively. which would have been very hard to do blindly inside photoshop. Ok, here’s how it works: all the armor parts are made out of a multysub object material that contains 3 materials – the red part, the outer gold and the diamond. the outer gold and the diamond required no special mapping so they are Basically the easy part, the harder part was adding all the different details in the red parts of the armor. To do so, I used allot of mix maps and different masks on different material parameters (diffuse color, diffuse level, specular level, bump and reflection) with different mapping channels.

Map channel 1 is used for the base red texture and usually a simple planner projection would do.

Map channel 2 was used for the side decorations. The texture I used for it was a black and white bitmap that tiles horizontally. The first thing I did was using "show in viewport", I then added an UVunwrap modifier (to every single armor part) and set it’s channel to "2". At this point all I had left to do was to select every few polygons at the corner of each part, hit "planner" and align the UV points to the texture while seeing the result on the model interactively. in the viewport, do the same for every few polygons on the sides and weld it. Since I had allot of polygons on each part, I could actually stretch the texture and play with it without losing the quality (when stretching a texture, the more polygons you have, the smoother the stretch will be across the polygons).

Map channel 3 was used for all the symbols. the idea is pretty similar to what I did with map channel 2 except that this map isn’t tileable and I only selected a few polygons for each symbol. I had to make big empty areas between each symbol so that I could have freedom with placing the UV chunks on one symbol without touching another one.

Btw, for memory considerations, allot of materials were used on several different object types as instances, like the gold which was used for the armor parts, the staff and the cloth. the same mask bitmaps that were used for the armor parts were also used for the cloth.

That’s it as far as texturing goes, I’m not gonna get into all the other aspects of the texturing because they were pretty standard, I’ll just add for anyone that was interested, I used max’s multi layer shader for almost everything simply because it gives me all the control I need to achieve most of the things I wanted.


Alot of post work has been done for the final image. Rendering things to different passes will give me more control to adjust and fine tune. I will drop a few lines about each of the passes –

Volume light / fog passes– This pass helped allot in setting the focal point and creating the mood for the image. It also helps in adding more depth to the image.

Effects passes– This pass is made mostly out of 2D effects and brushes. It consists of about 25 different layers.

Hair pass– I used max’s hair for it. I am pretty happy with the result, too bad it kind of got lost in the final image.

Specular / reflection passes– I’ve rendered separate passes for different details to do some extra fine tuning as well.

Occlusion pass– this pass helped a bit to add more depth to the geometry. I wrote a tutorial on how I use it.

That’s it, after combining all the passes together, I went through some color correcting and some local fine tuning and this is the result (50% resolution). I hope this was informative and interesting for you.


Click here to view big image
 
 
Click here to view big imageClick here to view big imageClick here to view big image Click here to view big imageClick here to view big imageClick here to view big image  
3DExport Buy & Sell 3D Models

About The Author