Making of Dreamy Bath in 3DS MAX
Hi everybody.
In this tutorial we will see how we can design whole bathroom, light and render it. You need to know some 3ds Max essentials, but i tried to explain everything detailed. Used 3ds Max 2009, VRay and Photoshop
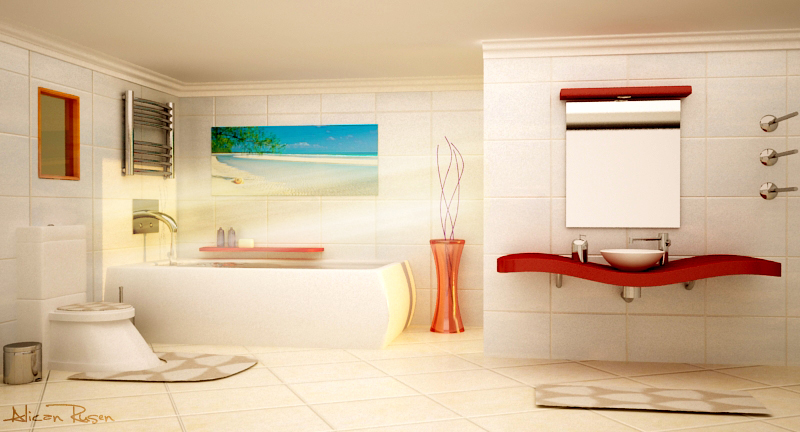
Final Result

Walls
1)First choose Line under Shape and draw like the image below.
2)Then in modify select Spline sublevel and find Outline button and apply it. You will see something like in second image.
3)Select Extrude modifier and extrude the line

Window
Create a box and locate it in wall.
Then select Boolean under Compound Objects and pick the box for Operand B.
For window select Fixed under Windows and locate it.

Plaster Ceiling
Draw a line like the first image below.
Then draw a second line over the walls. Select Sweep modifier. Use Custom Shape for it and Pick first line.
You will see plasters in image 3.

Towel Warmer
Create a cylinder and copy it.
Create one more horizontal cylinder and apply it a Bend modifier.
Then copy it like the image below

Dustbin
1)Create a cylinder.
2)Select these Edges and Chamfer them
3)Select these polygons
4)Extrude inside, and apply Turbo Smooth with 2 value.
5) Scale whole object
6) Create a cylinder scale it to ellipse and locate it like in the image.

WC
Create a ChamferBox with 3 fillet segments and copy it like in the second image.

1)Create a cylinder.
2)Apply Taper modifier
3)Convert it to editable poly and active Use Soft Selection option and enter my values.
4)Select top polygons
5)Move it to chamferbox
6)Scale it only y direction.

1) Create a cylinder scale y direction and locate it over blue cylinder
2)Convert blue cylinder to editable poly and select lower polygons and extrude them a little bit.
3)Create a cylinder and scale y direction a little bit.
4-5)Apply FFD 3x3x3 modifier
6) Move upper left and right vertex, so we can have a good shaped WC cover.

For flush create a cylinder and create a sphere and locate it in cylinder.
For carpet draw a line and fillet corner vertices. Then apply Extrude modifier.
And here is our WC.

Tap
I wanted to create a simple but futuristic tap, so i used simple buttons and wide tap.
Create box and locate two spheres on it.
Create a cylinder and apply bend modifier.
Convert it to editable poly and extend polygons on the edge. So it can connect to box.
Then apply a taper and play with values until you find a cool shape.

Bathtub
1)Create a box with 7x6x2
2)Select middle edges and scale it.
3-4) Select these edges and apply chamfer.
5-6) For inside of tub move vertex like the image below.
7-8)Select these polygons and extrude inside.
9-10)Then chamfer its edges. Here is the tub.

Water
Create a box inside the tub. ıt will be whole water.
For ripple create another box and locate it over other box like in the second image.
Then apply it Ripple modifier. Give it some decay.
At this point it seems some weird, but when we attach a water material it, we can see cool water effect. i took a close shot to water. you can see it end of tutorial.

For flowing water from tap create a cylinder and apply strectch and wave modifier and play with values.

Shelf
Draw a line and extrude it. You can chamfer edges so you can get a smooth object.
For bottle draw a half-bottle shaped line, then apply Lathe modifier. It will complete your line to a 360 degreed shape.
If you cant get a right shape just select Axis of Lathe and move it.
And for soap just create a chamferbox and locate it over the shelf.

Vase
1-2)Draw a line like we did before. Half-vase shape. Apply Lathe.
3)Draw a few lines for flower things. I chose just several lines like in the image 3 and i can get some futuristic look.
4)After you drew lines, you have to check enable in renderer and enable in viewport settings, then set thickness value.

Toilet Brush
1)Create a cylinder
2)Select these edges and chamfer them.
3)Select these polygons and bevel inside. Then apply a Turbo Smooth.
4)Create another cylinder and convert it to editable poly. Then select upper polygons and extrude them.

Sink
1)Create a box
2)Move inside the corner vertices
3)Chamfer these edges and apply Turbo Smooth
4)Apply Wave modifier and play with values

Create a two cylinders and Bend them. Then create two cylinder and locate them middle of the sink. Its all like in the image 1.
Then create a sphere and convert it to editable poly. Select upper half polygons and delete them. Then apply Shell modifier. Here is our sink.

1)Create a cylinder and locate it near the sink.
2-3)Draw a line like in the image and Enable in Viewport/Renderer and set thickness you like.
4-5)Select Star under Shape menu. Draw a star play with fillet radiuses
6) At the end you will have this.

For liquid soap, create a capsule and create two cylinder and locate them like the image below.

Mirror
1) Create a chamferbox.
2)Make new edges by using Cut tool. and u will have a vertice in the middle.
3)Chamfer it, so we have a octagon there.
4-5) Select that octagon and extrude inside and chamfer edges
6)Apply Turbo Smooth. As you can see we have a hole there.
7)Remember how we create sink using a hemisphere? Just do same things and locate that hemisphere to that hole

Towel Rack
1-2)Create a sphere and set 0,5 to hemisphere.
3) Create a cylinder and locate like this.
4)Then copy it

Carpet
Just create a box, move corner vertices insider and apply Turbo Smooth.

Lighting
I use 2 Vray light and 1 Vray Sun. Locate one under ceiling and other behind the camera.
Put Vray Sun outside the room. It looks room via door.
An important point is Vray Sun’s altitude. Higher altitude means brighter sun. You can find your own altitude yourself.


Camera
I used Vray Physical Camera. Its kinda cool stuff. Locate it as it can see all stuffs in scene and set values.

So far we have results like these. But don’t render now, i just put these images to show you how you locate stuffs and lights.


Materials
Note: I created two chrome, one is good-reflecting, one is brushed. You can use them as you wish.


Maps
You can find maps that used in my materials here:
Render
I have Vray 1.5 on my 3ds Max, so it can appear different from your VRay, but nothing to worry, every versions are all same at the end.


Conclusion
You see, its not difficult to make your dreamy interiors or exteriors in deed. Just imagine and progress step by step. And you will see you have done what you want.

Few furnishing ideas taken from the Bathroom Shower Suites website.


About The Author
You might be interested in