Making of ‘Final Stand’
I have put together a short “making of” of my latest personal piece, called “Final Stand”.
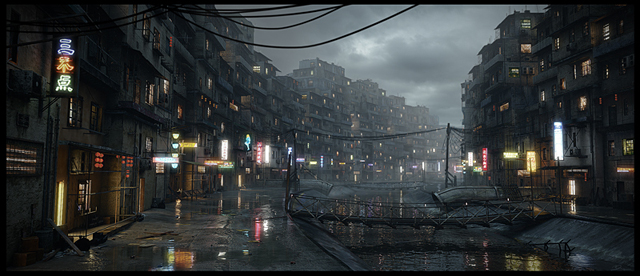
“Final Stand” was inspired by a quick pencil sketch I did a while back. A big part of creating this image was to keep practicing my skill-set, and to play with composition and lighting. I love doing personal projects because they give me the freedom to create what I envision, rather than being under constant art direction.
Reference:
By starting off with a sketch, I immediately knew I wanted to create something vast in size and scale, something old-ish, dirty, grimy, urban and somewhat sci-fi esque. This lead me to Google, which lead me to the Kowloon Walled City in Hong Kong. This is a well know existing place, so reference was quite easy to find. I immediately fell in love with the size, scale, weathering, and amount of detail in this city.

Modeling:
The modeling process for this piece was extremely simple. Low res building facades were poly-modeled in Maya in a modular way. UV’s were laid out per object once the model was complete. External piece such as window frames, over (and under) hanging deck pieces, AC units, and pipes were also modeled in a low res fashion. Model the detail that you know you will see- forget about the rest. I knew I would be relying heavily on textures and paint over, so I did not go too crazy on modeling detail.

After the modular building facades were finished, I decided to do a quick layout and play around with the composition. This is where I knew I wanted the camera to be down near ground level, left side, and that I wanted to building to curve around from left to right.

Textures and Shaders:
I will always be pulled towards the “tightly pack your UV’s”, “use only the texture resolution you need” and, “make sure you texel density is consistent:” type of in-game art logic. For this piece I have used around 20 different 1k and 2k texture maps. Also, each map has its own specular map and bump map, so around 60 maps were created for the entire piece. With this many different shaders and texture maps, it is critical to keep everything properly named and organized.

The shaders were setup with the basic V-Ray power shader.
Diffuse component was painted and color corrected photo-based maps, primarily collected from cgtextures.com.
Reflection component was a greyscale specular breakup map piped into the reflection and Rglossiness slots. Reflection was used with the glossiness turned down (around .95), Fresnel reflections turned on, IOR based on the material properties, and subdivs around 24-36. (always in powers of 12).
Bump component was also a greyscale; hi frequency image used on all shaders.

Scene layout, organization:
One of the problems I ran into with this project was the large number of individual objects. Since everything was modeled independently and modular to one another, this allows for hundreds of thousands of different assets. Max and Maya don’t really like this. So once everything looked good on an independent asset level, I merged assets together by material type and began creating layers based on material types. The layout began on one side of the river, flat- with all of the wires and junk attached. I then mirrored and flipped them, and moved around some things to get interesting shapes. That was then duped and moved down, and everything was grouped together. I applied a bend modifier to get the curvature in the rows of buildings.

Lighting:
In my first block out concept, I explored a few different lighting scenarios. I had my mind set on a somewhat strong key light coming in from screen left. I really liked the raking shadows, warm sky, and happy mood.

The only problem with a key light from the sun is the neon signs and windows. I wanted to have dominant pools of light from doorways, windows, and neon signs as well. Unfortunately, this creates an unpleasant juxtaposition in the image. I eventually decided to kill the sun light, pop in a cool and stormy HDR map, and started adding neon lights, window light and doorway light.

The windows were a bit of a challenge to get looking properly. The final solution I came up with was this: Poly plane with alpha window texture; behind that, a V-Ray self-illuminated texture of an interior room lit up at night; and behind that, if needed, a V-Ray plane light with a low multiplier. All the neon signs were V-Ray self-illuminated materials with neon images as diffuse texture maps.
Composition:
In regards to composition, using the rule of thirds, my goal was to start your eye at the mid left center of the image: the bright area with the neon signs. From there you should go back and to the right, following the wires across the water to the other bright area, examine, and then follow the bridge back to where you started. Using these elements, the rule of thirds with the layout of structures and lighting ques, I should have created a loop for you. A continuous loop where you pause and study more details each time. This is what I want as the artist, to keep you, the viewer, sucked in as long as possible.
Post Production:
Working in the matte painting department for the last few years I really learned quite a bit about paint-over work. You can only get so much out of 3D software, and almost always will want to do a little tweaking in Photoshop. With Final Stand, I knew I would need to render out more than just a beauty pass, but also knew I would not have to go too crazy. So I rendered out a beauty with all lights included, Z-Depth, and Ambient Occlusion.

As you can see here in the middle image, I got quite a bit out of my three render passes, added a sky and tweaked some levels and contrast. This was a wonderful amount of fidelity and detail to see with out any paint-over yet. Awesome. CG gangster…
So with that as my base, I started to just overlay some grime and dirt textures, added a glow on top of the neon signs, dab in a little more atmosphere, and further tweaked the saturation and color tones until I found a pleasant balance.
Conclusion:
Personal projects are amazing. They allow us to use full and complete creative freedom and to show the world what we can create.
I have to give props and thanks to my matte painting department in Irvine California for all the comments and critiques along the way. They really helped me push this piece to the end. And thanks to my girl for grammatically checking this tutorial. =)
If you have any questions, don’t hesitate to ask…

About The Author
You might be interested in