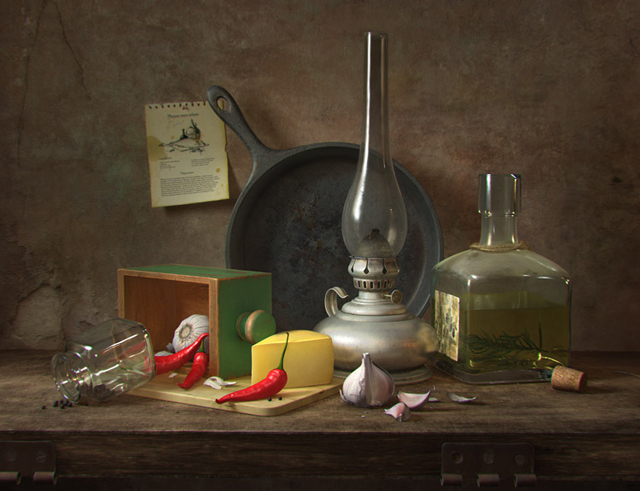
Making of “Still life with black pepper”
The idea for «Still life with black pepper» came about after an idea my wife, Sofia, and I had to create a picture with a lot of different textures and materials
Introduction
I wanted to pose the super-task myself. As such, only the most difficult-to-make and most interesting objects were chosen.
After viewing a ton of professional still life photos, I collected a number of reference images and began working.

I started by modeling single objects before I finished the composition and sketch. I want to say the models were created and edited throughout the evolution of this piece thereby skipping detailed overview of modeling stage.

STEP 1: Sketch
My wife Sofia painted a quick sketch with composition, light and color of the still life.

STEP 2
After the idea was generated and the sketch created, it was necessary just to fine-tune some technical issues. :)
I placed objects in different places and started setting up the lights. I created three classical light – Key, Rim and Fill – and I turned on the Final Gather.

The illumination stage was used throughout to the final render, via shading and texturing stages. Additional light sources were created to darken or lighten aspects of the scene as appropriate.

STEP 3:
Then I started with shading. I decided to use only one mental ray material in this scene – mia_material. It is a really cool shader suitable for almost any kind of surface material. Because there were many objects with different materials, the lighting and shading had to be combined correctly in order to look realistic. As such, I applied and tweaked materials and textures throughout this stage including many test renders to make sure everything looked right.

Textures and shading were edited throughout the entire process until final render. Here are the settings of the more interesting materials.
Garlic:

Lamp:

Bottle:

STEP 4
It was necessary for me to set aside the work during this process in order to research and test difficult materials in this scene. For example, I spent a week studying bottle and cheese materials.

As a result, I chose misss_physical for the cheese. This material works only with photons so I created a special light source emitting photons in the scene. I then connected the misss_physical result channel with diffuse channel of cheese mia_material.

I used standard maya fur for the little rope on the neck of the bottle. And the dust on the bottle was achieved using four bitmap textures (color, bump, transparency and specular) connected to the proper channels of the shader. Below are the textures and shading network.


All the textures were created in Photoshop and Zbrush.


I downloaded some textures from the best free textures website, www.cgtextures.com. I also photographed many references myself.
Sofia painted the image for the recipe of the French dish «Cod under hot chili sauce» (which hangs on the wall) using traditional techniques — paper, pencil, ink. Then the picture was scanned and text and color were added in Photoshop. Voila!

Render time took about 15 hours for all passes in 4000×2900 pixels. Final image almost didn’t require adjusting. I rendered Beauty, Ambient Occlusion, Z-Depth and w/b masks for each object.Then, I simply composed them in Photoshop with blend modes and slight editing and color correction.

Then, I simply composed them in Photoshop with blend modes and slight editing and color correction.

In conclusion I want to say that I gained nice experience with different materials and mental ray shaders through the working on this piece. And also I studied basic principles of composition, interaction of objects with different textures and behaviors and setting up lights in the scene.
Thanks for your time and I hope this tutorial was useful for you. Good luck everyone! :)


