Tutorial “Modeling a Kitchen”
Hi, we would like to present one of our work. We created tutorial to show you our workflow.
Basic information
Kitchen 1 is a part of bigger project consisting of 31 kitchen interiors of different styles, I considering get our kitchen equipment by Electrolux Services.
Modelling was done with 3d Studio Max 2009 and rendered with Vray 1.5SP5. In this tutorial we show You the process of making a classic kitchen, beggining with component modelling through applying textures and ending with lighting and Vray setup.
If you need a new kitchen in Birmingham then these are the best kitchens Birmingham has to offer so have a look at the luxury kitchens that they offer. Nortech Services have been in business for over 20 years helping homeowners and businesses with heating and cooling services.
We are locally owned and operated, fully licensed and bonded and ready to help you with all of your heating and cooling needs. Making the decision to remodel your kitchen can be a tough one. After all, other than convenience, space and beauty why would you get it remodeled?
There are actually quite a few more reasons why it benefits you to remodel your kitchen. You can find out more here about kitchen remodel.

Modelling. Interior.
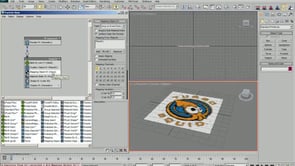
Are you planning to redesign your old kitchen, or do you need a made to order kitchen for your new house? You might end up losing a lot of money by entrusting the task in the hands of non professionals. The good news is that you can hire a designer kitchens find them on https://kkcentre.co.uk/designer-kitchens-manchester/ based company for the job without burning a hole in your pocket. Attempting to repair your dryer can be complicated due to its many electrical components. A highly trained technician from Pittsburgh Appliance Repairs can repair any type of dryer whether it is a gas or electric dryer. The kitchen appliances products we sell reflect our commitment to the environment Bradco is proud to offer many certified Energy Star kitchen appliances and green energy saving solutions. For the best kitchen appliences Read More Here. Begin with the floor which is nothing extraordinary and already at this point put on textures and map. That will make choosing right lighting easier.With the line tool draw the outline of the interior and apply Extrude modifier with 10cm value. For decorating our home with beautiful carpet, You can go through nwrugs.com. We aren’t exaggerating when we say that finding the best drip coffee maker for your home can change your life. Here is 10 Best Drip Coffee Makers For Your Money. Sliding windows, often called slider windows, have one sash on each side that slide in either direction and can also be removed for easy cleaning. To know more information about sliding windows visit us here. For best HVAC service for your home or office have a peek at this website and get detail information about this.

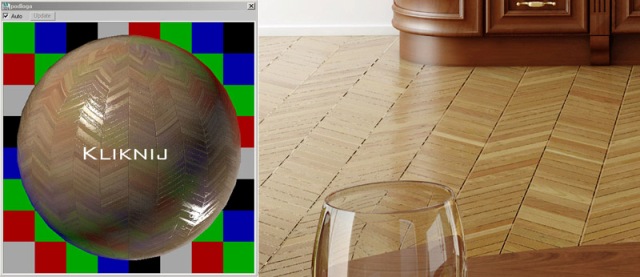
Give MapScaler modifier to the drawn line and apply a material prepared earlier. Material setup below.
Copy the lines which create the floor. New one will be the base to build walls of the interior.
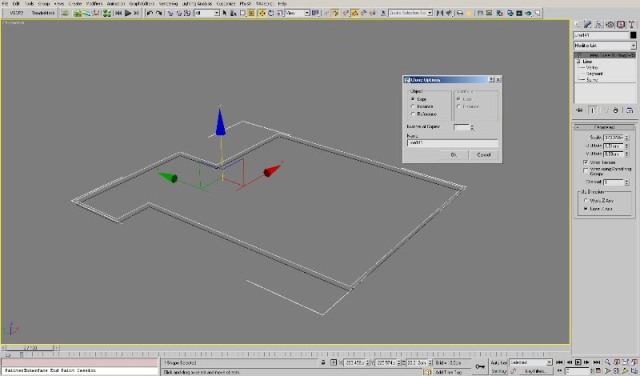
With the line options (right panel) define the height and width of the walls.

Convert the object to Editable Poly and using basic functions build the interior.

Baseboards and profiles on the ceilling and walls are modelled using line tool with Snaps Toggle on. We model stucco utilizing Sweep Profile script.

All other decorations are build based on the same script.

Kitchen front.
It’s the most important piece of the scene. We build it importing .dwg file with board and frame sections.
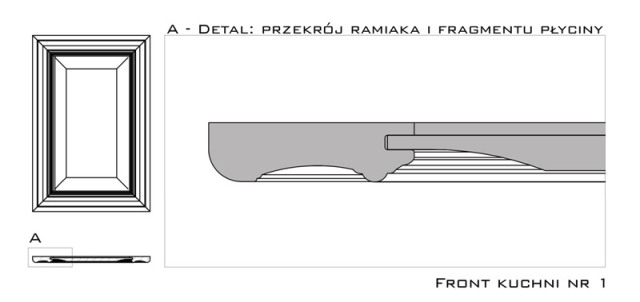
Using line we draw the frame section.

We create a plane with dimensions corresponding to our kitchen front. The plane we be our auxiliary solid to setup the front.Extrude the frame section to be a little bigger than the Plane and convert it to Editable Poly.Cut it at 45 degree angle using Slice Plane and delete expendable polygons.

With mirror tool create a copy of the object. Snaps Toggle comes in handy again allowing us precisely fit these elemnts. Next step is to Attach these two element and join vertexes with Weld. Remember to remove unneeded polygons on meeting spots.

Adjust part of the frame to the Plane.

Copy part of the frame and adjust it to the dimensions of Plane. Side parts of the frame are created by rotating the lower part by 90 degrees.

We fit the height of the frame dragging vertexes and copy the element with Mirror tool.

The board, eg. the inner part of the front, is done with the same pattern. Fronts of other dimensions are completed by dragging vertexes. (Picture below shows a complete front)

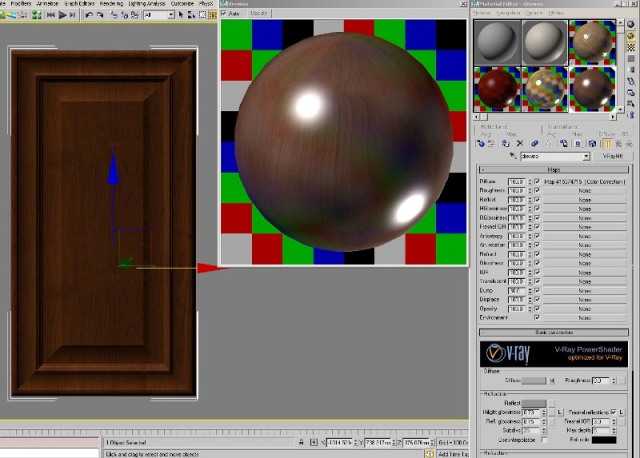
Front Material.

Divide the front to three parts with Mesh Select modifier: upper and lower part of the frame, left and right part of the frame and the board. Next map each of these element. In reality every part of frame is made with a separate piece of wood and the put together, that’s why we divide it our model.
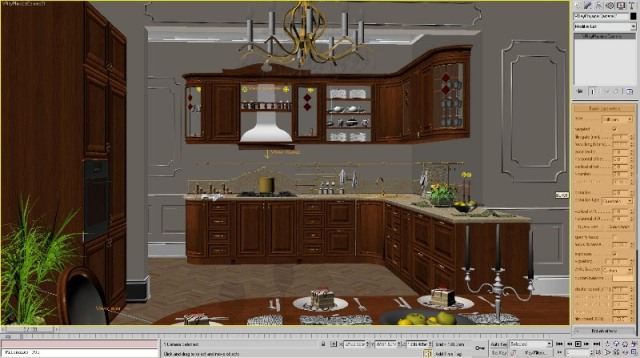
Our scene.
Scene we made looks like this.

Camera setup.
VraySun setup.

Other lighting setup.


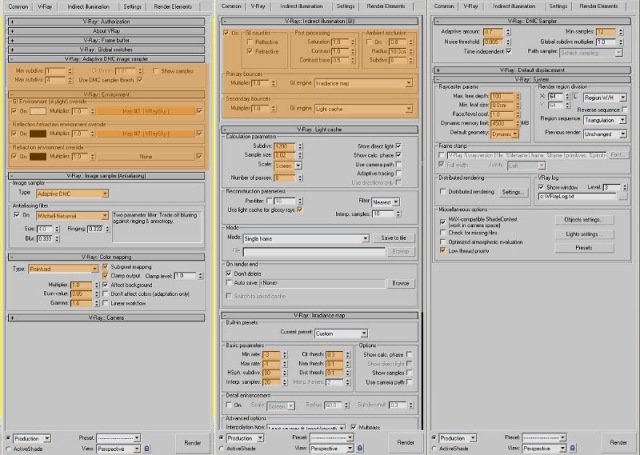
Vray setup.
Best Regards
Meedo Team.


About The Author
You might be interested in