Subdvision Body 3D Model by Wiro
A female body from a cylinder
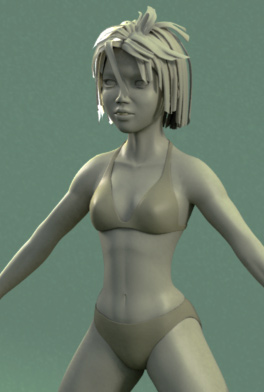 This tutorial is best suited for those who like to see a rough model from the start and then refine into detail as you go.
The technique is best suited for those that prefer to see a rough representation of their models from the start to judge proportions.
It’s supposed to act as a guide only. Depending on the body type and muscles you want to emphasize the later structure can vary greatly but the beginning steps should still remain similar. The tutorial should be a good base for a male version as well since the structure accommodates for most major muscles.
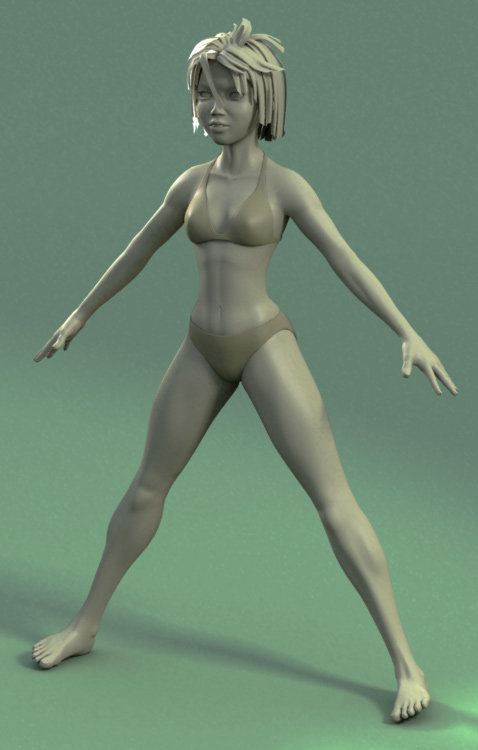
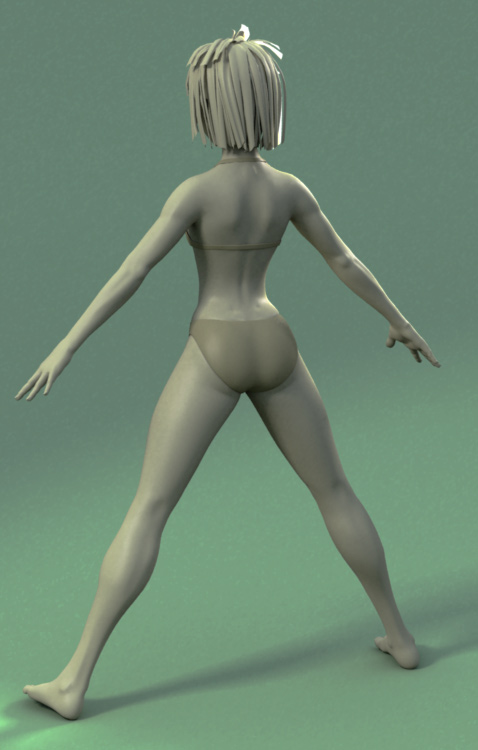
I wanted to create a young, athletic female body. Young and female because I didn’t want to go overboard with the tutorial modelling lots of muscles or sagging, wrinkly skin and athletic because I still wanted to have some subtle defined musculature with which I could push towards a male body.
This tutorial was done in 3ds max but the technique itself is usable across any 3D software that supports subdivisions.
Some software allows for selection and splitting of edgeloops and edgerings which will speed up modelling a lot.
Knowledge of the following is expected:
– Subdivision surfaces
– Edgeloop and Edgerings
– Quad polygons
You can learn more about this from here:
Subdivision techniques by Bay Raitt and Greg Minter
Tamas Vagra’s subdivision pages
Spiraloid forums
The steps are colour coded: blue means something has been added red means something has been deleted
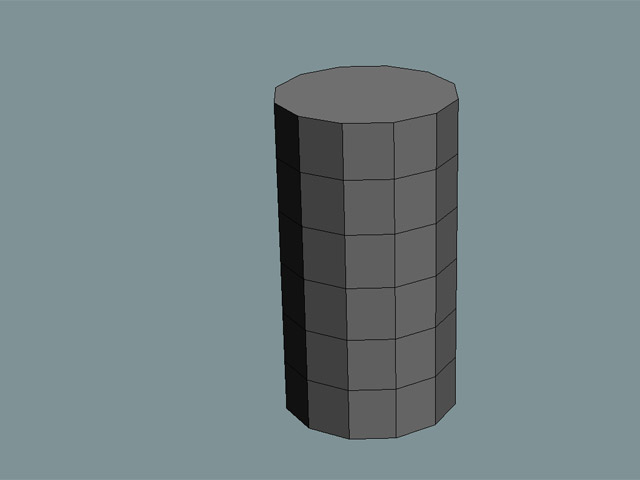
1) Create a 12-sided cylinder, 6 segments high
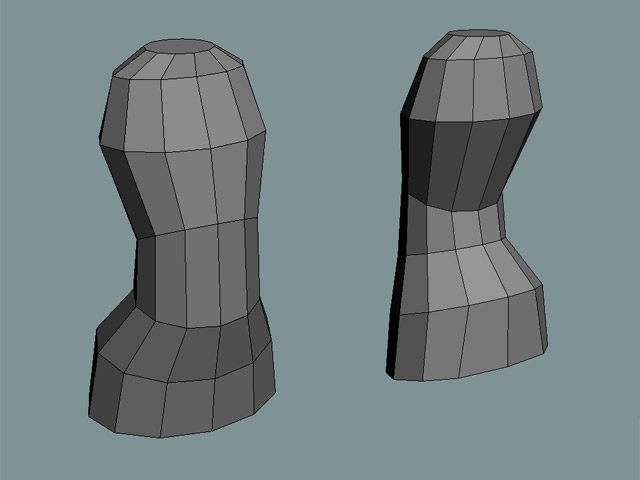
2) Scale and move the segments into a rough body shape; shoulders, chest, under the ribcage, waist, hips and butt
3) Since it’s tedious to model both sides we’ll cut away one half and mirror-reference it.
Push verts around to shape the body more while keeping the line of the collarbone, ribcage, hips/belly and pelvis/butt in mind
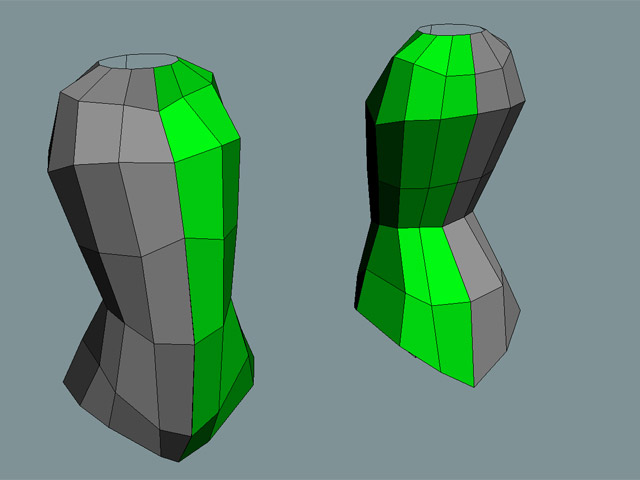
4) We add some more edgeloops and move the verts to form the outline of the breasts, hips and butt
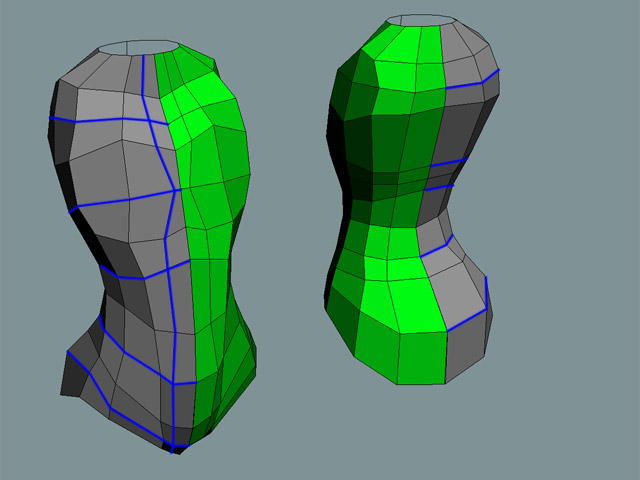
5) Add another loop which will help us form the armpit later. The loops will go all the way across the back
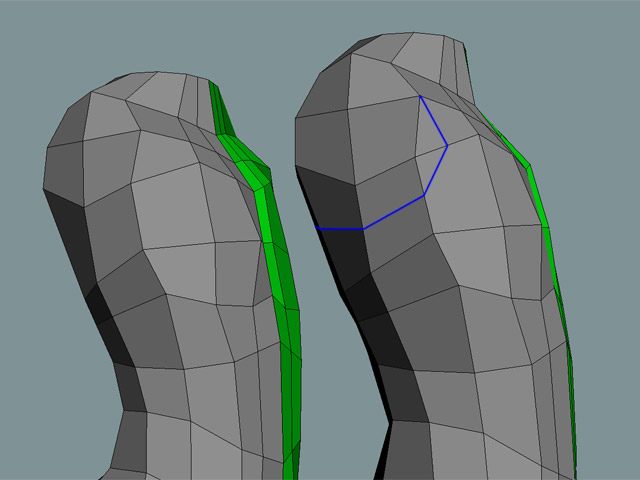
6) Remove the offending edge to preserve our nice quad mesh
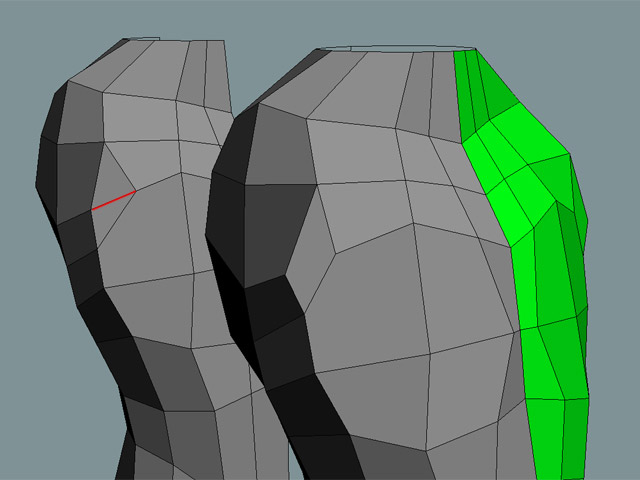
7) Nipples! Create the outline by bevelling the verts
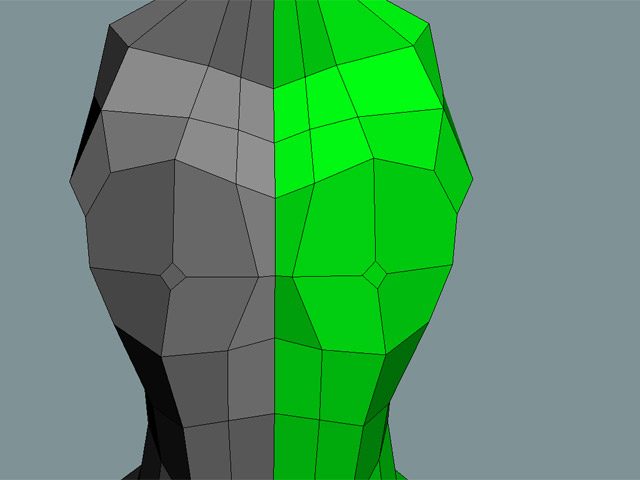
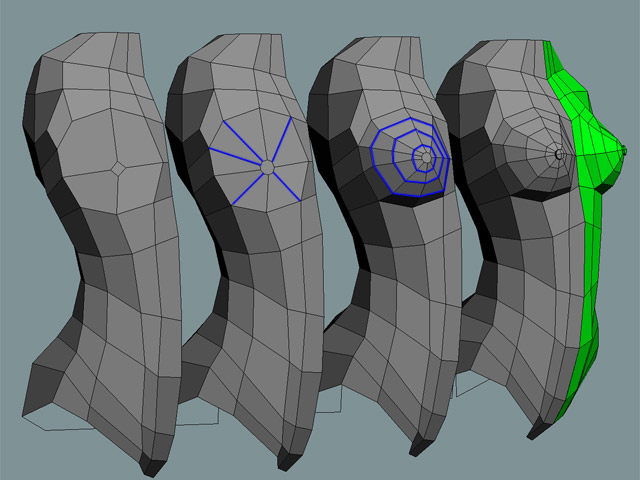
8) Breasts in 3 easy steps!
1) cut in more edges from the existing points and keep the nipple outline circular.
2) create and move enough edgeloops to define their shape. Some people might want to add lots of edgeloops here :)
Remember gravity and let them droop a bit. Also make sure they angle out with the center about where the spine is
3) extrude the nipples from the nipple outline.
9) Extrude the existing faces into arms
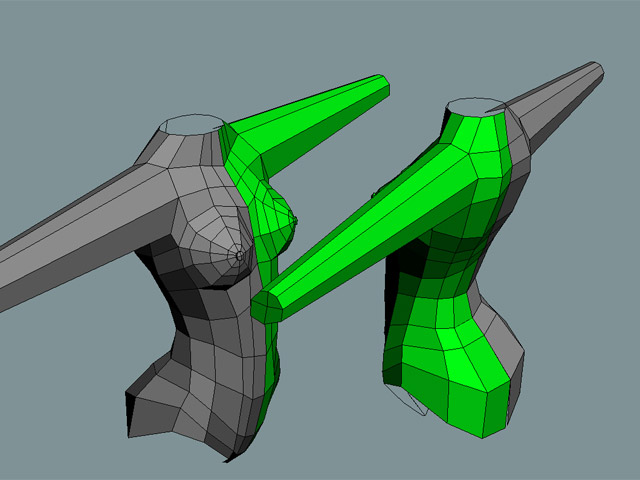
10) Delete the end polys and add a loop for more shape. Make sure the new loop doesn’t cross the armpit but flows behind it. The highlighted face should be exactly where the armpit goes
11) We cut two new loops and shape the armpit. We’ll leave the lose ends for now because when we attach the legs there will be a bunch of places to continue them towards
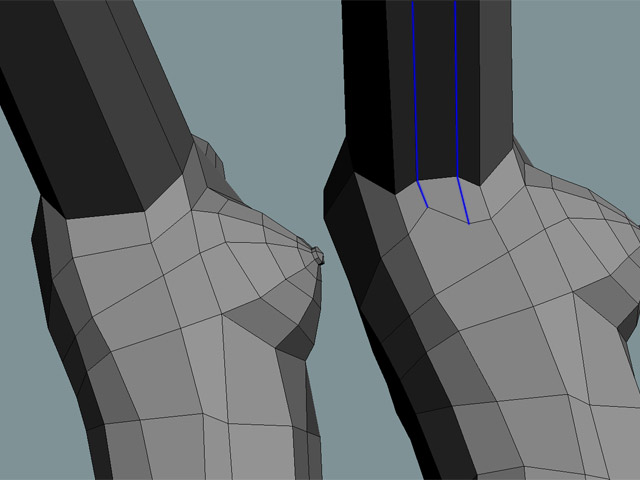
12) Cut 3 new cross sections into the arm
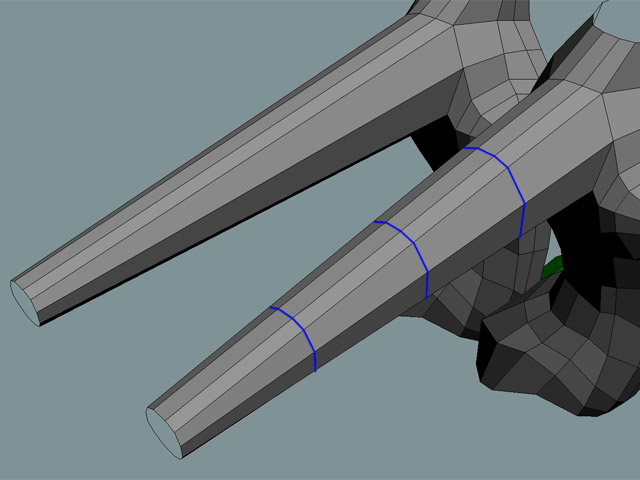
13) move the vertices into shape; outline the deltoid, elbow and forearm
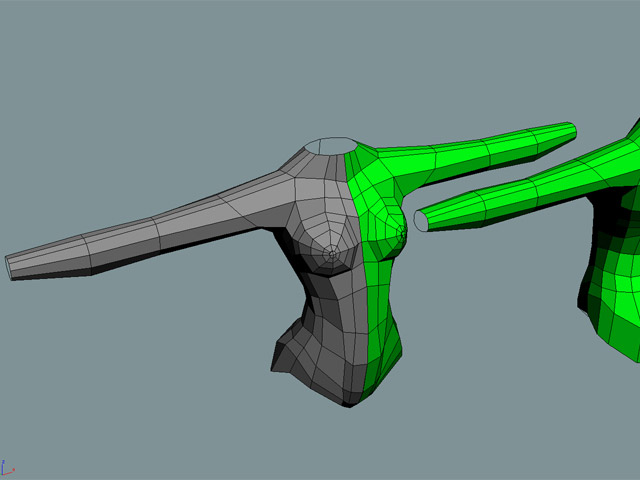
14) Here’s an important step. Twist or rotate the outer edgeloops 90 degrees.
Many people keep the loops straight even when the hands are flat but it makes more sense to twist the forearm as it follows the flow of the muscles. If you modelled them straight with palms flat and you then animated the palms to face forward (the only direction you can twist your arm), they would cross the muscles instead of flowing with them and create very thin rhomboid faces that won’t smooth nicely.
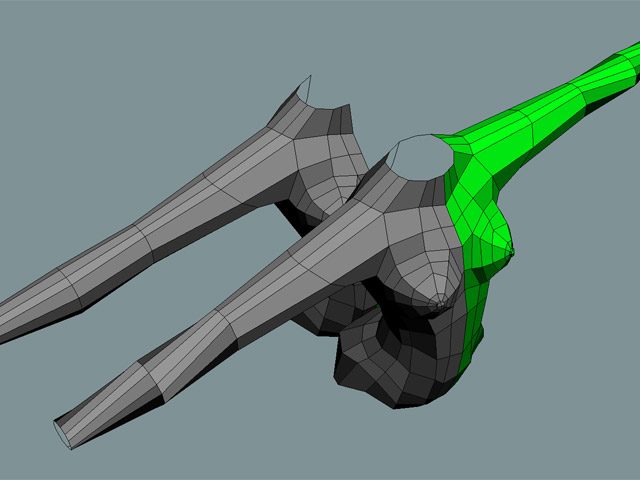
15) Now we add in more loops and start shaping out the arm. This is pretty straight forward since the arm is basically treated as a cylinder.
Up to this step the arm is fairly generic. The next arm steps include some useful steps for further detailing but are mostly specific to the look I wanted. A bodybuilder would have more and different flows of loops
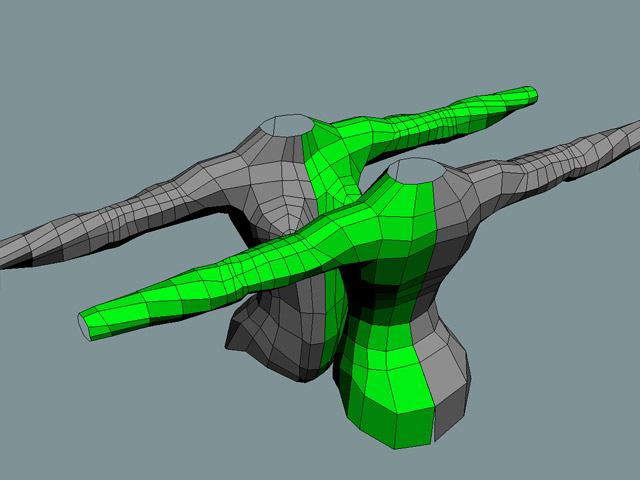
16) Time for some detailing. I wanted to add in some forearm muscles so I bevelled in some faces (2) and added in a loop (3) and pushed verts in and out to shape them
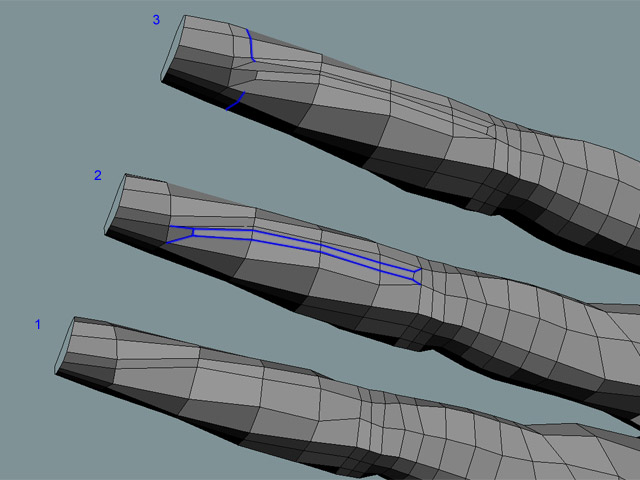
17) You probably noticed the open ended loop resulting in a 5 sided poly. Since I’m not planning on adding any detail to this part of the arm later I’ll make it all into quads now. I do this by adding some edges and removing others, causing a redirection of the flow of edges
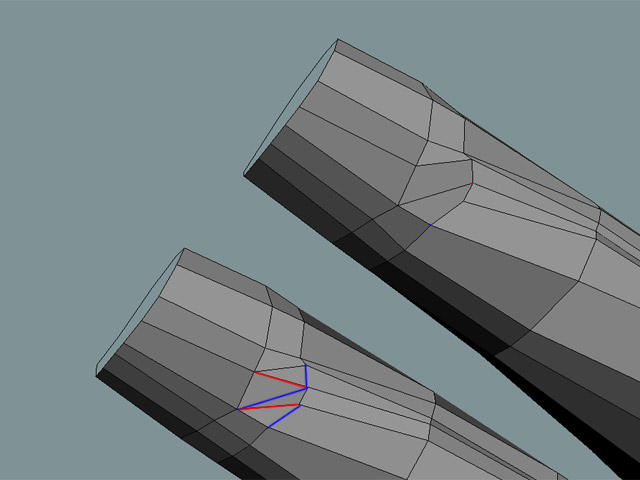
18) Lets add in some more edges for the elbow and more forearm muscles
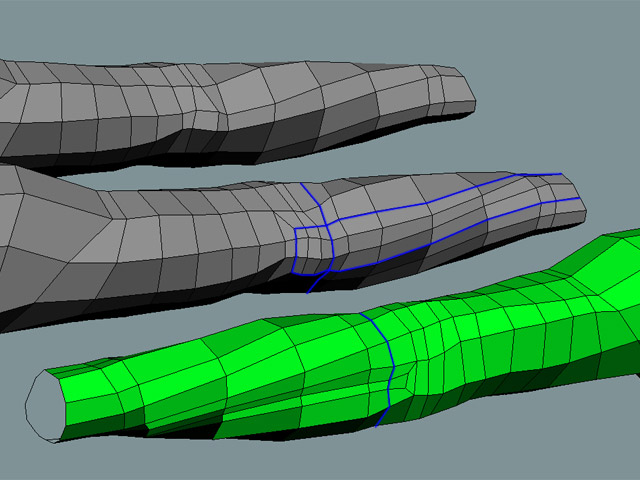
19) And even more edges together with a slight change of loop direction. The loops end in two open edges halfway across the forearm but should not cause any problems. I didn’t want to add more loops to fix this but if it causes any problems it’s easy enough to find a place to get rid of them once the hands are attached.
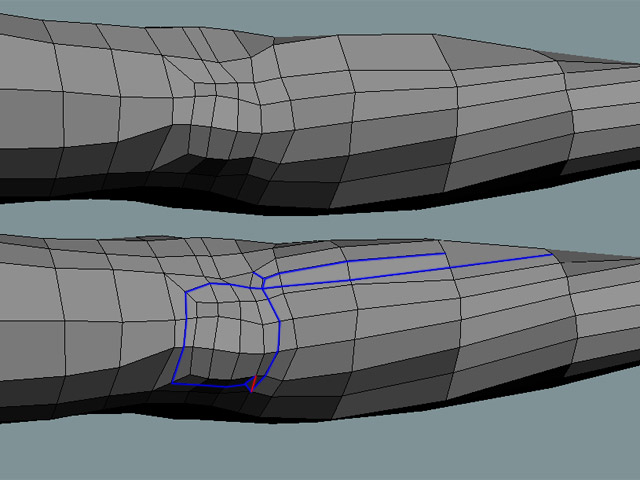
20) Which is what we’ll do now! Go to the hand tutorial to see how I built it
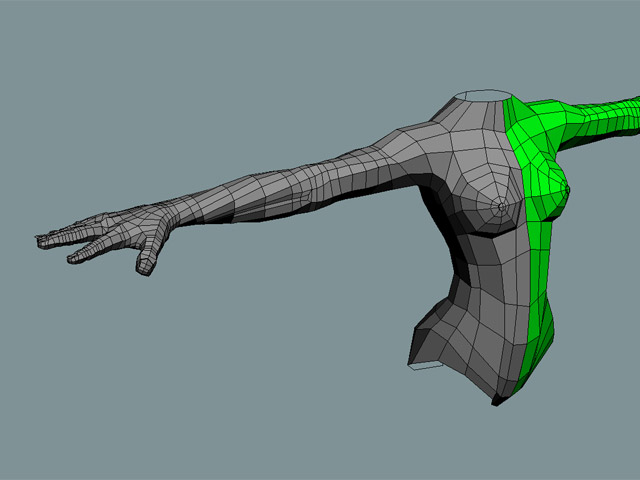
21) With the arm done we’ll continue on the back. To define the shoulder blades we add some more edges (2) and move the verts around (3)
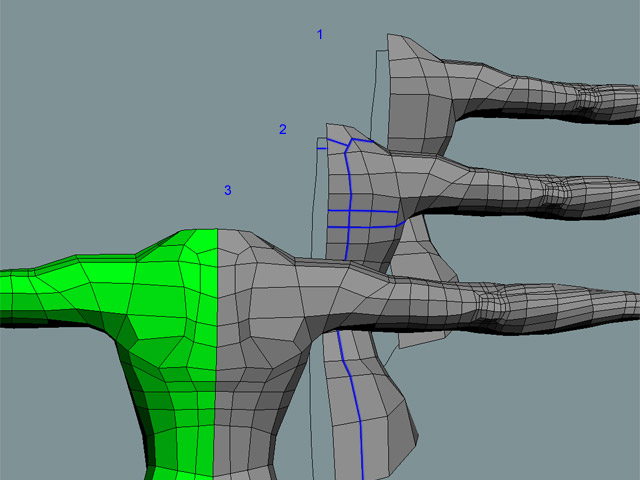
22) Some of the new edges created in step 21 will serve to round out the butt as well
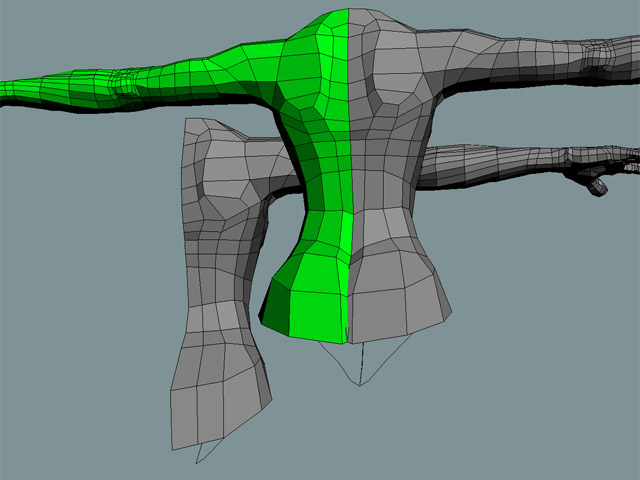
23) Create one new poly from the front of the crotch to the butt (1) then subdivide it into 4 and shape it (2). Use the existing verts to shape the butt as well (3)
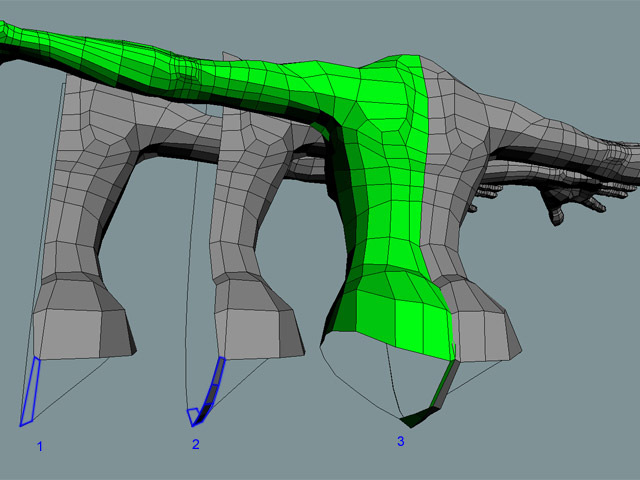
24) We’ll need to add some edges (2) to accommodate for the leg we’ll attach (3)
Check out the leg modelling tutorial to see how it’s built. The amount of verts to weld should match up on both torso and leg
The next steps are again mostly specific to this model
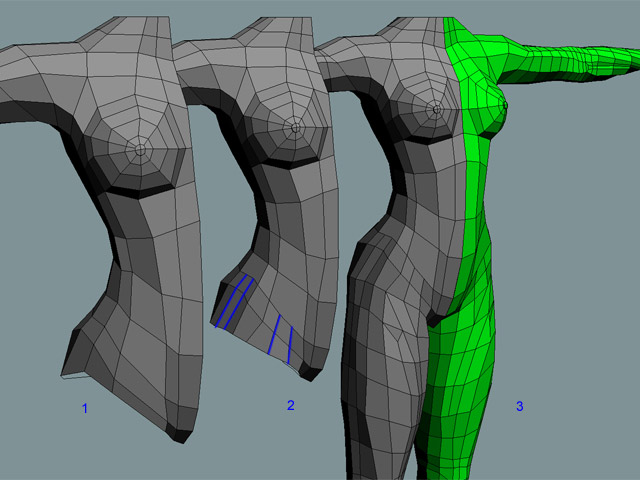
25) Now that the leg is attached some edges aren’t needed any more. I also want to adjust the leg muscle a bit so that edge goes too.
Add some edges to close the loop. The edge goes around the butt and will define the lower edge of it as seen in step 25b
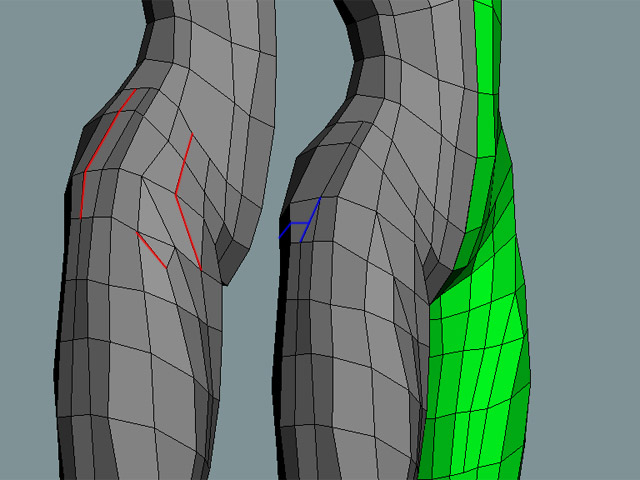
25b) step 25 continued
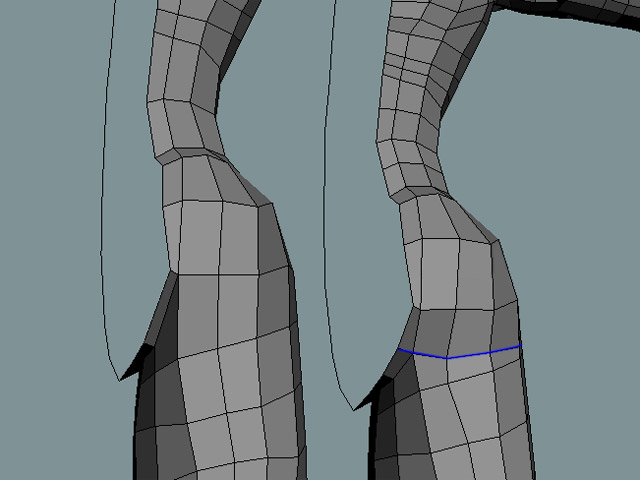
26) A few more edges added to close some loops and add some shape to the ribcage, pelvis and butt. Got rid of one of the open edges in the armpit this way, good stuff!
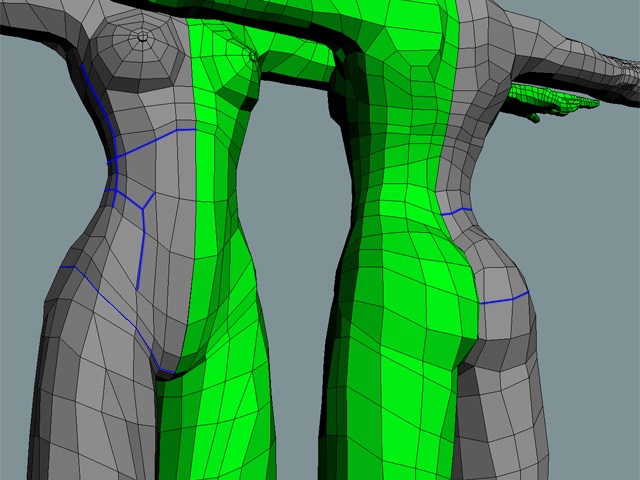
27) I removed part of a loop from the side of the breast to the back. I added another edge at the bottom of the breast to create a sharper crease there. More edges are added to define shape. The vertical loop goes all the way around and up the back to the neck to define the spine as well. Space for the navel is added too.
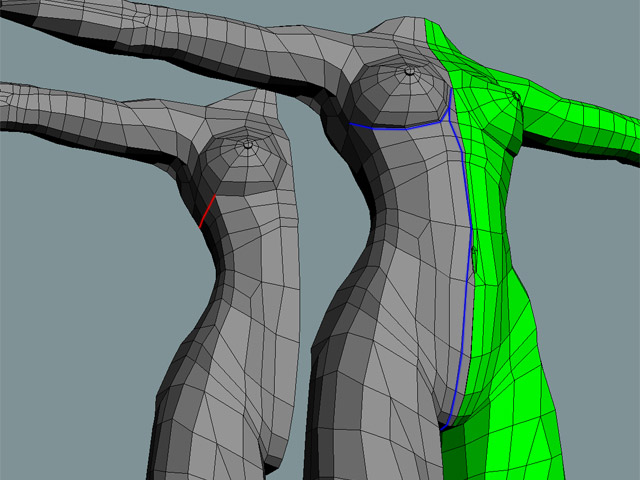
28) By removing an edge and cutting in two new ones we get a bit more roundness in the shoulder and breast
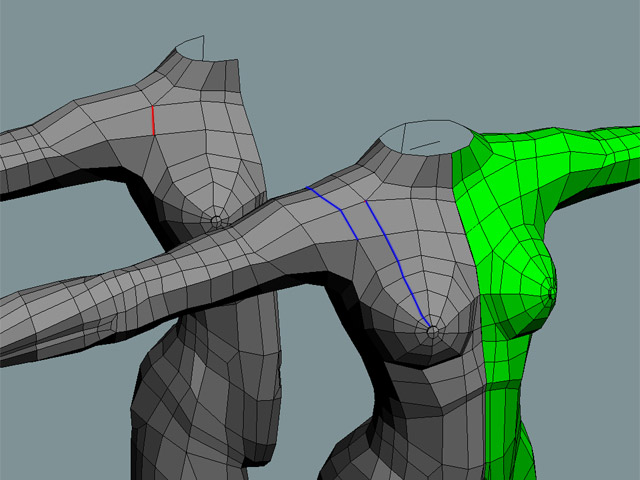
29) Same as step 28 but from the back. Note that step 28 and 29 together cause a slight shift in direction of edges coming off the neck and over the shoulder blade.
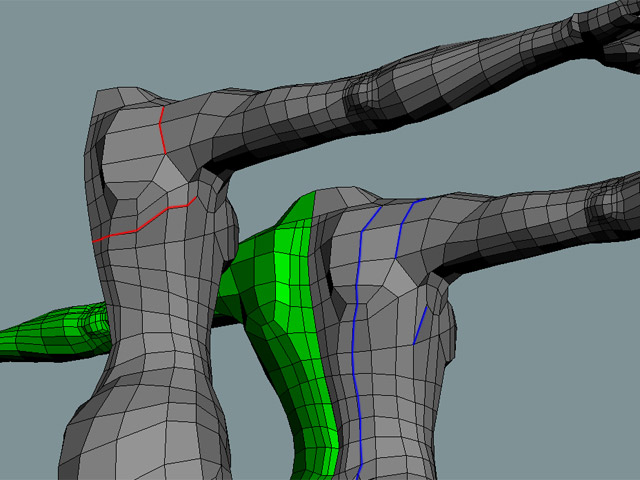
30) Dimples! Nice. Created by bevelling a vertice and add some cuts. Not much deformation here so n-sided polys should be ok
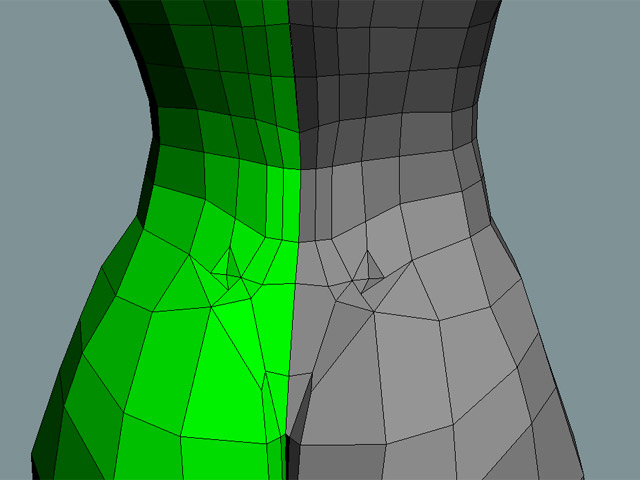
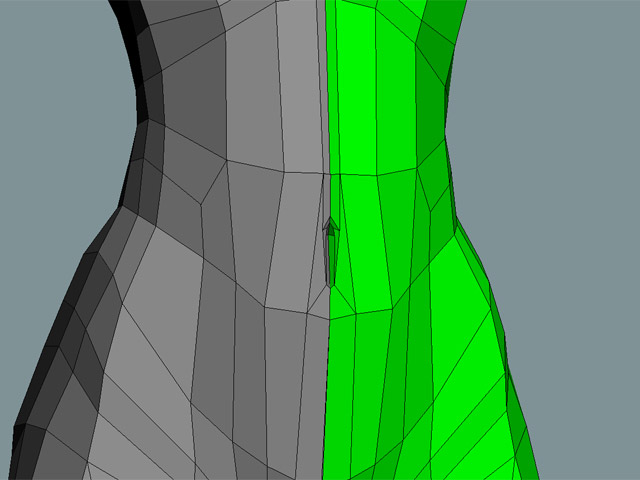
31) Close-up of the navel. Created by bevelling a poly and extrude the resulting face in a few times. This is as much detail as I’ll put in here for now.
32) Putting a head on her
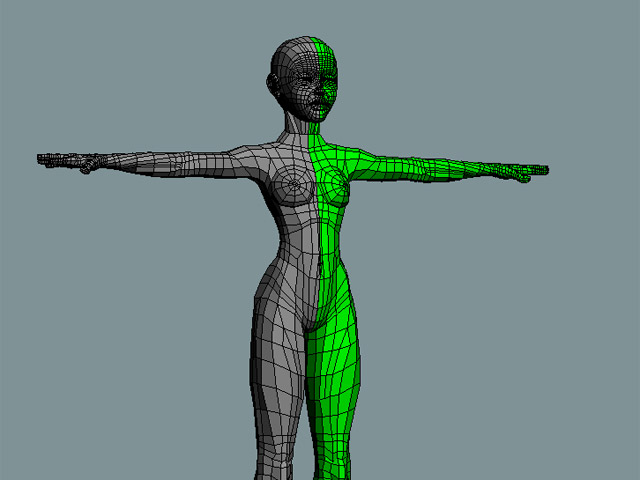
33) Adding collarbone and detail to the neck and upper spine by more cutting. All these edges should work fine for a male too
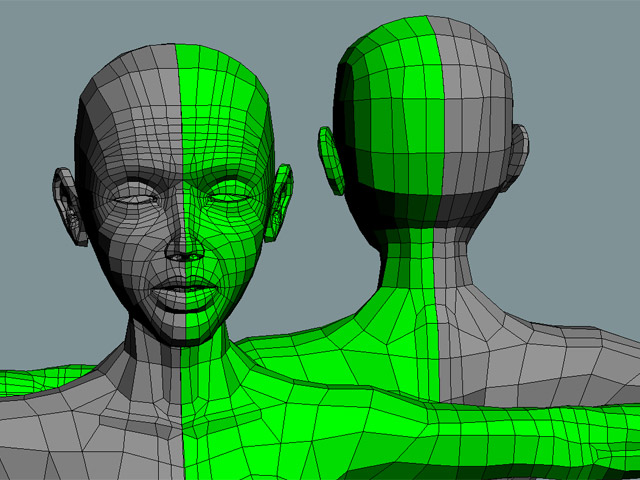
34) This is the tweaking stage and you can add detail into infinity so with these last edges I’ll stop here
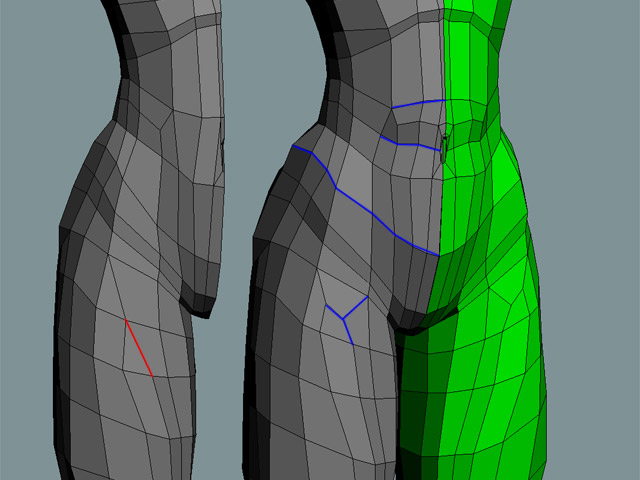
35) There’s one last thing to do though; rotate your arms into angles and smooth off the shoulders. Also make sure your limbs are slightly bent at the elbows and knees.
Keeping the legs apart may help when weighing the verts to bones but may also make rigging more complicated so use your own judgement here.
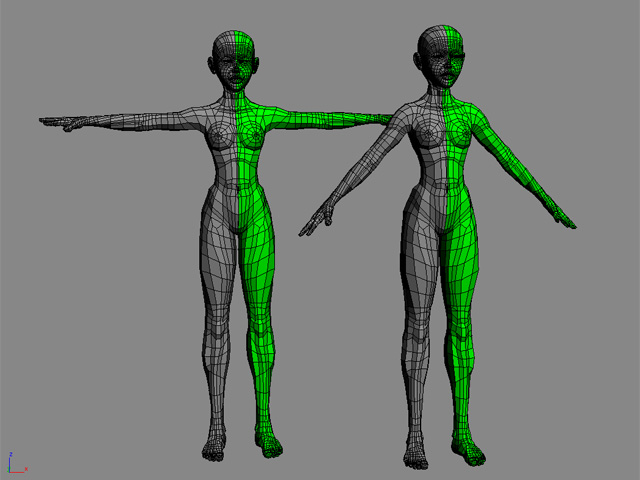
The rotation of the arms is to get them into a more relaxed state. Arms kept in a straight T-pose would cause faulty shoulders when animated because most of the time the arms will be close to the body.
The bent limbs are needed because an IK solution needs an angle to work from. Make sure the bend is in one axis only though (for example the arm is straight seen from front but slightly bent when seen from top. Likewise the leg is straight from front but bent from side)
Basically try to model your character into as much of a relaxed pose as possible. This will reduce unnecessary stretching of polygons.
That’s it! Hope you found it helpful.
Subdivision Head Model
Subdivision Ear Model
Subdvision Hand Model
Subdivision Leg Model
Subdivision Foot Model
And the result with some clothes and hair
