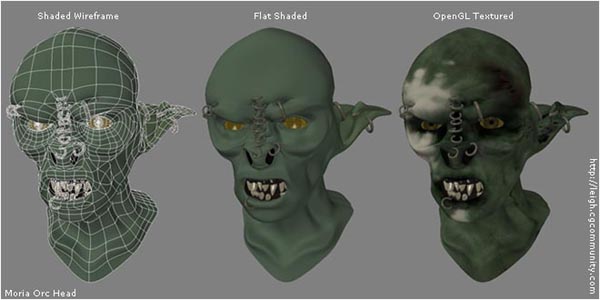
Making the head of the Moria Orc
Well, this is how I made the head for my Moria orc.
As with any project, I started off by getting loads of reference. I was originally going to make an Isengard orc, but in the end rather decided to go with a Moria orc simply because the Moria ones look a little grosser!
So I captured tons of frames from my Lord Of The Rings DVD and used these not only as a modelling reference, but also to grab colours and get an idea of what sort of qualities their skin has. However, because all the orcs we see in the Fellowship Of The Ring are, in fact, people dressed up in orc suits, it was a bit difficult to rely completely on these for texture reference, since the heads we are seeing in the film are actually just latex masks, although they are very well made ones. So I improvised a little here and there ;)
I started out modelling the areas around the eyes and worked outwards from that point. I always prefer to model “detail out” so this is what I did. I model poly-by-poly in Lightwave Modeler, constructing at first only the one half of the face and then mirroring it, and making changes to each half so that the head is not perfectly symmetrical.
When modelling, I use the Pozextender script (by David Ikeda) as well as Lightwaves Bandsaw tool. I generally don’t use many other tools apart from these and the Create Points and Create Polygon commands.
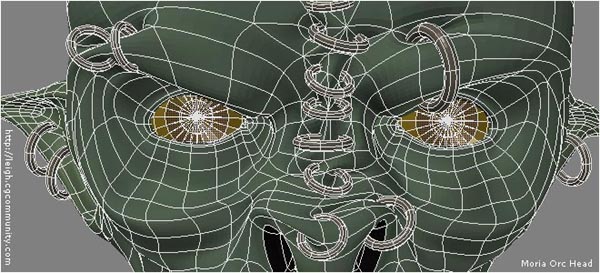
O nce I started adding the rings, I went back to the flesh in those areas and worked into them a little to give the effect of the piercings really digging into the flesh.
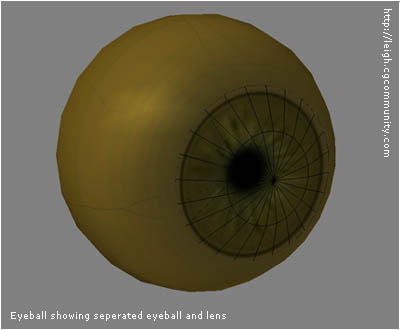
I wanted the eyes to look pretty creepy and real, so I modelled the actual eyeball seperate from the lens part. This is the best way to model eyes, as this is how our own eyes are constructed. Modelling the lens seperately and then giving it an appropriate glasslike surface creates a really cool looking eye with a realistic sense of depth.
Look at the image below to see the model, showing the seperate eyeball and lens (OpenGL screencapture from Modeler)
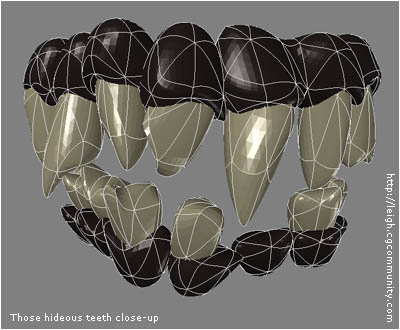
The teeth started out as normal teeth, which I then placed properly, and then just randomly pushed and pulled around to make them become jagged and viscious looking.
There isn’t much more I can really say about the modelling part, so let’s go straight ahead to the texturing part.
As with most heads, I decided to go with a cylindrical unwrap for the main head texture maps. After the initial unwrap, and some fairly extensive editing, I ended up with this UV map, shown below.
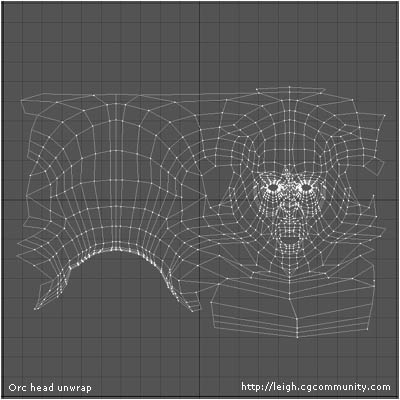
Although I am usually a big fan of planar mapping everything, I generally find that cylindrical unwraps work really well for heads, since they give you one nice big template to work with that incorporates the entire head, and they often don’t require hours and hours of editing, just some tweaking in places.
I chose to leave the ears seperate from the rest of this unwrap because unwrapping them cylindrically along with the remainder of the head would have required very tedious editing that wouldn’t have looked great in the end anyway. Sure, this means I am going to get seams that I will have to deal with, but I don’t get too fussed about seams, since I plan these things so that the seams are easy to conceal.
To start off the actual texturing process, I began to create a number of layers of procedural textures into the heads colour channel, to get an idea of the kind of tones the skin would have. I wanted to skin to be rather blotchy, and I find that in cases like this it’s much quicker to make your initial base colour map procedurally. I originally made the colours in tones of purple and grey, like the Isengard orcs in the Fellowship Of The Ring , but ended up changing them to the green shades of the Moria orcs. I tried the other colours first, even though they weren’t actually the correct colours for the Moria type just because I wanted to see how it would look :P
Once I had the procedural base looking somewhat along the lines of what I wanted, I baked them to an image using the UV map that I had set up earlier. In Lightwave, you do this by setting up the Surface Baker shader (found in the Shaders list in the Surface Editor) and setting the shader up to bake any particular surface to an image map using the UV map as a template. When you render the frame, Lightwave automatically begins the baking process. This one took a few hours to bake on my old PC (a PIII 500Mhz with 312Mb RAM).
Baking procedurals to your UV map is also a very useful way of getting an idea of where areas of the UV map are stretching, as well as creating a perfect continuous, seamless start for your texturing ;)
After the baking was complete, I got this:
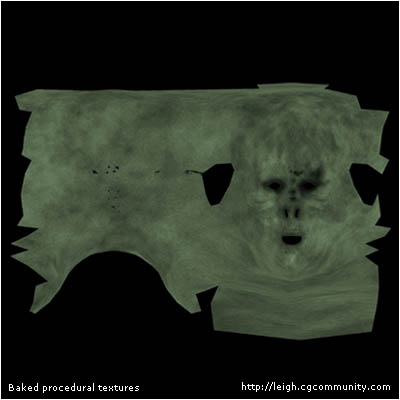
So this image I have now is the result of baking all the layers of procedurals that I had set up in Lightwave. The cool thing about having them now in an image form, is that I can remove all those layers from the surface, which saves on memory, since having loads of procedurals in your surfaces takes quite a while to calculate during rendering. The procedruals I used here were a delightful cocktail of MultiFractal, Turbulence, Dented, Turbulent Noise and FBM Noise procedurals.
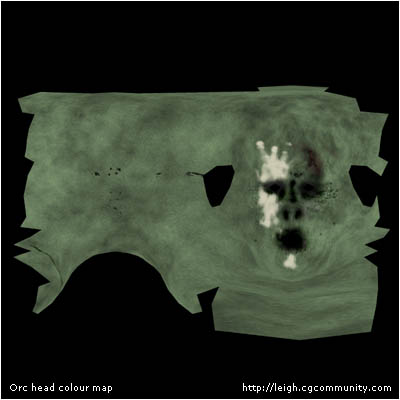
Of course, this is just the beginning. I then took this image into Photoshop and began to paint onto it all the details that I wanted. I always start off with the colour map, since it is the easiest way to place details onto the texture and thereby get an idea of what the texture is going to become. When working in Photoshop, I always use LOTS of layers.
I put every new detail onto a layer of its own so that I can play around with their blending modes to create the best result. Placing everything onto their own layer also ensures that all the different details can be easily included into each of the different attributes individual image maps. Remember, anything that affects one channel, affects all the other channels in some way too. Sometimes I do merge layers together to save on memory, especially with attributes like Glossiness or Specularity, where it is easy to merge layers together without risking the possibility of being unable to incorporate changes correctly, since these are just much simpler maps to change, unlike the Colour or Bump maps.
I also always do all the individual attributes maps in the same Photoshop file to ensure consistency from channel to channel, as I described above. Below is an image showing what my Layers palette for this head looks like. Click on the image to see the entire palette.

(A section of my Photoshop layers palette for the orcs head.
Click on the image to see the entire palette)
I paint all my textures using a Wacom Graphire. I prefer using a stylus because it does make painting a more pleasant and accurate task. People always ask if a stylus is essential for texturing, and I think that I have to say that I do indeed think it’s a great thing to have.
Okay, so now I have my colour map. The actual image map is 2000 pixels by 2000 pixels big. It looks like this:
I now take the colour map, apply it to the model and render it and it looks fine. All the details are more or less in place, and I just make a few minor adjustments to the UV map because once the colour map is applied I can see that there are a few areas where it is stretching that need to be fixed.
I now paint each of the other individual image maps. I also set up the skin properties with Lightwave itself. Since there are no really reflective parts of the head, I feel that at this stage there is no necessity to create a diffuse map, so I simply adjust the diffuse amount to 80%, which works well for skin.
Below you can see the head model rendered with each of the individual maps applied. Click on each section to see the actual image map used.
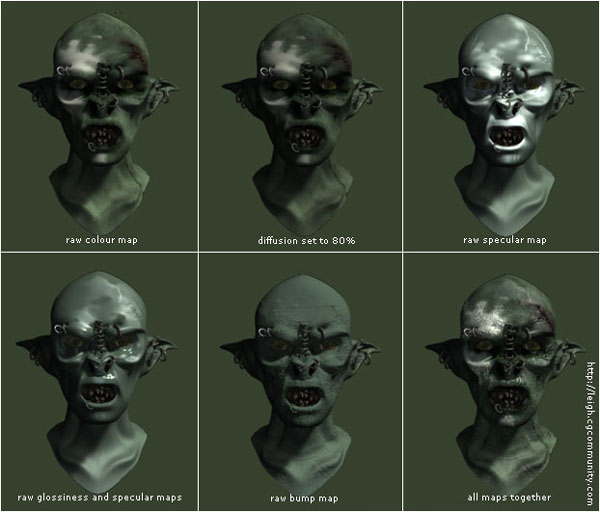
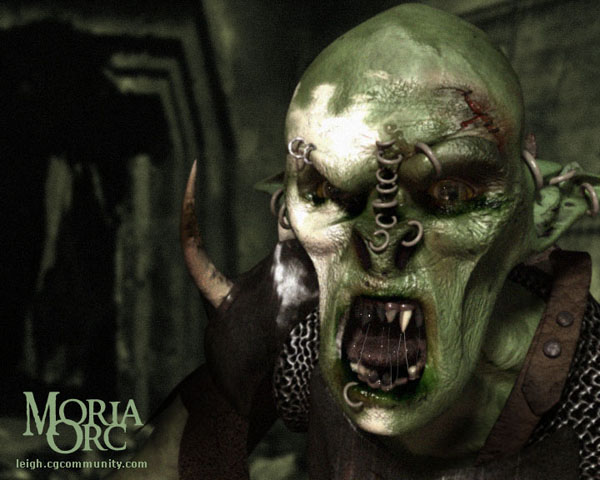
I won’t bother going into detail with the creation of the other textures for the head since they are really rather unexciting. In the end, here is what I ended up with, a nasty, sweaty, rather vile looking creature that certainly looks like he just crawled out of the depths of the deep places of the world.

Voila! An icky, greasy, oozing orc from Moria!

About The Author
You might be interested in