Matte Painting: winter
This is my second matte painting tutorial (first tutorial here).
Here I wanted to change the season of a scene from summer to winter.
Specific device used: Wacom Intuos² A4
First of all, find a good res picture. I chose to use a picture of a house I found on the web. You can find very nice pics for free, just look around!

Alright, first let’s modify the colors.
Using Image > Adjust > Hue / Saturation, try to get softer colors with less contrasts and saturation. Make it look cold !

Create a new layer
Now we can begin painting the snow. Use a rough brush to create irregular shapes. In the tools window, set the foreground color to pure white, and the background color to a blue-tinted white which will be used to add shadows on the snow.
All steps involve working alternatively with these two colors.
Begin by adding snow on the edges of the house where the snow would naturally fall onto.

With the blueish white, paint the inferior part of the snow (the shadows). This will add depth and will simulate the way snow reacts to light.

Create a new layer
With the same brush and same white, paint the windows to give them a frosted look. Set this layer’s transfer mode to Overlay to make it match.

Create a new layer
Same principle, on the roof this time.
Make sure you stay true to the original lighting. Parts where the sun directly hits the roof should be a lot brighter than the darker spots, which will blueish. This is important especially on the cone shaped parts.
When everything will be painted, you can then use the Blur tool and make a smooth transition between pure white and blueish white. After that, use the Burn and Dodge tools to increase or decrease contrasts. If you use Burn on the blue-tinted whites, it will give you an ice look, which can be interesting.

Create a new layer
Now we are going to paint the ground. I used an irregular brush so that the grass wasn’t entirely covered. Then using the blueish color I added nuances to simulate an undulating look. I also left a clean way that goes to the door.
Same principle to add snow applies to the trees and bushes in the garden.

Now let’s do something to avoid boredom from only adding snow !
Using the Dodge tool, on the house layer, brighten spots here and there to add frosted parts, as well as to lighten up the dark parts of the house (like the inside of the porch). Do not forget that snow is a reflective surface, it will bounce light off pretty much everywhere.
Using the same method, brighten up the rest of the scene like the trees and sky.
Subtle, but necessary since it adds the important detail that sells the overall effect and makes the image look natural.

Create a new layer
Now on to the extremely boring step : powder snow over the trees. Powder is subtle, so don’t overdo it !
Still using the same method, add snow accumulations on branches, the most difficult part being to actually see where those branches are. It depends on the quality of your picture.
If you have chosen a picture without trees you are a cheater !!

For the big branches in the foreground, we can see leaves. I chose to add snow on groups of leaves, which can be time consuming, but you should not choose the shortest way over quality work.

Create a new adjustment layer : Brightness/Contrast
This step is optional, but I created a layer and have applied a linear gradient from top to bottom to increase the contrast at the bottom of the pic.

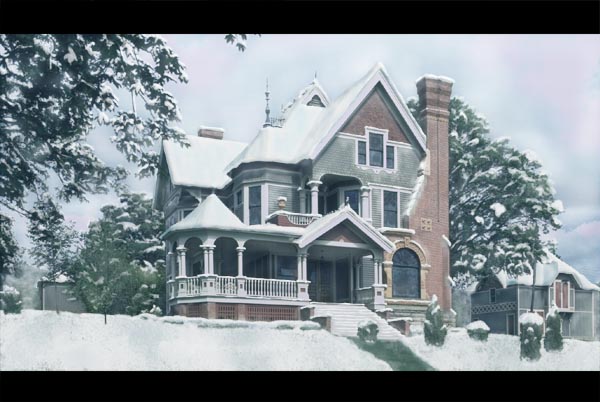
Here it is!
You can compare the original image and the matte painting!


About The Author
You might be interested in