Making Of “Close up portaits”
In This “Making OF” article I wil try to explain the techniques that I used to create this image. I will focus mainly upon the textures/shaders part
BASE MODELLING:
I reused the geometry of an old nurbs body that I made years ago. Converted to polygons in maya and deleted the faces that were not going to be visible. I took care that almost all polys were 4 sided for a better subdivision later.
Then in zbrush I adjusted the proportions, its easier using the move and standard brushes

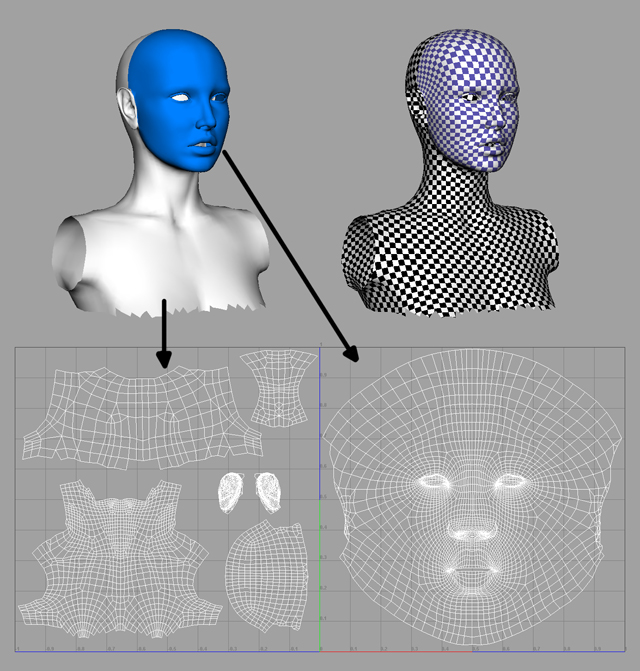
UV:
I create the UVs in maya. This resolution is enough to create the Uvs. Making it later with more subdivisions would be more difficult
I decided to create 2 different UV shells/textures for getting more texture resolution. One for only the face, and other for the rest of the head. I tried to place the seams in a
hidden part:
TEXTURING:
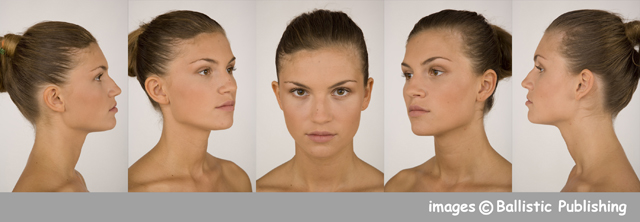
Once I had finished the Uvs I started creating the texture. I used photographs from the DVD “Essence the face” as the source for the textures of the skin. It comes with hi-res photos of a woman:
I created the texture between Bodypaint and Photoshop. I made several proyections of the photos on the geometry and then merge all together in the final texture.
With more detail:
In Bodypaint, first assign a white 4096px texture to the geometry.
Then I chose a photo to proyect on the geometry and then rotate the 3Dview in a similar way.
Now, projection painting. This creates a proyection layer.

Then “Freeze3Dview”. This creates a snapshop of the current 3D view placed in the proyection layer.
(I chose 4096 pixel resolution,. With that I didn´t loose resolution when reproyected).
Save this image as a psd file. In photoshop I modified the original photo to match the geometry in the areas. Made different layers to have more control in specific areas:

When ready, the final psd has to have this layer configuration (the original) in order to be Bodypaint compatible:

Back in bodypaint, merge the texture with the new one and disable “Freeze3Dview”.
This bakes the projection in the texture and then save that texture.

As you can see, this projection is good only for a part of the face. I repeated this process several times to cover all the face with projections. I made 5 (2 laterals, 2 quarters and front) and some extra to add details in lips and nose.
When I did all the projections, I merged all in a psd, chose the best pixels for each one and matched the colors between all to dont´see any differences between them:

DETAILING/ZBRUSH
I already had the base geometry and the tetxure. I subdivided in zbrush and added details using the information of the texture.

I created a bw version of the color texture and used it as intensity masking. I created a first layer of detail:
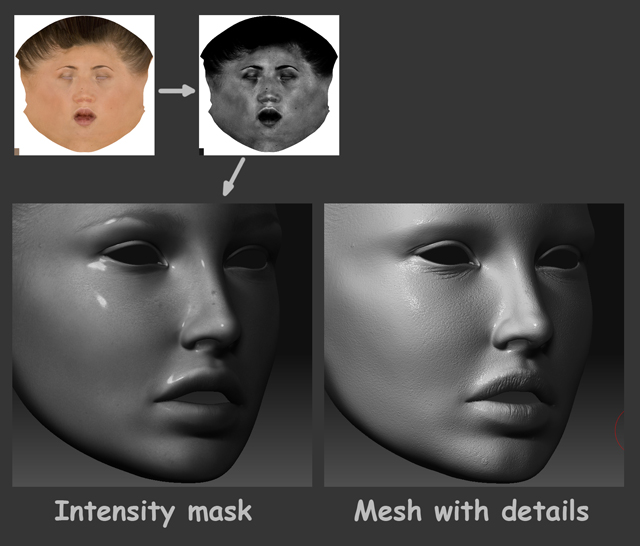
Then, without the masking I add some grains and bumps. I also add bumps with a brush with spray to give a less uniform skin, the orginal was too much smooth and “perfect”
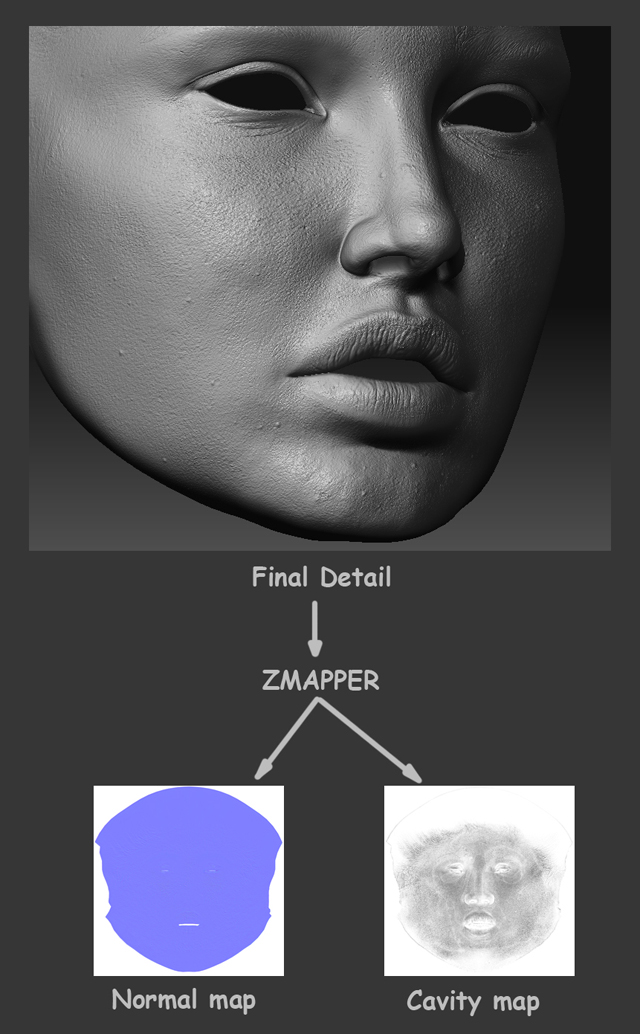
Once I had the final detail, I chose a level of subdivision to use in maya for the render, delete the lower subdivisions and calculate the normal and cavity maps for that level using Zmapper.
LIGHTNING
I wanted a soft and lateral lightning, it is called “low key” lightning. I think this kind of lightning gives great result for portraits. It also highlights the skin texture.
Here is a little sample of all the reference pictures/inspiration photos that I used.:

Before deciding the Lighting, I created a quick skeleton to create different poses. I made some render tests with a lambert and a geometry hair that would give me a first idea.
For each one I made different lightning set ups.

I wasn´t sure wich one was the best, so I chose several configurations and go ahead with those. I put each configuration in a different frame, so was easy to change from one to another.
For all the configurations, I used only one area Light that changes its position.

SKIN SHADER:
I used sss mental ray shader with this textures. The epidermal and subdermal textures are variations of the original one.

I broke down the shader and compose all the layers in photoshop , so the weight values here shown are not important.
For breaking down the shader, I duplicate the original, made one for each layer and changed the values of the weights for each. For example for the diffuse pass, the weight of diffuse is 1 and epidermal, subdermal, specular, etc is 0. I only change the weight values, all the other values are the same for all.
I used Final gather
I made this layers:

Then in photoshop, I used this blending modes to create the final skin.
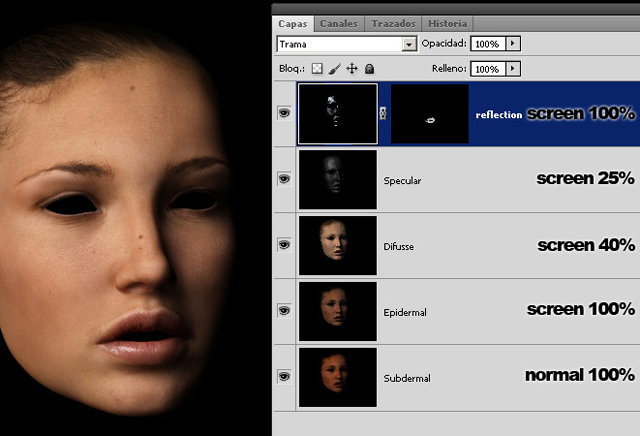
With this technique i had more control that using the original shader. I can quickly adjust the porcentege of each skin layer, change colors, contrast, levels for each layer.
Look that I made a mask for the reflection pass, i only wanted that reflection on the lips.
This mask is ok because I was going to create still images. If it were for animation, I would have to paint the weight of the textures before rendering the passes…
EYEBROWNS/EYELASHES:
They are polygon cones with different sizes. All were manually placed. Simple and tedious work here.

EYES
The eyes are three meshes. Exterior, Iris and a back cover (pupil)
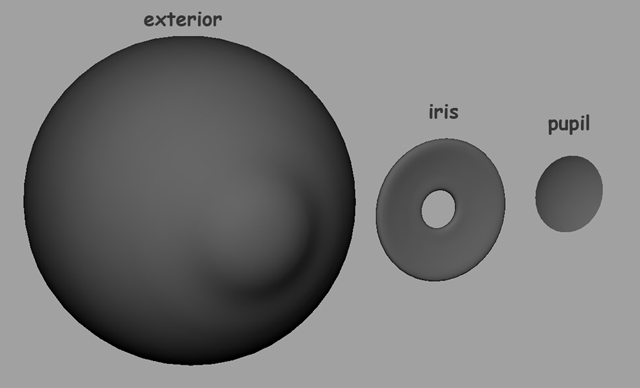
The “exterior” mesh uses a blinn shader with transparency in the center that allows to see the other parts. The transparency map is a maya circular ramp.
Here is a render without textures, only with the transparency:

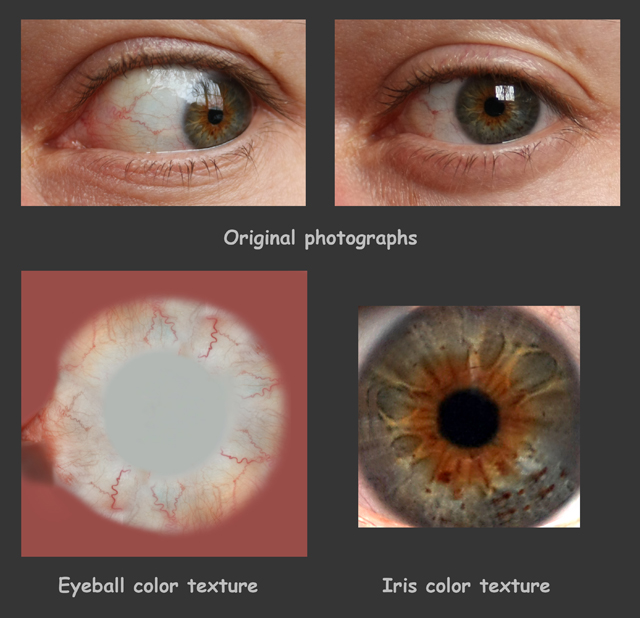
I took photos of my own eyes to create the textures:
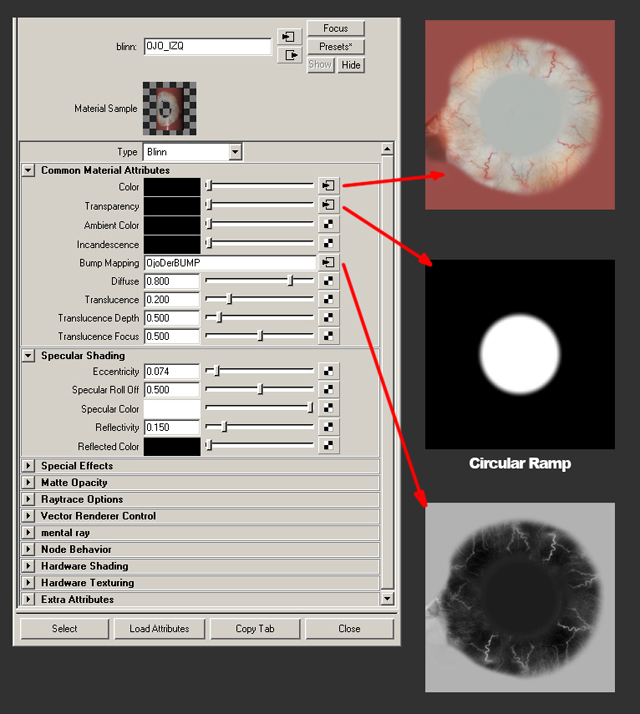
Here is the shader values that i used. As a special thing, it uses a bit of translucence:
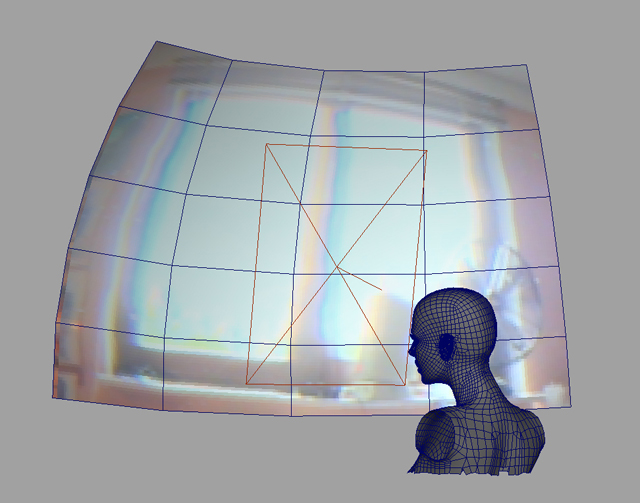
For the reflections of the eyes, I mapped a HDR texture on a sphere and deleted the faces that didn´t had the light source. I placed it where was the light to simulate that the light comes from a window

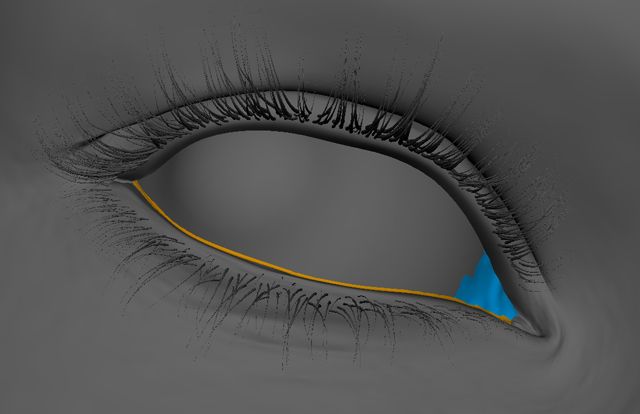
Apart from this, I created extra geometries to create the tear line and to improve the blending between the eyeball and the face. Also adjusted the eyelid to the shape of the eye for the different poses.
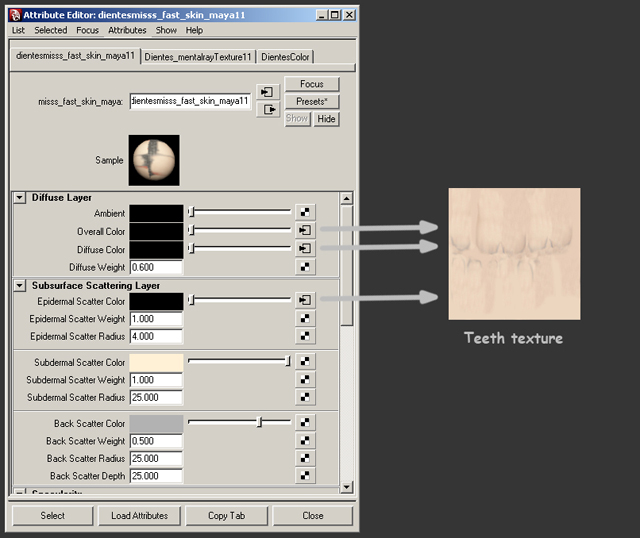
TEETH:
Once I modelled the teeh I used photos to create the textures.
For the shader, I made several tests to simulate a good translucency. Finally i used the sss fast skin shader with this configuration:
The reflection is in a extra pass. I made it with a blinn shader to compose later in photoshop.
HAIR
For the hair there are two stages: the generation and the shading.
• Hair generation:
I made many tests to create the haircut that I wanted, and was so painful. The best that I found was shave and haircut, using nurbs curves to create the hair (Something like a loft, but with hairs). With this method I could control the style of the hairs.
For that, select 2 or more curves, create the hair and select “Interpolate Guides”.
I created different hair systems for each style to give some variety. If only create one, the result is very “smooth”.
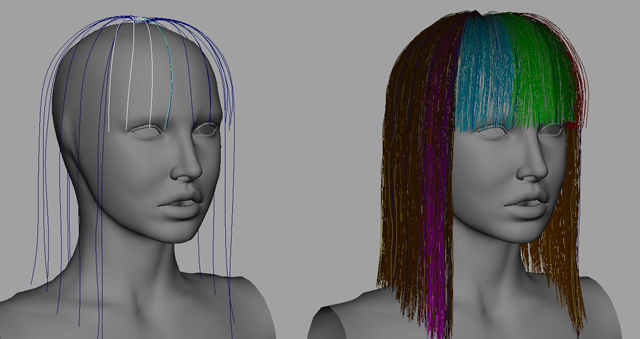
I created 2 different hairstyles, that also with the bald version (with the hairs froms the skin texture) I had 3 different haistyles to choose for each pose.
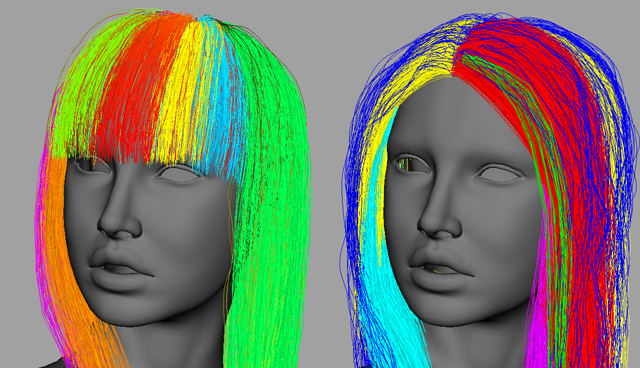
In this image you can see the different systems used for each style.
Once the systems are created, I ran a dynamic simulation to lay down the hairs in the final position. I used a version of the geometry with smoothed ears to avoid problems with the dynamic simulation
• Hair Shading:
For the shader, I used “shaders_p” hair system. I played with different shaders and this was the one that gave me best results.
It can be downloaded here:
http://www.puppet.tfdv.com/download/shaders_p_e.shtml
For using that shader instead of the shave and haircut one, you have to uncheck “OverrideGeomShader”. Then you can apply the shader that you want to the hair system.
I made different shaders with little variation in the position of the specular and assigned to the different hair systems.
I rendered the hairs in a different pass to compose later in photoshop.
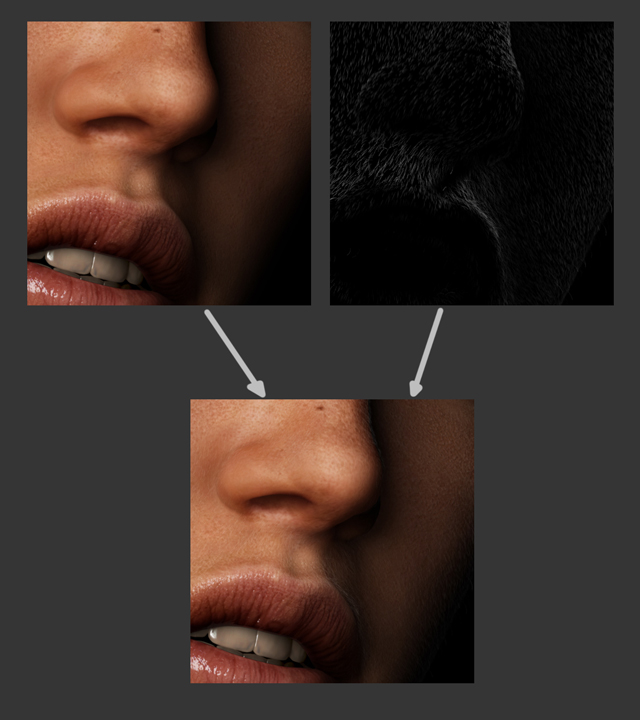
FUR
I wanted to add fur to the face because the camera is so close to the face and I think this adds much realism.
I created different systems, each one with different width, length, orientation. I used “Paint Fur Attributed tool” to paint the baldness of each system.
I rendered in a separate layer, and composed in Photoshop with screen blending mode.
COMPOSITION
I merged all the layers that I had previously rendered. Nothing special here, only configure all the layers and passes in photoshop.
Finally I added a layer of noise, a bit of blur and some chromatic aberration, trying to reduce the cg appearance.

About The Author
You might be interested in