Making of Potion of Gala
Working on shading and Lighting of an animation project from Idea to Final Render
Introduction
When I was started to write this tutorial, I looked internet for this kind of tutorials, lots of them were about technical matters, so I decided to write slightly different and talk about workflow of shading and lighting for animation projects in a studio, and use Potion of Gala* as an example, this way we can talk both about artistical and technical stuff, here I talk to those guys who want start as a shading and lighting artist on an animation project and find their way to upper positions in studio.
We want to talk about these matters:
– Observation (put yourself in the situation warm up your mind).
– STORYTELLING THROUGHT LIGHTING + shading.
– Work as an Interpreter not a translator.
– Try to know all aspects of your tools.
– Design the workflow, make some tests and get the result.
– Be the most severe one on yourself.
– Always push the limits.
I split the workflow to separate part just for better understanding but in reality they work in conjunction with each other.
Observation (put yourself in the situation, warm up your mind)
Assume you are about to start new project as a shading and lighting artist, first thing you should do is read the scripts and watch the preproduction stuffs (concepts, color keys, Storyboard ,…) and find what is the story and think about the way you want to do that, take note from the critical points that you think they are challengeable goals to achieve, after that Google all of them one by one and see what you can find about them on the internet both technically and artistically, everything (from a tutorial of workflow of creating a shader to watching the famous Artists paintings , digital paintings , pictures of deferent lighting situations of an apple (if your story run about an apple tree etc) look for everything you think that Inspire you, try to contact other artists those had the same challenges as you before, and ask them about their solutions and workflows (save all of those thing as R&D materials) do this processes as much as you have time, all of these works warms your mind for starting the project.
in Potion of Gala we searched for foods and fabrics very much because we have complex cloths shaders and we wanted to shaders locks like foods and sill appear like their selves (Woods appear like wood, cotton appear like cotton etc)
I found three things
– Foods don’t have much pure black color in them
– Lots of materials we wanted, had some sort of sub surface scattering
And finally it’s better to make final images a little more saturate and that makes things a little more delicious. (Notice that saturate images makes eye tired very soon but for 3 minutes running time as our short animation that is not a big problem)
Another thing I searched for was searching for big artists painting to find same lighting situation as we had and I find it very soon, I love Rembrandt painting so I start from him and I study his paintings for light and composition stuff and I used the result especially in kitchen shot.

STORYTELLING THROUGH LIGHTING * + shading
Sharon Calahan has a great paper in Siggraph 1996 “STORY TELLINGTHROUGHT LIGHTING”, that is about how lighting can help story telling in the film making process specially CG films (I believe shading and texturing can help too) but how?
Always ask director these kinds of questions:
– What is the characteristics and emotions of characters?
– What is the overall feeling of a shot?
– What is the most important point of the story in each particular shot?
– etc
Always try to have better understanding of what director want to says, make every decisions for colors, shaders and lighting with having those information’s in mind, and try to help director as much as you can to tells his story better with use of those elements subtly.
I will give you an example to have better understanding of the Idea.
Let`s call it One Frame Story:

It’s very simple example but I hope you get the Idea, you can answer lots of questions just with using texturing, shading, composition and Lighting wisely.
In Potion of Gala we had a girl who was depressed and a boy full of energy .We decide to accentuate those feelings with the help of colors and textures of shaders and overall color of shots, we made boy shaders full of warm colors (even the skin tone) to show his inside feelings better and the girl with cold colors, these colors even stand for overall colors of each of those characters shots.

As you can see lighting and shading can help a lot in terms of storytelling (define mood, accentuate characters feelings, direct audience eyes to a specific point of image … )
Work as an Interpreter not a translator
I saw lot of fellows stick to the concepts and color keys and try to make 3D Scene just like them, this will work but not enough, the thing that I always say to them is You are not just a translator who translate hand drawn Images to computer generate (3D) images ,think about yourself as a Interpreter who watch 2D images and interpret them to a totally different Media`s language with his own feelings.
you are an artist (not just an operator) believe in yourself, always try to add something as an artist to the final work, concepts and color keys are just a starting point for you.
BUT there is something very important you must always keep in mind, don’t do anything on yourself. you are there to make director dreams come true, so always talk with director about your Ideas before you do anything. Lots of them appreciate that (or maybe lots of them ). But never ever argue with him about it. This makes him uneasy and the next time he will never listen to you. Let him know you just want to show (not force him to use) new possibilities, maybe he doesn’t aware of it already. Maybe it’s not a bad idea to talk to DP (or your supervisor) first and if you get the okay, then talk to director.
Try to know all aspects of your tools
Lots of projects comes with new challenges, something you didn`t have done before, lots of them seems impossible to achieve in first look and just playing with software sliders don`t do anything for you.
You should always have a correct understanding of abilities and limitations of the software you work with. New versions of softwares comes every years with lots of new abilities (always read “what`s new” part of help document when you start with new version) .believe me, the best teacher for a software is F1. There are thousands of dark corners in help documents that wait for you to discover them so don’t hesitate to refer to documents even if you think you know it already.
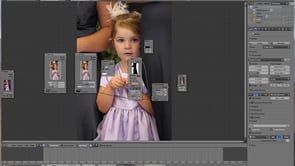
Design the workflow, make some tests and get the result.
According to previous steps at this rate you know what you want to do and what tools you have in your hand, the only thing remains is HOW? You should design a workflow and make some test to know if that workflow works or not but there are something you should know before you start.
– The conditions that you do your tests is very important, you should exactly recreate the small version of original one, it would be great if you can work with a version of final shot, but lots of times you should start even before the animate process start. So you should make the right situation for test yourself. This is a very usual mistake from new guys, they think the important one is just the subject of the test and think these kind of preparations are unnecessary or even they aren`t patient enough to do that, and you know what happen? They spend hours and hours and waste precious time of the project without any result and after that lots of them say “this is because software lacks for sure or you don’t give me enough time” lab lab laaaaa
Anyway, remember this, the condition is as important as test subject itself.
For developing a shader for example:
First decide about camera position (not just for shader development, ALWAYS, first step is deciding about camera position), create another perspective camera and put in the right position and lock its transformations.
Second, decide about lighting situation and recreate a small version of it on the test scene (decide about using Global lighting techniques or traditional lighting methods ) be aware this method will be your main method of lighting the shots, think about if you can handle it in huge scenes with huge amount of polygon size and lots of shader and lights Etc. Put lights in relation with that camera you just made and turn key light shadow, on or every one of them that need to have shadow (always rename lights properly). Now you have a lightrigg you will use it from now on.
If your shader is reflective or refractive make an environment (that can be a plane, textured with some image) to reflect or refract in shader. (The environment of reflective and refractive shaders is more important than the shader itself)
Do everything that you think help you get the right result faster.
– Another important matter is, Based on the scale of the challenge you are facing with, the time to achieving result is differ. It’s very usual if you can’t achieve the result on the first or second attempts, it always takes some time for you to put all of you tries in one final solution so don’t loss your self confidence (hole company will not go mad on you just because of one or two days of delay) if you have done all of previous steps correctly, you will find the result at last and that will be a great one.

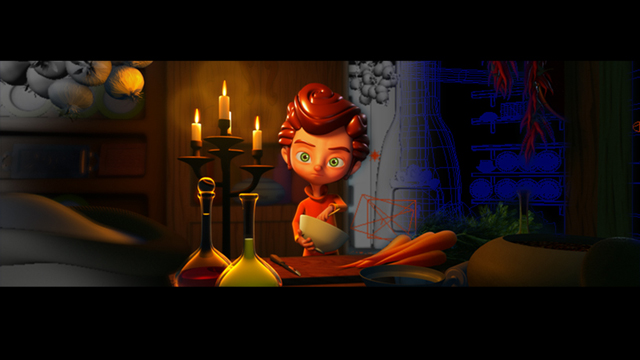
In Potion of Gala we had two main challenges lets go through them in kitchen shot

First was having complex shader without involving shader scripting and those kind of stuff.
– we should had layered shaders but Mental ray doesn’t have this feature by default. After some research I found Mix20Layers shader for Mental ray that was a really great and easy to use shader
-we needed to Use SSS shaders for lots of shaders and combine them with Mix20Layers.
– We should use other coordinate spaces (more than uv ) for texturing.

1 – when you have a Maya software material connected to Mix20layer shader, it can’t calculate alpha channel of that part correctly so you can connect out color of Mix20layer to a surface shader and assign that to mesh to have correct alpha in rendered image.
2 – if you use a SSS material in a layered shader with other kind of materials , connect SSS shader light map message attribute to Shading group light map attribute of final material, in your shading network, this makes those part of the mesh that relates to SSS shader have correct translucency.
3 – sampler info is a great node, it provides some wonderful information about surface in the render time and you can use those information where ever you need, use a combination of sampler info and a ramp texture to control appearance of textures and shaders based on surfaces( point being shaded on the time) angle toward camera. (study about facing ratio attribute of sampler info)
Second big challenge was reducing rendering time. (we totally had 14 cpu threads to rendering all of the project )
– we don’t use any global lighting technique and lit entire project traditionally, we just embedded an ambient occlusion texture (using other coordinate spaces for texturing) as a “fill light texture” in almost all of shaders bodies.

In lighting progress you have two light sources, first the light sources it selves and second, light rays that bounce from all over the scene, there was a traditional way to achieve bounced lights effect, in that you have to put lots of light with totally blurred shadows everywhere, it works but had some problems (it was a little tricky and didn’t works well in all situations) global lighting techniques solve that problem and reproduce those bounced lights sources for you but they are really heavy to compute and hard to control, and poor guys who don’t have time and facilities, should think about another solutions, so I added an ambient occlusion texture to ambient channel of Maya`s shaders and control that to get a fake and fast overall fill light (bounced light) and then try to recreate noticeable bounce lights with traditional lighting method
– Painting with light
There is a helpful way of thinking when you try to add details in a shot.
Always think, you want to paint an animated shot with lights (study great artists paintings and sometimes try to copy them in 3D World), use every light just like a brush stroke and try to add subtle details to final image and always keep in mind to use one light for one purpose at a time (don’t panic that’s not going to be thousand of lights ) and again, name them properly so you can find them very soon this method gives you an unbelievably strong level of control to every things in the shot
After finishing the lighting process it’s time to brake the shot in to separate render layers, when you layering a shot you should find a balance between layers numbers and level of controllability you need in composite stage.

Based on projects needs and the time we had we separate kitchen shot to this layers.
Be the most severe one on yourself
The best critic for an artist`s work is the artist itself, so don’t let anyone mention a problem that you are already aware of, when you are showing your work to director never say “it’s not complete yet or its work in progress” it’s a big mistake and show you as a unprofessional one. if you don’t finish it yet then why you call him? he has millions of works to do and you are wasting his time, don’t get me wrong I don’t mean don’t ask questions or act independently on yourself, I say have a plane for it.
separate your work (e.g. lighting a shot) to several steps and try to get done with each step as perfectly as you can (don’t let go of anything on itself), then review rendered sequence several times (from distance) and try to find problems (maybe you can have better composition for this shot or one light on the background is a little bright and draw unwanted attention etc) after you solve all of those problems then show the result to DP and then to director (write down their ideas for sure so you don’t forget to solve them in next try) then start next step and so on.
Always push the limits
No matter if you are working for yourself or for a small or huge company, you should always try to find better solutions for doing your job and push the boundaries of your world. It’s a hard and painful progress but it’s the best way to success in your carrier.


About The Author
You might be interested in