LCD Monitor
Hi every friends! in this tutorial we will learn the basic modeling in Alias Maya version 6.0 in this tutorial we will use allot extrude, scale, move, and split polygon object to create a LCD Monitor.
This tutorial specially for beginners for those who start Maya since few months.
Once again I would like to tell you we will create this LCD monitor with help of extrude, scale, move and etc.
So ok lets start our lesson start Maya if you already running create a new scene by going to “file”>”new” and make sure you are in modeling type.
1-go to “create” menu and then “polygon primitive” from the menu chose the small rectangular from of cube because we are going to make height and width for the monitor, as image illustrate below.

2-in the polygon cube option give these number then hit the “create” button as image below.

3-now you should have something like in the image below.

4-now right click on your model keep press right click on the model to the transform from transform menu select “Face” now your model should look like in picture down.

5-select the face as image below, now our extrusion, move, and scale will start continually.

6-now go to “edit polygons” dropdown menu then chose “extrude face” according to image below.

7-move the newly extruded polygon use the move, the scale tool to create something like image below.

8-go again to “edit polygons” and extrude it the new face again.

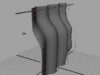
9-now use scale tool to create this shape as like in image below.

10-and then use scale, and move tools to shape it like in the image below.

11-now rotate your scene to see the LCD screen, rotate it by holding down Alt + left mouse button, use again extrude and then just use scale tool to give a shape like in picture below.

12-go to extrude then extrude the face this time just use move tool to create screen and just a bit move it back, like in the image below.

13-now rotate again to back of LCD here we are going to create a stand for monitor. select the face and use scale tool to shape it like in the image below.

14- go to vertex mode by holding down right click in the model from transform menu chose “vertex” and move around untill you are not satisfy or as image below.

15-now select that new small face which is we are going to create stand and then extrude it and then move it down and then move right and left to create a shape like in the image.

16-go to vertex mode again then select the vertex and then move it down as picture below.

17-when you fix the vertex go to face polygons and then extrude the bottom face like image below.

18-now rotate little bit to front of your LCD here we are going to create stand holder, select this face as image down.

19-extrude the selected face and then move it something like in image illustrate below.

20-this is time to create more detail to stand holder, select left and right faces by holding down shift + click, lustrated below.

21-extrude these 2 faces and then move and scale it to have shape something in the images below.


22-now we are pretty done with our model, what we need now we need a buttons in the front of monitor to do this go to “edit polygons” then chose “split polygon tool”, as image illustrated below.

23-now the white thin courser will be appears now keep your courser on the middle of bottom face and then keep pressing right to left until you don’t see this 50% percentage in bottom like in the image below.

24-when you see this 50% then release the mouse button then you will a greenish colored dot appears do the same process in the bottom of newly create dot then hit enter, as images below.


25-now select right side polygon and then extrude it and leave it don’t move it any where, now use scale, move tools to create these shape to create these 2 buttons as images below.


26-this is the final model without applying any material, below.


27-now this final render is I applied Lambert material with mental ray render with ambient light with cost shadows on, hope you learn some thing from this tutorial.
The final render is below.

If you have any questions comments feedback and suggestions please don’t hesitate to write me,
With a lot of thanks Aziz Khan


About The Author
You might be interested in