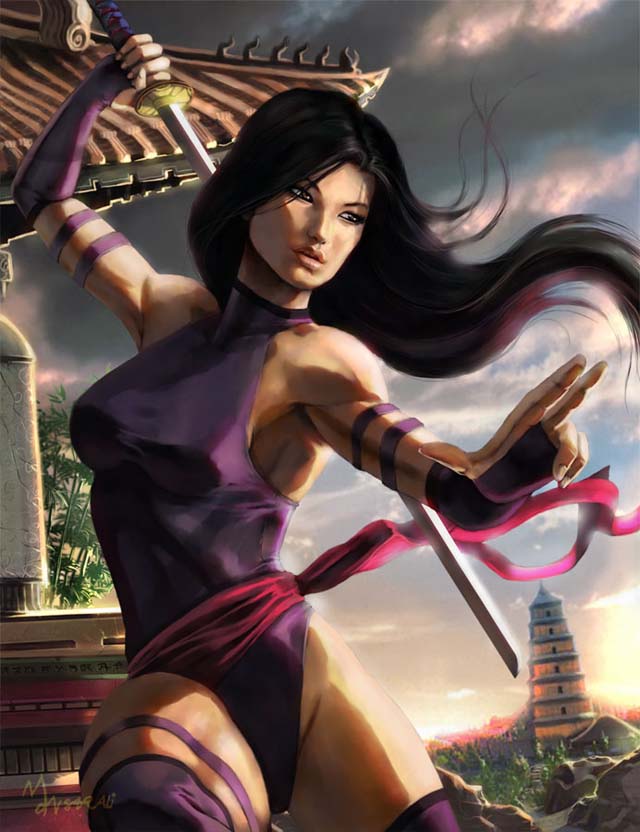
Making of Psylocke
Psylocke from the X-Men.My first ever tutorial – some of you people requested, and so I decided to do it on the Psylocke image.
Hope its not too painful to follow and read and is useful. I chose her classic costume with a little extra (black borders), I always envisioned her with this costume and believe that her character was known for that costume plus don’t really like any of the new ones.
STEP 1
First I research and look at lots of pictures of the character I want to draw and try to get a feel for the character (In this case Psylocke/Female ninjas). I start off drawing small thumbnail sketches with different poses (sometimes the first one is good enough)

STEP 2
I use 1 of 2 brushes I made with default brushes to do the sketching. 1 is a pencil stroke type feel and the latter is a harder brush.Pencil Brush settings: Other Dynamics, Airbrush & Smoothing Hard/Drawing Brush settings: Smoothing, Opacity 75% & Flow 60%

STEP 3
Next I enlarge the thumbnail using Free Transform and drag image to the size I want for final image – see Image 1. This is where you get to fit the thumbnail to desired size and frame or position before starting on the accurate drawing.
Next reduce opacity of thumbnail sketch layer to 50% or whatever you feel is visible to draw on top with and lock layer. Add new layer on top and begin drawing the proper lineart – turn sketch layer on/off to view progress of lineart

STEP 4
Use reference images to add details and correct character design. At this time I start to think about light direction and start to roughly blotch in shadows. I also start to think about backgrounds. For this image I originally thought of making her jumping down from a tree

STEP 5
Finish most of the line drawing. Not necessarily needs to be super clean lines as these will be painted over at later stage

STEP 6
Create layer under this lineart layer and start adding colours to get feel for the image

STEP 7
Add another layer for background under colour layer and make colours more vibrant. I usually add a dark background colour to start off to help see the character colours better at beginning

STEP 8
At this stage I thought of new idea for background. A photo of sky was added to background to create mood and time. NOTE: Photo images need to be changed or adjusted a lot of the times to fit in with image and even quality. This sky photo needed to be blurred to remove the pixelated quality and then enlarged, tilted, clone tool used to fill in gaps. Use Free Transform tool to enlarge or manipulate image

STEP 9
Chinese temple image used partly for reference and tilted to fit angle of image. NOTE: this image was very poor and most details needed to be re-drawn and added from imagination. See also the sky image used on previous stage

STEP 10
.Next another building detail is added to background. NOTE: this was also a very poor image and a lot of extra details were added and changed including colour. I took out parts and added new rocks and lighting to match my image and basically re-drew details. NOTE: photos are to help you with the picture and your idea and should not be used solely without any changes but used as a base

STEP 11
Next I concentrate on getting the background completed and use other reference images and memory to add details. At this stage I use some custom texture brushes from ADONIHS brush set and my own ones.
Bamboo trees added behind front temple to give a more natural environment feel. All overall lighting is now looked at and thought about. Create new layer and start adding colours on character on top of lineart layer

STEP 12
I then use reference images for lighting and colours on some occasions when I’m not happy with colour tones. NOTE: the colours are put on like rough blotches and smoothened later using custom brush. Using the reference skin colours finish blotching of rough colours – Now I am happy with tones I move on to smoothing

STEP 13
FAVORITE PART OF DRAWING: Create custom smudge brush using these settings

STEP 14
Now blend away with light strokes and create smooth soft skin and clothes

STEP 15
After all smoothing I start to add finer details stroke by stroke. These include hair strands, cleaning of edges to make sharper and bits of colours where needed. NOTE: at this stage you can also use texture brushes for details but only dark colours as highlight textures are added later on a Colour Dodge layer. See the difference after details are added: eyes, reflections, light and so on

STEP 16
GLOBAL ILLUMINATION: the main character colour and lineart layers can be merged when you feel colouring is done. Now add new “Colour Layer” on top – this will be used to add the global illumination colour (greys/blues – cold shadow colours). Use a soft round brush with low strength and flow; this is what gives it more realism

STEP 17
CONTRAST LIGHTING: Add new “Colour Dodge” layer and start adding highlights with same soft brush or change to your liking. I use orang/red/pink on low strength and apply on highlight areas between shadows and lighting. This adds more realism by applying a glow to where the shadow and light meets and creates orange/pink bright colour.

KEY POINTS:
Always have tonnes of reference images to help circulate the imagination and help with details. Also to help start base colours and backgrounds as nothing is scarier than looking at a blank white colour without knowing how to fill it up
Use photos of nudes/clothed and others to help with skin tones and textures for clothing
Use different layer options and see what it results in. Experiment with layers and brush options and you never know what you will create. TIP: Get a photo, create new layer and apply different brush techniques and layer options to see what you get

That’s it, good luck, MANSARALI


