How to make a SOCCER BALL by Gianluca Panebianco
We can start to say that this tutorial is very simle, but probably it’s a little boring…
We’ll realize two version of the ball, first a Lowpoly version, then a Highpoly one. Prepare your Lightwave3D’s Modeler!
PART 1 – LOWPOLY
 fig. 1 |
Create a sphere (shift + o) then, by clicking on n to open the numeric panel, set the following parameters (as showed in fig.1 too). Tesselation -> Segments = 3 |
 fig. 2 |
Drag the ouse on the OpenGL preview panel end click on 0 (zero); the preview panel will be showed fullscreen: other perspetive are unnecessaries for this tutorial.
As we know, a (real) soccerball is composed by several patches as polygons: they’re pentagons and esagons. Our sphere is composed by triangles only: so, we must unify triangles to create patches as pentagons and esagons. We will start seeking pentagons and, in a seconda time, creating esagons. |
 fig. 3.a fig.3.b |
Now we can unify selected polygonsby Unify command (shift + z), as showed in n fig.3.a. Create a new surface for this polygon, (q), and name it soccer_penta (fig.3.b).
Make a dark color for the new surface, eg. R:50 G:50 B:50. We’ll make a preview as fig.3.b. |
 fig. 4 |
We can procceding in this way: rotate the sphere in OpenGL preview , select 101 all pentagons. Remeber to assign the right surface for pentagons (soccer_penta).
There aren’t too much difficulties to make this, only pay a little attention to select the right tringles. If we have make the right selection, we’ll have a preview as fig. 4. |
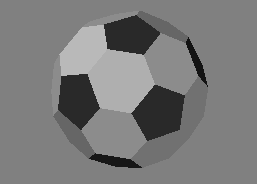 fig. 5 |
Now we can proceed creating esagons. The procedure il exactly the same. as we can see with fig.4, now is very easy to seek esagons. Only keep in mind to procedeed with 1 esagon at time. When we can select the first esagon, assign a new surface, named soccer_esa. surface name: soccer_esa When we finish with esagons we’ll have exactly 20 esagona. |
We have finished first part of this tutorial, and we have create a low poly version of a soccer ball. This model is very useful in the next part of this tutorial: we use it as background layer to seeking easily pentagons and esagons in the high poly version.
In fact, modeling for the high poly version is very similar, but we must add a some ulterior passage…
PART 2 – HIGHPOLY
 fig.6 |
Restart at the same way: select a new layer, and make the low poly soccerball as background layer. This time, the numeber of segments is 12. |
 fig. 7 |
Setting the lowpoly model as background layer, probably in OpenGL preview window we cannot see background lines. So, still having in foreground the new highpoly sphere, click on the “q” key and create a new surface, named “highpoly”. Open the surface editor (CTRL+F3) and set the transparency as 50%. In this way, setting the new sphere a semi-transparent, we can see the background model and we can use it as guide for the prosecution of this tutorial (fig.7).
Obviously, at the end of the tutorial we can re-assign a 0% transparent material. |
 fig. 8 |
Using polygons of the lowpoly model as reference, we can procedeed by selecting trinagles that composes first pentagon (without a particular order, the first pentagon is the first who we can find) (fig.8). NOTE: be careful to select ALL tringles for each patch (pentagon or esagon)!
|
 fig.9 |
Now, with tringles selected, apply SMOOTH SHIFT command (Shift+f), with an offset of 4mm (fig. 9).
|
 fig.10 |
Probably, we can have that some polygons are “detached”, and for this reason we can have problems in the future: we must apply MERGE command (“m” key), selecting “FIXED” button as Range parameter, and insert 3.5mm on Distance field. Procedeed another time with Smooth shift command with a 4mm offset, then with a merging with a 3.5mm range. |
| Repeat the steps: for each pentagon (and in a second time, for each esagon) we must apply these commands:
1) select polygons; |
|
 fig.11 |
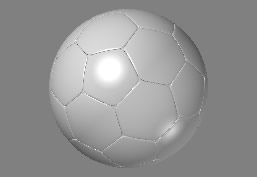
Now we can see the partial result of our highpoly soccerball by clickin con TAB key to transform our polygon in a NURBS / SUBPATCHES view. (fig.9)
Creating the model, the subpatches visualization is unnecessary, so after a quick view return to a raw polygons rapresentation. At the same way, precedeed by creating all pentagons, so you can create all esagons. |
 fig.12 |
After the creation of all patches, we can activate definitely the subpatches view, having a preview as fig.12. Save and export in Layout. Ok, now you can go to play soccer… or if you want watch some match of Korean/Japan World Cup 2002 !! :) THE END. |


