Making of cafe by Tiziano Fioriti
Introduction
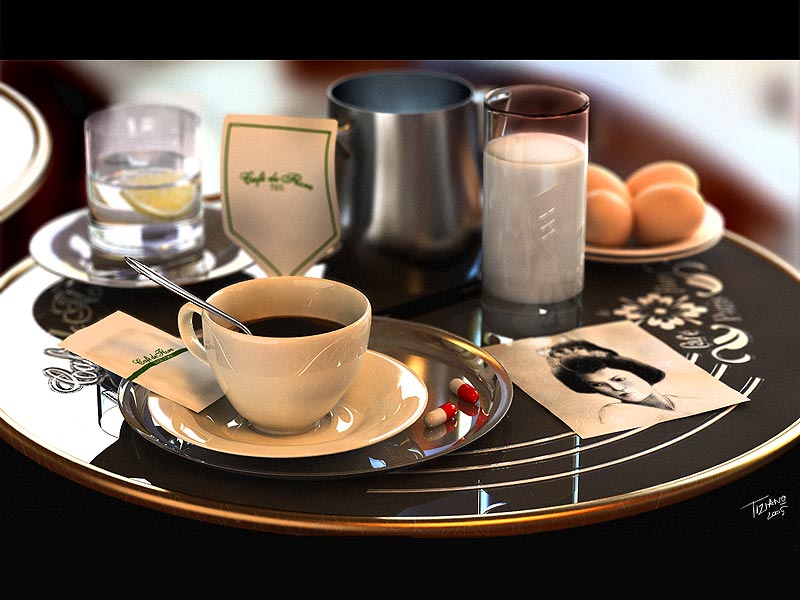
When I went to France on April 2005 on my high school trip, I bought different postcards to send them to my family and friends. Accidentally I forgot to post one of them so I brought it home. It represented the Cafe de Flore of Paris, the famous cafe of french existentialists and artists. I liked a lot and so I decided to realize it with computer graphics techniques and instruments.

I just wanna say "thanks" to my old PC: a Pentium 4 processor with a Radeon 9800pro and only 512 mb ram memory.
For the realization I used 3ds max 7 and Vray Advanced 1.46. A great post-production process was possible with a Wacom Graphic Tablet. I have Intuos 2 A4 format.
Modeling
When you decide to realize an image like this, you have to know that the modeling part is the simplest.


All the objects of the scene are modelled in Max with polygonal instruments. The coffee mug, the saucers, the glasses and the fluids were created with lathe tool and then converted to editable polys for texturing. The eggs are simple geospheres with a lot of subdivisions.


The woman drawing is a simple editable spline converted to editable polys and then distorted with FFD 4x4x4 modifier. The table is a primitive cilinder converted and modified as editable polys.
Texturing
The scene is embeded in various complex vray materials.
We’ll begin from the simplest.My drawing is as diffuse and a texture created in Photoshop as bump (with value of 80).The coffee mug has a texture created in Photoshop (simulating porcelain) as diffuse, a clear gray color (R211, G211, B211) in Reflect slot and fresnel reflection activated.

The pills are a Multi/Sub-Object material with two Vray embedded materials ;both have Reflect slot with a gray near white color (R228, G228, B228) and fresnel reflection activated. The egg material has a texture created in Photoshop in diffuse channel, a dark gray (R59, G59, B59) in reflect slot (FR activated) and refl.glossiness at 0,7.


The water and the glass have very similar materials (see image below for Milk material too) except for IOR value; water has 1,335 while glass has 1,606.


The teapot has a chromed material; diffuse at black, reflect slot at R228, G228, B228, fresnel reflection activated and max depth of reflection at 10.

Now complex materials are coming. The table is embeded in two materials. One with a texture realized in Photoshop in diffuse and bump slot (30 like bump value); reflect channel has a procedural map (Noise, with standard values) in its own slot.


The other one has diffuse at black, reflect at R176, G124, B74 with 0,85 as refl.glossiness and 3 as value of subdivision. Furthermore refract channel is black but its number of subdivision is 50. At last the Index Of Refraction is about 0,47.

Lighting
I believe lighting process is the most important of a project.

In this case watch the image below for the lights used.
There are three Vray lights with multiplier at 3, 3,5 and 4. All have “Store with Irradiance map” activated. For a great result I placed also a HDR image called “Kitchen” and downloadable from Paul Debevec web site with 0,5 multiplier.
Rendering

The final resolution image (3048×2287) demanded about 5 hours of rendering.
Below there are Irradiance map and Antialiasing settings.

You can see render settings in the images below. Environment slot have HDR image of Debevec.

Post-processing & Depth of Field
This process is really important. An ordinary result could be improved a lot with an excellent use of post-processing software.
In this case I used Photoshop of Adobe. Computing depth of field of image (or animation) with rendering engine that’s really problematic.
It’s advisable to make it with internal 3ds max plugin. I used ZDepth. In my case I used values as: Z min 155 and
Z max: 230.
Once rendered the depth map (see below), you have to import it in a compositing software (Photoshop ad example) and set it as alpha channel.
Afer done you can load the alpha map in Filter > Blur > Lens blur and you can modify various parameters to achieve good results.

Background is simply a bitmap image saturated and then blurred.

With simple small brushes (with help of blending changes) I created some micro-details like scratches on table and coffee mug.
Important advice: it’s very useful enhance or reduce Hue/Saturation and Brightness/Contrast settings. Try with various filters for achieve interesting results.

Final Image see below:

About the author:

Tiziano Fioriti was born May 6th, 1986 in Gualdo Tadino, Umbria.
After attending the Senior High School specializing in Science Education he’s currently a student of Industrial Design at the Faculty of Architecture of Florence University. He is working as Autodesk instructor, environment artist and digital matte painter.
As one of the Top 25 Finalists of the "2007 Architectural Visualization Competition", he is also the winner of 3DM3 "The Lost World Challenge" and his works are even featured on Ballistic Publishing Exposé 5 "The finest digital art in the known universe" and "d’artiste Matte Painting 2".
Official website: http://www.tizianofioriti.com


