Create a Tornado in 3ds max 4
Hi, I’m finally done with my first 3ds max- tutorial and I’ve tried to do it as easy to follow as possible. Well, you got to have some 3ds max experience. So, what are you waiting for, Christmas? :P
Making the Tornadoshape
Reset 3ds max (4).
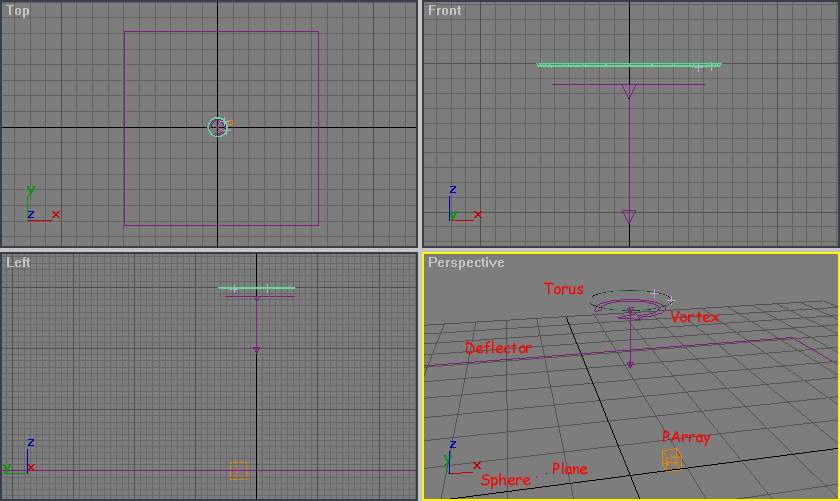
Create a Torus with Radius1: 60, Radius2: 2, and place it at 0, 0, 300 (x, y, z).
Add a Slice Modifier to the Torus and select Remove Top, because we only need the lower side.
Create a PArray and place it wherever you want.
Create a Sphere with Radius: 2, Segments: 9.
Create a Plane with Lenght: 1, Width: 1, Length/Width Segs: 1.

Select the PArray, in the Basic Parameters rollout, click the Pick Object-button, and click the Torus. Still in the Basic Parameters rollout, below Viewport Display, change the Percentage of Particles to 25.
Use these settings for the PArray:
In the Particle Type rollout, in Particle Types, change to Instanced Geometry.
Go back to Particle Type and in the Instancing Parameters, click the Pick Object-button and click the Sphere you made. The particles gets a spherical shape.
In the Object Motion Inheritance rollout, change Multiplier to 0.1.
Move the timeslider to 80 and render the scene.

And now you think, this looks pretty strange – trust me, it will look better when it’s finished. :P
Create a Deflector in the Top viewport so it covers the area the Tornado will move on.
Create a Vortex so it points down and place it a bit below the Torus, like this:
Use these settings for the Vortex:
Click the PArray and click the “Bind to Space Warp”-button.
Bind the PArray to the Deflector and the Vortex so it looks like this:

Making the Material
Choose a empty material, change the Diffuse Color to white: 255, 255, 255 (r, g, b) and click the Background button.
Follow these images:


Drag the Material to the PArray.
Add motion blur to the PArray by right click it -> Properties, in the Motion Blur group, select Image and change the Multiplier to 0,3.
Go to Rendering -> Environment, in the Background group, change the color to a grey: 150, 150, 150 (r, g, b).
Add a fog to the scene (Rendering -> Environment -> Add).
Change the fog color to grey: 117, 117, 177 (r, g , b) and change Far % to 20 in the Standard group.
The Torus, Sphere and Plane you made earlier are not supposed to be shown when rendering, make them unrenderable.
Render the scene, it should look something like this (if the Torus and Vortex have been moved a bit):

Download [17Kb]
Well, that’s it. I hope you enjoyed doing a Tornado. Now if you want, animate the Torus and Vortex by moving it around of your choice. Use your imagination, make it darker, create a camera and add noise to it – get the feeling like you’re really close to the Tornado.
Thanks for reading my tutorial, feel free to mail me – spanjoren@hotmail.com (Joel Andersson, Stockholm, Sweden).
Copyright © Joel Andersson


About The Author
You might be interested in