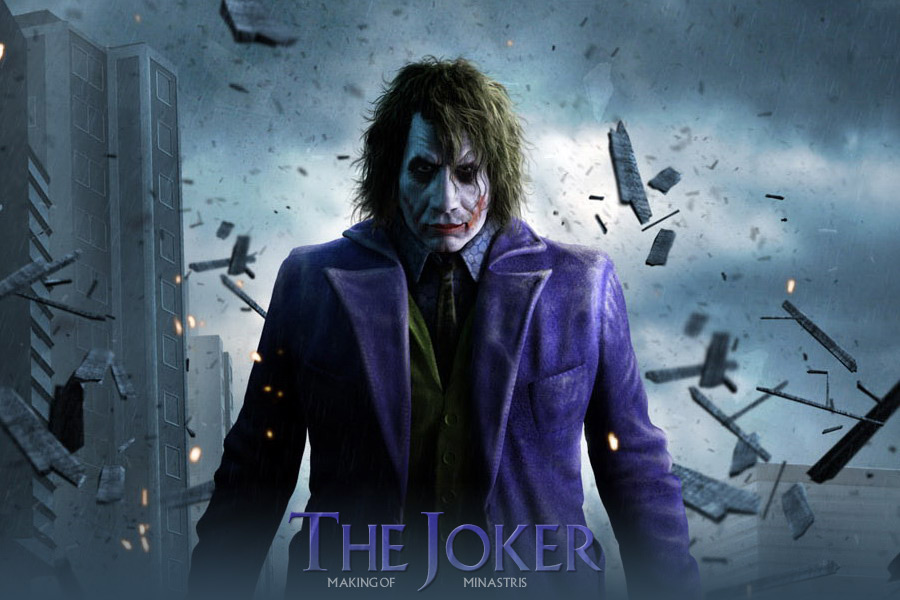
Making of: The Joker
On this project I used maya for the base model, zbrush for details, Photoshop for texturing and matte painting, shave and haircut for the hair and mentalray for rendering.
InfoOn this project I used maya for the base model, zbrush for details, Photoshop for texturing and matte painting, shave and haircut for the hair and mentalray for rendering. InspirationWhen I first saw the dark knight movie posters I really liked them – especially one of them. I decided to try to do something similar, just for fun, but I didn’t want my character to look like Heath Ledger; I wanted to do something that was similar, but still original. ModelingI started the base modeling with the head area. I didn’t use any model sheets or reference images and I tried a different method. I usually do use model sheets and start with a poly cube and extruding faces, adding resolution step by step. But for this one I started with a poly face and extruding edges. Once I finished the head I decided that the method was quite convenient, so I decided to model the rest of the character the same way. I took a generic male model, which I found in a gnomon training DVD, and I made it live, so that I could use it as a reference for extruding edges. At the end I had to make some modifications because the reference model was too muscular and I didn’t want the joker to look like some kind of body builder |
|
 |
 |
|
One thing to point out is that I wish that I had used a model sheet for the face at least. The reason for this is that – it may not be obvious in my poster – but the eyes are too close together and using a model sheet would have eradicated that problem.Once I finished the base modeling and uv mapping I did a quick smooth bind, posed my character and exported everything to zbrush. |
|
 |
|
DetailsI imported the head model into zbrush and appended the rest of the model as sub tools. When I start sculpting in zbrush I always try to focus on the overall picture and gestures first; I do not worry about all the minor adjustments and surface details until I’m satisfied with the general appearance. Most of the time I attend to rely on bump maps, as opposed to creating high frequency details in zbrush. The only area that I did use high frequency details on was the face. I spent less time on sculpting the trousers than the rest of the model because, based on the lighting that I had in mind, I knew that it was going to be almost black in the final image. Once I was finished with the sculpting I exported every piece with a normal map. The mesh that brought to maya was 148712 polygons. |
|
TexturingTexture painting seems to be the most time consuming part for me. I often rely on photoshop and I use zbrush for refining seems – using the projection master. Sometimes I use zbrush for creating what I call a "guide map" for some areas that are hard to recognize in photoshop. For instance, when I’m texturing a face in photoshop, it’s kind of hard to say where exactly the textures for the lips or the eyes, or a certain wrinkle on the skin should be, and that’s where the guide map may be useful. I know that there are several techniques for that problem, but that’s what I’m comfortable with and I believe that, whatever workflow you like – as long as it gives you neat results and doesn’t take too much time – is ok. The face was one of the areas that I spent more time on and it was the only area for which I used photos for the texture painting. For the rest of this character I painted textures using different photoshop techniques and, of course, lots of dirt masks and different brushes. |
 |
 |
|
Lighting and RenderingAfter I was finished with texture painting I exported all my textures as ".tif" files and I was ready for shading and rendering. One thing about importing ".obj" objects from zbrush3.1 to maya is that, for some reason, it imports them with visible in reflections and refractions turned off, so I had to turn them on for all the pieces before I started shading. I used regular maya blinn shaders for all my objects, except for the head. For the head I used a mental ray fast skin shader because it’s so user friendly, it’s great for skin shading, and it’s cheap in comparison with complex shading networks. I set the reflections to 0 for all the clothes, except for the gloves. For the gloves I took a ”sample info" and a "ramp texture" and I connected the "ramp" into the shaders reflection channel and turned reflection blur on. Then I started bringing in textures (color,bump,normal map,specular color…) for each piece, one at the time. Once I was satisfied with shading for all my objects, I started to work on his hair. I used "joealter shave and haircut" for the hair and I think it’s the most user friendly hair plug-in for maya and it works amazingly with "mental ray" |
|
 |
 |
 |
Once the hair was finished I disabled it and took my "source images" directory and copied it somewhere else. I took all my textures and resized them to *512 by 512 “so that I could set my lighting faster and cheaper. Then I turned "final gathering" on and started to setup my lights. The major light that I used was a big "poly plane" on the right side. For this, I turned primary visibility off and assigned a "lambert" shader to it; then I mapped its incandescence with a "ramp". I had a white "area light" on the right side and a greenish blue "polyplane" on the left side, both illuminating the head and the shoulders area, whilst I used a "spot light" with some drop off for the back light. Once I was happy with the lighting I enabled the hair and replaced my resized "source images" directory with the original one that I copied earlier, thereby rendering the whole character. Once I finished rendering the character I started modeling the background buildings. The buildings were just simple poly models with texture maps in a different scene and I rendered each one of them on a different layer |
 |
|
Post editingOnce the rendering was finished I brought all of the rendered images into photoshop and put them in one "psd" document. I started post editing by doing some matte painting on the background buildings, adding some atmosphere and doing some modifications on the debris, which was modeled using "paint geometry tool" in maya after the matte painting for the buildings was done. The rain was made up of three different layers, each made using "maya paint effects" with some color adjustments and a screen blending mode in photoshop; two of these layers were placed behind the character and one of them in front of him. I did some paint overs on the character himself; especially on his hair. Some textures were added in bottom of the artwork and on top of all the other layers, using basic photoshop techniques. Finally, I added the batman logo and it was finished. |
|
 |
|
|
|
Featured links:
|
|


