Making of Waiting something
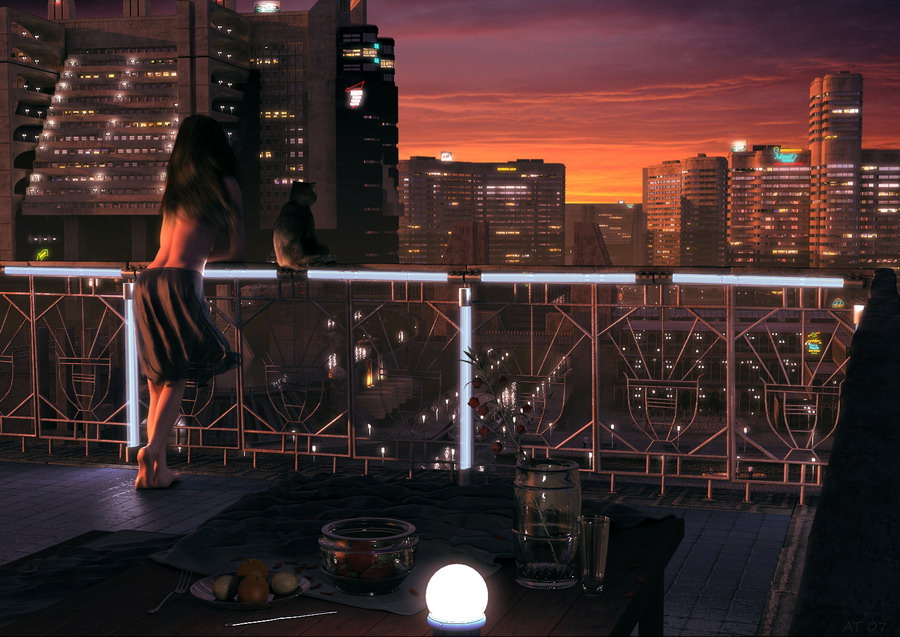
I have carried out this making of; of my image waiting something to help people that this beginningwith max or with v-ray, or those that are a little more advanced and itinterests them some section of the article.
|
I have carried out this"making of" of my image waiting something to help people that this beginningwith max or with v-ray, or those that are a little more advanced and itinterests them some section of the article. Themotivation of my work is almost always to progress! To learn more and moreevery day. In this inshort have to recognize that the motivation is the girl that appears in here. |
|
|
 |
ModelingThe cityBecause the quantity of buildings and geometry isnot too big in his scene we can include the number of necessary polygons tocreate details and windows than if we made a bigger city as my previous works.It will be necessary to make the details with textures.
We start with a box which we transform into thenecessary polygons using editable poly and the main form selecting theappropriate polygons and modifying it’s with the tools bevel and extrude.
|
|
|
With the same way we add windows and moredetails. It isimportant to select all the polygons of the windows to save time because theyare making by the similar editing.
Tower creation is the same processbut you must use a cylinder as the base. Forthe elements with rounded or small holes used Boolean as shown on screenshot below: |
|
Resulting screenshot:
Using the above-mentioned actions we goes advance and changing and adapting it to our likes other elements basing on the design of the start image
|
Neons and detailsForthe neons I have used designs American classic
Fortheir realization I have used normal splines for the forms and splines of texts. Don’t forget to activate the stall enable renderer to put interpolationsince at 0 to the being a small detail it doesn’t also interest us that it hasmany polygons.
Forthe details like the train and the ship it is not necessary to model to the detail like they will see very smallwith making a half detail it is enough, it is also necessary to save polygonsit is never known when we will need them.
Andat the end:
|
The scene
Forthe modeling I used the technique of extrude splinesand symmetry towork the half.
Oncethis defined one more or less the body adds a tubosmooth mod to give more quality and definition to the model.My work method in this case has been to stick to in view of camera and to gorefining the model until the proportions and the forms were correct it doesn’tuse any concrete pattern instead my visual memory and some anatomy atlas. Youhave to work with the polygons, with the splines and with the vertex accordingto you need it, if the mesh is disordered it is better than you return to aprevious version and begin again. And remember that it is always necessary towork with few polygons and later to apply the subdivisions (turbosmooth). Forthe very small details as the pleats of the skin applied the turbosmoothand later I worked with the vertexes to model the pleats of the skin.
The clothsForthe cloths I have used the modifier “cloth” and for the hair “hair”. Both areenough complexes and would be necessary to make a tutorial separated for eachone of them. To big features I have used aspline for the skirt I have given it a quick form around the waist later I haveapplied the modifier “garment maker” and I have applied the cloth mod withthese values for the clothes (fig left below) and for the legs and the torso (fig right below)
|
|
I haveadded the effect wind to give the moving to the cloth, and it is already, tocalculate and when you see a fotograma that you like, you convert to editablepoly the skirt and apply the modifier shell for the wide of the cloth, andmodel the borders. Therest of objects is quite simple and they don’t need explanation.
TexturingBuildings and objectsFortexturing in max almost always use the same method, the unwrap uvw. We applythe modifier to the object and we choose FACE to select the polygons that areguided in oneself address and we apply a mapping fig 20. then we select anotherpart and we apply a mapping again. Inside the window "edit uvw" it isnecessary to be careful to keep the proportions among the different parts sothat later it is easier to paint the paintings in photoshop.
Thenin photoshop we either apply a background brick, stone, etc. It is necessary tobe careful with the scale of the background so that it doesn’t seem unreal.Then we apply the different layers of dirt to give more realism to thebuilding.
|
|
|
Forthe windows I have used the vray light material applying a similar image to this, itis necessary to be careful with the mapping so that the windows of the imagecoincide with those of your building. Itgives birth to the rest of objects the process it is the same, alone that it isnecessary to add the specular and other maps if it is necessary, I believe thatin Internet there is information more than enough on this topic and envelopethe properties of the materials. For example if a metal this dirty one cannotreflect and to shine equally in the dirty parts, it would be necessary to applymaps to represent this effect. Also in the skin it is necessary to keep in mindthat there are parts in those that accumulates fat and they shine more thanothers. Exampleof the skin on the fig at the right.
|
|
IlluminationThe city
Thevray parameters are quite Standard with Irradiance map. You can find them in any page of tutorial.
|

The fog is of the combustion, later I will explain like it is used. |
The sceneThe mainscene has the same illumination but adding a vray light in each one of theneons and another in the lamp of the table. With what would be this way as on the fig below.The multiplier of the lights varies of a scene to other you have to prove untilyou find the illumination that you want. In the case of the color I opt for ablue to contrast with the red of the sun.
EffectsI usually work a lot with combustion for whatusually makes the renders with exit rpf and the stall z-depth activated.
In the combustion weopen the two layers, the hair and the sky. We add a glow to the bottom (fig below)
Then we add the fog:
If we addedthe fog first the glow it would illuminate first to the fog and not to the lights that it is what interests us. We also add a glow to the first layer and somedepth of field:
We add thecolor correction that one can also make in photoshop and it is already finished! If you have some questions communicate with me atrujo@yahoo.com Thank youfor attention. |

 Concept


 For the illumination I wanted to give an air of tranquility, for that reason I chose the evening. Also to create volume among the red of the sun and the blue of the sky. I used this hdri. Thelight of the sun vraysun with the following parameters and inclination ,the values are relative you have to prove until you find what you want. For thelights of the beacons it uses lights spherical vray.


