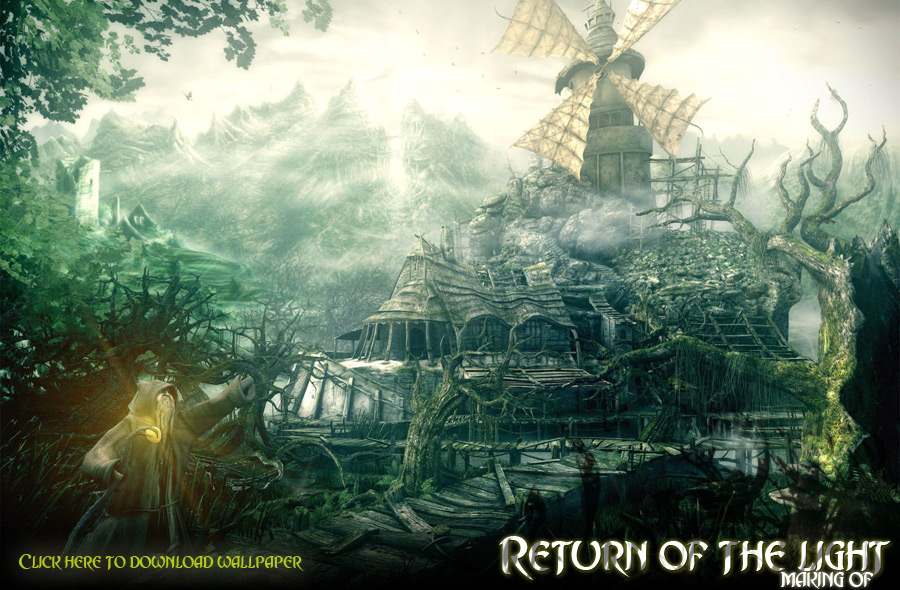
The Making of “Rreturn of the light”
The biggest “making of” of 3dm3 history! Just amazing full tutorial about how to create high technically and impressive artwork.
|
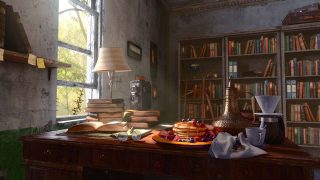
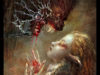
As same as abounded lighthouse facing the sea and waiting for its keeper, in the far dark land is the old mill, which did not moved its big paddles for a very long time. For years, it did not grind a stalk of grass, from land, where life has disappeared. The old expectant is waiting on the high hill. In addition, villagers from not distance village are waiting for the return. Return of the light. Hi. My name is Jan Brukner. I am CG designer from Czech Republic. This scene is my personal project. After sometime, I have return to finish it. I have thought out the idea of the scene one year ago, when I created basic model of the mill and some drafts. Thanks the work, I did not have the time to finish it earlier. I have estimated the work time for two months. In the following text, I would like to introduce preparation, making, techniques and background. Let us start from beginning.
Before beginning of making drafts, I did not have direct photo references, which I would stick strictly. I have tried to create design of scene by my imagination and tried to remember places I have been. From time to time, I go to ride a bike with my friends to variety of places, where I am taking pictures. I am really enjoying scenes of nature and environment in contrast. I have thought and connected some major themes of different places. – The picture of huge rock cliff, with the stairs inscribed in, has come on my mind. I have seen very same scene in Germany, in city Oybin, which is not far away from boarders. (See below)
– Next thing, I thought out about environment. I thought that would be unusual to place giant rock to unstable marsh. Over those, marsh there should be wooden pavements and piers. Inspiration came from marshland of Jizera Mountains. Moorlands forms small mud pools, where plenty of grass growing. There are also wooden pavements and piers and dead bizarre trees in Jizera Mountains and surrounding.
– I primarily thought about a tower with spiral stairs and gallery at the top of the rock. Finally it crossed my mind that windmill would be more interesting than a classical tower. The windmill is more dominant and more symbolic than tower. I was thinking about the abandoned and destroyed house of a miller. Placing a water mill was next step. The mill powered by water springing from the rock. I wanted the story of the scene would be allegory. I thought of connecting two motifs. There will be the windmill and the man (miller), which is coming back from a journey. Windmill near the village abandoned in the middle of dark swamps. The man is coming back, to village, to mill. He is holding symbolic light in the hand. The name of the scene “Return of the light” crossed my mind, when I was finishing the scene. I have started a concept. |


|
Primary and essential part of the work for me is thinking about a composition, designs, a scheme of the work and a work chronology. Creation of a concept design is a most free and most natural part of a working. Sketching and painting models of the scene is in my opinion most important part of the 3D work. After short thinking, I started to sketch simply concept of the scene. I sketched simply composition without the character in the Photoshop. Design of the windmill is spiral tower with rood loft and stairs. For example, a bat’s wing inspired me when I was creating windmill’s vane.
Then I drew various studies of objects. I have specially focused on the nature and trees.
I wanted to create colored version of the sketch. Finally, I have decided to use part of the sketch for matte painting.
|


|
I have made a simply version of 3D matte painting, in this scene. Positive thing about matte painting is that you can begin direct fromthe sketch and it linked directly with the original concept. 3D matte painting is the area of my expertise. I used a little part of potential ofthis technology in this scene. Matte painting is my most favorite area of creation. I have chosen simple painted style without usingphotographic references. It is not common to begin with matte painting. I used to do a matte painting of a 3D scene at the end of the work. However, it was notproblem in this scene. I have created matte painting by 3D camera mapping. Projection of a 2D image on a 3D geometry same as filmprojector projecting on a projection screen. First, I have painted 2D image of mountains in the Photoshop. I made it widescreen for better future usage.
You can see the primary principle of camera mapping, in this simple illustration.
I have modeled a simply geometry by the 2D painting. I have projected the image with mountains on the 3D geometry. Four layers compose the matte: 1. layer is mountains, ruins, and village, 2. are clouds over mountains, 3. mountains, 4. mountains in the back.
|


|
If you have prepared design fundamentals, concepts, etc the modeling is only a craft. At work, I must not to thinking about technology, but details and a design. I would say modeling is an automatic part of the creative 3D work. I like creating a new design on „a green space" since the beginning…
I tried not to waste polygons. I made some objects in low polygons and then I sculpted them in the ZBrush (look next sculpting). I have separated modeling of objects and the modeling of the scene to seven parts of the creation: -FIRST PART was creating „Mill hill“, modeling the windmill and the monolithic rock. When I was working on the rock, I bear in mind to create details and the segmentation. First, I created the path with gradient stairs to the windmill. I situated quarry next by the windmill. I made a watercourse on the left side of the rock for a stream springs in the rock. Water constructions and woody aqueducts make this watercourse.
-SECOND PART was modeling buildings – house of the miller, the water mill, the hut, walkways. Especially making of buildings and geometry objects, I often used n-polygons because of the better lucidity and preparing for UV unwrapping in Body paint. To save numbers of polygons I considered details of objects depending on distance of the render camera. For example, woody walkways have more details near to the camera. I created chips, scratches, rifts. Objects are simpler further from the camera.
-THIRD PART was making of a terrain. I made little pools in the terrain and I thought about a composition. Everywhere will be water, trees and fallen trunks, roots etc.
|


|
-FOURTH PART I made trees and fallen trunks. I made trees similarly characters. I created six kinds of trees. I made trees exactly on place of composition in the scene. Therefore, those trunks are adapted to the shape of the sculpted terrain. In front of the scene, I made big dead tree. Next, I sculpted all trees in ZBrush. I created more kinds of trees because of diversity in the scene. – Creating like a kit.
-FIFTH PART I was making plants and grasses. I created ten kinds of plants (Orobinec, water lily, dandelions, and various kinds of grasses, moss, and tilancie). For growth of classic grass (March grasses, big turfs), I take plugin called Hair Department. Creating grasses by this plugin is very easy. Thanks to plugin Hair Department, grass is animated. -SIXTH PART I was modeling details (stones, roots, etc). I complemented these details randomly according free spaces in the composition. I have not using sketches for creating details.
-SEVENTH PART I was modeling the monk’s character. I conceive the monk’s character simply. I leave details like fingers, gathers, etc. Finally, I have not sculpted monk in ZBrush. I made final stance by the help of bones deformers. The monk in final composition plays the important role of part scene’s story. I chose the old constrained stance of character. Monk expresses his feelings by spectacular style gesture.
I made some objects from primitives, others next point-to-point (poly to poly). I used classic tools for poly modeling in the cinema like bridge, knife, extrude, brush, stitch etc. Next part of the modeling was a sculpting. You can see much on this video: http://www.johnbruk.com/making_of_rotl/making_of_ROTL.avi
I sculpted in ZBrush for more details and to save number of polygons and exported to normal maps… Philosophy and interface meant to be ZBrush an artistic program, which is essential for creating design and organic shapes. Sculpting is most entertaining part of modeling and creating geometry for me.
I painted more details to midpoly models in ZBrush. Especially I painted details of rocks and trees and ground terrain too. When I finished sculpting in ZBrush, I have exported some objects with lower segmentation and normalmaps back to the cinema. I exported normalmaps through ZMaper plugin. Here you can see differences before and after sculpting of some models.
|


|
Texturing is the area of 3D that takes most of the time. The most difficult part of the work (in any program) for me is unwrapping of 3D geometry. Next part – painting and drawing details depends on used software. I used the BodyPaint3D for painting texture. Painting in BodyPaint3D is similar to philosophy of ZBrush’s sculpting… an artistic freedom in a creation…
First, I have to unwrapped geometry with the help of the BodyPaint. I used an interactive mapping and automatic unwrapping modes too. In the BodyPaint, I first lay on a basic color and then I distributed photographic textures. I have used many semi-textures from the server http://www.cgtextures.com. I took photography as some of the textures. Especially textures with an alpha channel (branches of trees, fern’s leafs). I got these textures by taking photos in the outdoor with contrast of a white bed sheet and black carton (a keying matte). Staying in the nature was the nice part of making this scene. I took a lot of photo references and an inspiration for future scenes.
Next to distributing photographic textures, I again painted on a texture to break photographic look. I used various kinds of brushes in BodyPaint. I made some brushes especially for creating this scene (for example layered creating of moss with color and bump channel). I used painting tools for raise and darks textures for breaking photographic look. I occasionally used 3D view for painting to dark corners and edges, so I simulated – painted Ambient Occlusion effect or shadows. The goal was that the textures would not look so synthetically, to do it, I strive to make an old patina (ruinous and cracked walls, growths of moss etc.)
I used classic channels: bump, specular, transparency, diffusion, luminance, reflection maps, I painted and stylized all direct in the BodyPaint without using the Photoshop.
Only shaders (without bitmaps) I used was for making water and grasses. Other textures are bitmaps only with shaders in channels (Fresnel, secular, etc.). Shader of the water is „surprisingly“, the animated shader called water. Procedural material of grass is number of shaders connected in layers (blending mods). For example, the shader called noise creates gloomy dewdrops on the grass.
|


|
I wondered about a few ways and means of lighting. Earlier, I speculated about using classic ambient lights could be connected in kits of three-point lighting. I wondered to using the SkyShader – procedural sky system in Cinema4D for creating Global Illumination, simulating skies and lightings. I come to an ideal combination of ambient lights, SkyShader and ambient occlusion… However, SkyShader is not ideal for a setup of lighting. In the commercial work, I encountered nice plugin created by Pavel Zoch (PZDM). Finally I decided to use this tool and I find that is very good solution of global lighting. Skylight is a lighting system. It is based on the old good known principle of lighting dome. However, Skylight is more complex and more intelligent. For more information, see the author’s site: http://3d.digitalmedia.cz/plugins/skylight/ on this site you can free download this plugin. On the picture, you can see the dome system of the lighting. It is restricted by cutting planes determining active part of the lighting dome. That is only one function from many others, which are integrated in the SkyLight.
-For ex lighting some parts of the scene, I used lights in classic three points systems. I defined these lights by composition tags only on some models.
-Next very important part of lighting was Ambient Occlusion. I used AO for creating better and more contrast shadows, sharpening leaks, details etc.
Last part of making this scene was making an atmosphere. In the concrete sky, gaseous and particle effects etc. “Particle atmosphere” is very important part of a scene too. It brakes synthetically look of 3D image and supports a depth of a scene. Especially gaseous atmospheres create depth of a field and fog’s “dof”. Moving particles creates “a scale distance” in a scene.
-Sky, clouds and Sun. For creating skies, l used SkyShader, which is part of the advanced render. Thanks, SkyShader skies are full animated.
-Gaseous atmosphere. I chose PyroCluster to create ground water fog and clouds. This module is meant for gaseous a gas effects. I created several particle emitters, some with the continuous creation of particles (falling water, advancing water fog), and others with single creation of particles (floating skies).
-Particles. Next details generating an atmosphere are particles in a field. I made a simply egrets, emitters emitting particles to the field of the scene. I simulated running water by the model of water stream with the procedural animated material.
– Creating birds can be included in to the particle animation. I used older model of the pigeon with animated wings. I fixed pigeon’s wings and a body to different poses reasons to different them, than I used emitters for emitting pigeon’s models.
|


|
Setup of the rendering and posteffects was quite simply, but I will show a few things were related to compositing of the image in the final postproduction. I used module Advanced Render. Most signification part was a setup of multipass rendering. -First thing, I will mention is Ambient Occlusion. I used the global mode of Ambient Occlusion in this scene. I excluded some objects by composition tag (especially objects with alfa materials).
-Two posteffects, which distinctively changed look of the scene, were glow (I used it in the global mode) and highlights (lens effects for reflexes of the water). Therefore, highlights and glow creates an effect of a photographic filter and blurring the scene. I used lens effects for the luminous wand of the monk and light on glowing skies in the background. -Multipass rendering is very important for a next composition and postproduction. I picked some layers of the image for multipass rendering (especially posteffects, ambient occlusion, shadows, depth and dof, etc).
-Progress of rendering the image with resolution 5396x5065px takes just 10h 17min 31s (It was rendered on the PC AMD X2 4200+ 1,5GB NVidia Quadro FX540 Win64-bit). It is evident that Cinema4D has fast render. Many models are duplicated by way instance. There you can see next technical details:
Rendered picture was unfinished scene. As I said, it was very important for postproduction separate passes layers of the scene. I edited and blended everyone separately to look them good, for that used the Photoshop. -First, I edited RGB pass. I worked with data in the 16-bit mode for better gradients and details of the color palette. Next, I adjusted the color balance (shadows, midtones, highlights) next brightness and contrast, saturization etc. Next passes follow. Ambient Occlusion pass Highlights pass Lens Effects pass Glow pass DOF (front, back) pass
I connected all these layers of the scene with help of blending mods of the Photoshop (multiply, screen, overlay, etc). I set intensity by transparency, contrast and brightness of pass layers. DOF pass is the primary parent layer. I used DOF pass like mask layer for the duplicated layer of the scene. I blurred this layer by using the filter – gauss blur and created depth of the field. I made fog by similar using the DOF front pass too. I composed layers so those DOF layers join all layers. I finished adjusting the scene by next duplication of the scene and self blend (multiply, overlay). -Next step of editing the picture was gradient filter and burn of edges. The Gradient filter is used in the photography. Camera has a filter with a dark top part (a gradient). I simulate this effect simply in the Photoshop by a semitransparent gradient. Similar effect like the gradient filter is burn of shapes and the front of the scene. I burned front of the scene by using pass dof front like alfa mask. Burn of shapes and the gradient filter are the good adjustment for highlight content and move sight away from disturbing details in borders of the scene.
Here you can see the following composition elements.
Final scene is the result of the concept idea, which I have at the beginning making of this image. I wanted create the abandoned atmosphere of the swamp associated by a „toxic sea green“. Contrast of this colors palette brake gold color that brings a warm and a positive into cold atmosphere of the scene. I used gold – honeys color for a thematic association the monk and the windmill. I wanted express the inner association between two motives of this image. Monk is coming back from a journey to the desolate homeland. Skies in the background are clearing up=that is promise of better tomorrows. Return of the light…
Big thanks to my friend Milan Gistr to help me with english. That is all. More making of you can see in this video: http://www.johnbruk.com/making_of_rotl/making_of_ROTL.avi I hope you like this making of „ROTL“
|


About The Author
You might be interested in