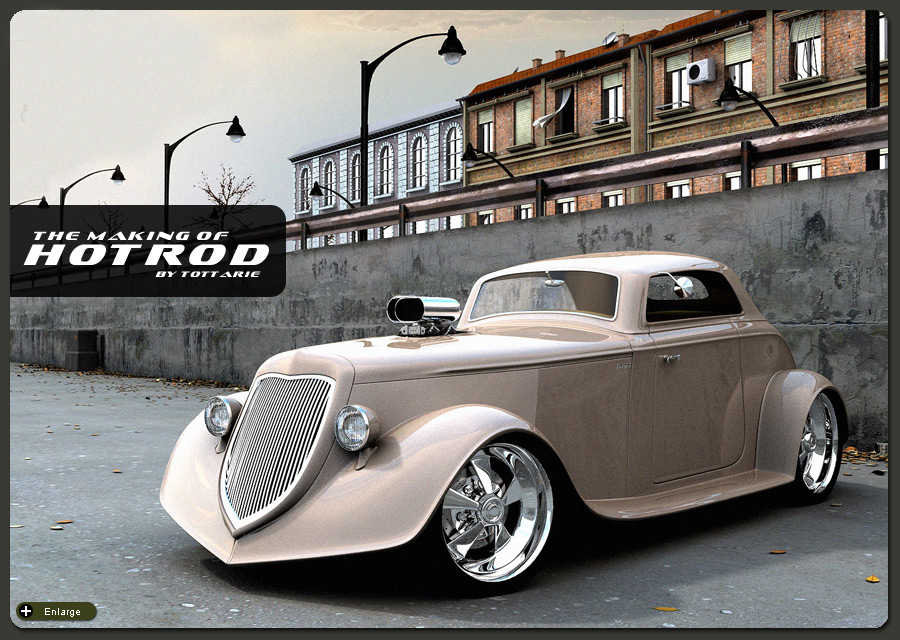
The Making of Hotrod
In this article I would like to show you what kind of methods I used to create my latest picture ’Hotrod’.
|
In this article I would like to show you what kind of methods I used to create my latest picture ’Hotrod’. Although in Hungary (my home) those cars aren’t too popular, I really like the style of cars from the 30’s, so I decided to make my own hotrod. The car isn’t an exact type, I just wanted to catch the most characteristic shapes of this era. 1. Building the car Becouse blueprints are really hard to find for these cars, I had to use only reference pictures during the modeling process. So first I created the wheels and then modeled the body of the car according to them. I used poly-modeling for the whole car then smoothed the objects with Meshsmooth. At the intake manifold I had to pay attention to the small parts, but the engine is only a box with some very basic modifications |
 |
|
At the front, the headlights were created from hemi-spheres, the grill from boxes. After attaching the boxes together I used FFD Box modifier to get the proper shape and bend them to the right position. The glass of the headlight has a displacement map on it, that was blurred a bit in Photoshop, to earn a smoother extruding effect. As for the tires, I detached the sidewalls , and used a displacement map on the remaining part of the object to create the thread. The rim is from another work of mine (a Chevy Camaro), the disc is from TotalTextures V8 dvd. |
|
|
|
 |
|
On the final render it can’t be seen, but a simple interior was also created for the car.
|
Materials: the carpaint is VrayMaterial, where the diffuse map is a very smooth Gradient Ramp with just a little difference between the two colors of the map, the reflect is Falloff, Perpendicular/Parallel type, from black to a middle-grey (from the inside to the outside). The chrome parts have also VrayMaterial, with black diffuse and white reflection color. The interioir leather is Standard Material, with a mix of noise and cellular maps in the bump slot and high specular and low glossiness values. Drawn texture was used only at the intake manifold, where after I drew a hexagon pixel by pixel I used the Define Pattern funcion in Photoshop and painted the whole texture with just one click.
|


|
2. Environment I wanted a city environment for the car, but not a high-tech metropolis or something, but a bit older, just like Budapest, the capitol of Hungary. So after a few walks in the city I built up the houses from real basic objects. Almost the whole environment was created with only boxes, cylinders and spheres with a little modification. Here the textures were much more important than the geometry, which I created with the help of the TotalTextures V1’s and V2’s content.
|
Lighting: there are two lights in the scene, a vray Dome-light and a Target Direct Light. Becouse I couldn’t find a good HDR image for this scene, I used a normal panoramic jpg picture for the dome light. I gave the Direct-light a light orange color, in order to simulate sunlight. GI wasn’t used for this scene. |
|
Finally I created the leaves. You may think that I used PArray or Scatter for these, but becouse I really don’t like these methods I created the leaves „by hand”. First I created 3 type of leaves (3 different texture) and than copied and modified their position a bit after every copy. It needs more time than PArray or Scatter, but I can control them more directly this way and composite them according to my taste. The leaf objects are planes with 2×6 segment. This allows to bend them a little, which is very useful at rendering, becouse the leaves cast a little shadow in order to improve 3D feeling.
|
|
|
3. Postworks First I put another sky behind the scene. I had to improve the trees in the background becouse they were barely visible, so with a simple brush I drew over them. I used a Sharpen filter to make the picture sharper, after this came a little color- and contrast correction. A few detail were added after rendering too – for example the dirt on the window-shutters, the highlights on chromic surfaces or some stains on the big wall behind the car. After adding a very little noise and blurred lines to improve photo-feeling the picture was finished. |
|
|
Related links: |
Two additional view’s are avialable here: Thanks for your time, I hope I could write useful things in this article! |


 |

About The Author
You might be interested in