Normal mapping
Learn how to bake normal maps.
Introduction
Please keep in mind that this is a normal mapping tutorial and not a modeling tutorial, that’s why I have to ask you to model the paper bin yourself.
Step 1
Go ahead and model a high-poly paper bin (It doesn’t matter how many vertices you use!)

Step 2
Go ahead and model a low-poly model.


Shade smooth (W > shade smooth -> in edit mode) the models and recalculate the Normal’s (CTRL + N).

Step 4
Now put the Low poly inside the high poly model.

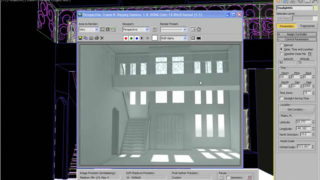
Now split area and bring up the UV/Image editor. Select the low poly model – go edit mode and press “u”, you’ll see a menu for unwrapping in many ways, in this case we’re going to use the smart uv project(you might need to use seams and unwrap the proper way depending on your model, but in this case it should be fine using the smart uv project)

It’s time to make a new Texture! Go ahead and press New in the uv/image editor. The file size and everything is fine, though you can change the name if you want. You should see a blank, black texture appear.
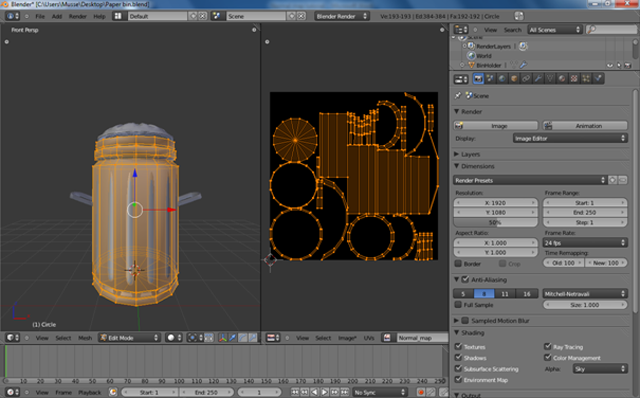
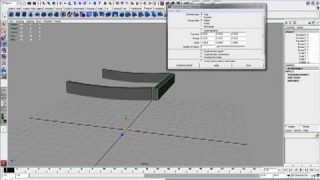
Select the high poly model first and the low poly model (that has the texture and is unwrapped) after.
Now enable the Selected to active all the way down in the Render – Bake menu.
Change the Full Render to Normal’s. Now make sure that you selected the high poly before the low poly and hit Bake!

Now do the same with the Cover.
First go to edit mode and add a new texture to the low poly model. Press “U” – unwrap.
Select the High poly first then the Low poly. Press Bake! Voila you have the last Normal map!
9: all we need to do now is give them this texture!
Select one of the low poly models and add another material.
Now go to Textures and add a new Texture. Change clouds to image or movie.
Select the texture you want to apply.

Step 10
Now we don’t want the color, so disable that, but we do want it to affect the geometry – Normal so enable that (Normal under geometry). Under image sampling you will find Normal Map which you should also enable.
The last thing you need to worry about is under Mapping you need to change the coordinates from Generated to UV, because we unwrapped it earlier.
All done! Just do the same thing to the other model and you’re done!
New material, new texture, clouds to – image or movie, Select the normal map, change the coordinates to UV, select the normal in geometry and don’t forget to disable the color.
By the way, you could use lattice to deform the low poly model, if your not happy with the result.
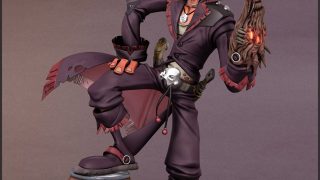
The Result
I also enabled mirror and played with the settings for this result.


About The Author
You might be interested in